The document provides instructions for setting up a Python development environment on Ubuntu 14.04. It details installing Python, creating a virtual environment, setting up version control with Git and GitHub, and retrieving code from a GitHub repository to run locally. Key steps include opening a terminal, checking the Python version, installing virtualenv and virtualenvwrapper to create isolated environments, configuring Git, generating an SSH key for GitHub access, cloning a code repository from GitHub, and running the code.
wxFormBuilder - Tutorial on A GUI for making GUIs for PythonUmar Yusuf
油
wxFormBuilder - Tutorial on A GUI for making GUIs for Python
Graphical User Interfaces (GUIs) in Python are commonly created using Tk via the Tkinter package. However, at the moment of writing this post, designing GUI via the Tkinter package is done purely in code (python syntax) which means that a simple dialog window may consist of approximately 100+ lines of code.
Wouldnt it be pleasant if we had a visual tool for making GUIs? That is A GUI for making GUIs. Creating GUI with code (WxPython) is too tedious work and it requires lots of attention and time. With WXFormBuilder, you create GUI much faster and efficiently in less time. In most cases this is faster than writing this code by hand.
That is what wxFormBuilder is set to realize. WxFormBuilder is a Rapid Application Development (RAD) tool for wxWidgets GUI design. It is an open source GUI designer application for wxWidgets toolkit, which allows creating cross-platform applications.
WxFormBuilder allows you to design your GUIs visually and save them in a wxFormBuilder Project File - *.fbp file (which is just an XML file listing every component in your GUI and defining each components properties). Then, the *.fbp file can be converted automatically into a Python *.py file ready to be imported into your Python program. It also serves as Source code generation other programming languages are supported such as: C++, PHP, Lua and XRC.
Tutorial objective:
I will guide you through the basics of wxFormBuilder as used with wxPython generated code. The goal is for you to build a usable First GUI in Python.
Install Qt/Qt Quick for Android devicesPaolo Sereno
油
This tutorial introduces Qt and Qt Quick application framework for Android. It is a howto guide to install the development environment on Ubuntu Host for Android target.
Learn the techniques for web development in PHP API 7 using the new middleware architecture of the open source project Expressive. The advantages of the middleware development in PHP are great: the simplicity of the code, solidity and development safety, ease f testing, excellent running performance, etc.
The middleware approach makes it easy for software developers to implement Web APIs that manage HTTP input / output. This presentation will show how to develop a middleware web API in PHP 7 with Expressive, the Zend Framework open source project. In this context, it is also possible to make clear the huge increase in performance of PHP 7.1 and the impact on API development. And if you've always wondered what Diactoros and Stratigility are all about, you should not miss this presentation.
A quick overview of why to use and how to set up iPython notebooks for researchAdam Pah
油
A quick overview of why to use and how to set up iPython notebooks for research in the Amaral lab. Example notebook is a gist at:
http://nbviewer.ipython.org/gist/anonymous/f8e6d8985d2ea0e4bab1
Short tutorial for getting started with wxWidgets GUI framework. Everything is tested on Windows platform but it should be cross platform with little or no effort.
Prerequisites:
- a modern c++ compiler (Visual Studio 2012+ should be just fine for Windows)
- cmake (latest version)
- wxWidgets (latest version - tested with 3.0.1)
- wxformbuilder (latest version)
This document provides an overview of Linux including:
- Its origins from Unix developed at Bell Labs in the late 1960s
- Why Linux was created with its entire source code being free and open
- Popular Linux distributions like Debian, RedHat, SUSE, and others
- The GNU/Linux architecture including the kernel, shells, and applications
- Key components like the GNU compiler collection (GCC) and makefiles
- File handling and process APIs in Linux
wxPython is a GUI toolkit for Python that is built upon the wxWidgets C++ toolkit. It allows building graphical user interfaces that are cross-platform, with native look and feel. wxFormBuilder is a GUI designer application that can generate wxPython code from a visual interface built in the application. It allows connecting interface elements to event handlers in Python code. The generated code includes the GUI class structure and stub event handler methods to be implemented.
The Ring programming language version 1.5.3 book - Part 16 of 184Mahmoud Samir Fayed
油
The document describes how to build Ring and its extensions on MacOS X. It involves cloning the Ring source code from GitHub, installing prerequisite libraries using Homebrew, and running build scripts to compile Ring, its compiler/VM, and various extensions like RingODBC, RingMySQL, RingSQLite etc. The build scripts generate C/C++ source code for some extensions before compiling them. The document also covers building Ring using CMake.
Installing Software, Part 2: Package ManagersKevin OBrien
油
This document discusses different levels of package management tools in Linux, from graphical user interfaces down to command line tools. It focuses on the command line tools YUM and RPM for RPM-based systems like Fedora, and APT and DPKG for Debian-based systems like Ubuntu. It explains how to add software repositories, update package lists, install, upgrade, and remove packages from the command line. It also discusses manually installing packages using the lowest-level RPM and DPKG tools when packages are not available in repositories.
Source code management with GIT
En savoir plus sur www.opensourceschool.fr
Ce support est diffus辿 sous licence Creative Commons (CC BY-SA 3.0 FR)
Attribution - Partage dans les M棚mes Conditions 3.0 France
Introduction To Embedding The PH7 PHP Engine in a C/C++ Host Application.Chems Mrad
油
PH7 is an embeddable PHP engine written in C that allows hosting applications to compile and execute PHP scripts directly without the overhead of CGI or other process-based approaches. It implements most of PHP 5.3 and introduces extensions. PH7 is highly portable, runs as a library, and has a small footprint, making it suitable for embedded systems. This document provides an overview of PH7 and instructions for getting started with a simple example C program that uses PH7 to execute a PHP script directly within the parent process.
This document provides tips and tricks for using Vim with Python. It covers getting around files using movements, setting and jumping to marks, making changes using commands like yank and delete combined with text objects, using visual mode, searching, undoing changes, splitting windows, configuring Vim through the vimrc file, indentation, autocompletion, tags, NERDTree for file exploration, flake8 for linting, and popular plugins.
Volunteers can develop web applications using open source technologies like PHP, MySQL, and GitHub. WAMP is recommended for Windows to provide Apache, MySQL, PHP and PHPMyAdmin. Linux users should install Apache, PHP and MySQL separately. GIT is used for version control, and developers should fork repositories on GitHub, make changes locally, and push commits to have their code merged by the administrator.
Complete MPICH2 Clustering Manual in UbuntuMinhas Kamal
油
Complete MPICH2 Clustering Manual in Linux Ubuntu for beginners.
Documented in 3rd year of Bachelor of Science in Software Engineering (BSSE) course at Institute of Information Technology, University of Dhaka (IIT, DU).
LIGGGHTS is an Open Source Discrete Element Method Particle Simulation Software developed by Sandia National Labs. LIGGGHTS stands for LAMMPS Improved for General Granular and Granular Heat Transfer Simulations. The higher programming language C++ is used to write the code of LIGGGHTS, which can be run either in a single- or multi processor. In this document we will discuss about the LIGGGHTS installation for the Linux operating system Ubuntu 12.04 LTS, 13.04, 14.04 LTS and 16.04 LTS. In order to install LIGGGHTS we need few libraries, like libvtk5-dev, libeigen2-dev,
libopenmpi-dev, a C++ compiler, Open MPI, LPP and Paraview. In this article we will discuss the installation procedure of each one in details.
How to Install Odoo 18 with Pycharm - Odoo 18 際際滷sCeline George
油
In this slide well discuss the installation of odoo 18 with pycharm. Odoo 18 is a powerful business management software known for its enhanced features and ability to streamline operations. Built with Python 3.10+ for the backend and PostgreSQL as its database, it provides a reliable and efficient system.
This is the detailed guide of MakePython ESP32 dev kit, With the 12 experiments, the readers will be able to make simple electronic projects with MicroPython on ESP32, and the basic knowledge& setting up of IoT projects.
This is the detail guide of MakePython ESP32, With the 12 experiments, the readers will be able to make simple electronic projects with MicroPython on ESP32, and the basic knowledge& setting up of IoT projects.
How to setup Pycharm environment for Odoo 17.pptxCeline George
油
Setting up a development environment for odoo using pycharm is highly preferred by odoo developers to develop and debug odoo modules and other related functionalities .
This document provides instructions for installing and using Code::Blocks, a free open source C++ IDE. It discusses downloading and installing Code::Blocks on Windows, Linux and Mac operating systems. It then demonstrates how to create and build a basic C++ console application project within Code::Blocks, edit and run the code, and debug programs using the integrated debugger. The document also provides tips on sharing projects between computers and includes an appendix with more detailed Linux and Mac installation instructions.
The document provides instructions for various post-installation configuration exercises on an Ubuntu system, including: getting accustomed to using sudo; creating a new user account called "inst"; learning how to install software; updating the software repository list; installing common development packages; learning how to control services; and configuring the X Window system.
Intro to Programming Week 2_Python Installation.pptxiksanbukhori
油
This document provides an introduction to installing and using Python. It outlines two main ways to install Python: directly or through the Anaconda package manager. Installing Python directly is simpler but only provides access to Python packages, while Anaconda provides access to packages for multiple languages. The document then demonstrates how to write and run Python code directly in the command prompt or by writing scripts in an text editor like Notepad++. It also introduces using the IDLE IDE for writing and running Python scripts. Virtual environments for Python projects are described as well. Homework involves trying different Python IDEs to find the most suitable one.
Python Book/Notes For Python Book/Notes For S.Y.B.Sc. I.T.Niraj Bharambe
油
This document provides an introduction to the Python programming language. It discusses that Python is a high-level language that is easier for humans to write and understand compared to low-level languages. It can be compiled into byte code or interpreted. The document then discusses the history and origins of Python, its key features like being easy to learn and maintain, and how to install Python on different operating systems. It also covers running Python programs, debugging techniques, and setting the Python environment path and variables.
This document provides instructions for installing various developer tools including Git, Vim, Java, Tomcat, Maven, and Psi Probe on Linux, Mac OSX, and Windows. It then outlines 3 homework assignments: 1) creating a basic Git repository, 2) forking and cloning a provided repository, adding a feature, resolving conflicts, and deploying the application, and 3) using Psi Probe to manage Tomcat web applications. Step-by-step instructions are provided for completing each task along with explanations of commands used.
This document provides instructions for writing, compiling, and running a simple C program in Linux. It outlines 4 steps: 1) Install build-essential packages for compiling C code. 2) Write a sample C program that prints a message. 3) Compile the program using the gcc compiler. 4) Run the compiled program using ./programName. The instructions are intended to serve as a foundation for writing and executing more complex C programs in Linux.
Fullstack Academy - Awesome Web Dev Tips & TricksFrances Coronel
油
Making Sublime Sexy, Themes, Packages, Customizing Your Terminal, Cool OSX Apps, Nifty Chrome Extensions, Wicked Websites, Funsies, and other awesome resources.
First created June 18th, 2015 at Fullstack Academy of Code.
Update July 27th, 2016: This slide deck is shared with all new joiners of Fullstack and Grace Hopper via email!
This document provides step-by-step instructions for installing Python on Linux. It discusses selecting a Python version, downloading the installer from python.org, extracting and configuring the installer, making and installing Python, and testing the installation by printing "Hello World!". The instructions cover installing both Python 2 and Python 3 on Ubuntu systems.
This document provides instructions for setting up Python on Windows 10. It assumes the user has basic privileges on their computer. The steps outlined are for beginner Python users. It discusses downloading the correct Python version from python.org, installing it with default settings, and verifying the installation. It also covers installing additional Python packages both online and offline using pip and downloading source/wheel files. The document provides examples of installing common packages like NumPy, Pandas, and NLTK individually and multiple packages at once using a requirements.txt file.
This document provides instructions for setting up secure remote desktop access to a Windows computer using CopSSH and SSH tunneling. The key steps are:
1. Install CopSSH on the remote Windows computer to enable an SSH server.
2. Generate an SSH key pair using PuttyGen and save the public key on the remote computer.
3. Configure CopSSH to use a non-standard port and require SSH key authentication only.
4. Set up Putty on the local client computer to connect via SSH tunneling to the remote computer, forwarding the RDP port.
This document discusses how to build a website using open source PHP and contribute to the codebase. It recommends starting with a basic starter application on GitHub, then outlines steps for setting up hosting, configuring the domain, and beginning development. The document provides tips for coding, debugging, testing, and deploying the site, and proposes future features like integrating with Meetup API and adding user authentication.
1. 1
How to Set Up Your Python Development Environment on
Ubuntu 14.04
Prepared By: Stephanie Chan, John Dennert, & Anastasia Khudoyarova
Last Edited: July 30, 2014
Version: 1.1
2. 2
Table of Contents
Introduction 3
Formatting Conventions Used 4
Prerequisites 5
Set Up Process 6
Open the terminal 6
Check your Python installation 6
Set up your virtual environment 7
Setup version control 9
Set up SSH with Github 9
Run the code 11
Summary 13
Troubleshooting 14
Additional Resources 15
3. 3
Introduction
The following instructions detail how to set up a Python development environment on Ubuntu
14.04. As a new software engineer at the company, this knowledge will give you the initial setup
necessary to begin contributing and learning about the technologies we use.
Although these instructions strive to be as thorough as possible, it is not intended to be a
comprehensive tutorial for the wide variety of tools and knowledge required to start contributing code.
Instead, we will link to various other resources throughout the instructions should you require more
background information on certain topics. However,reading the additional resources will not be
necessary to complete these instructions.
4. 4
Formatting Conventions Used
We use a number of different visuals throughout the instructions. This section will explain each
visual and how to use them.
Keystrokes are shown in the following format: CTRL+ALT+T
Commands that are typed in the terminal window are shown in the dark sections with
white text. The commands can be copied and pasted from these sections.
$ python
Tips and other resources are shown in the sections with light bulbs. They will provide
additional information and warnings.
Screenshots will have a figure number and a caption describing its contents.
Figure 1: The Python interactive shell showing Python version 2.7.6
Yellow text should be replaced with your information (name, e-mail address,etc.).
This is a tip.
5. 5
Prerequisites
A clean installation of Ubuntu 14.04
Minimal programming experience and moderate computer proficiency
Ubuntu is a Debian-based Linux operating system. Although experience with
Ubuntu is not necessary to complete these instructions, you may choose to
familiarize yourself with it on their website: http://www.ubuntu.com/
6. 6
Set Up Process
Open the terminal
To open the terminal, press the following keys: CTRL+ALT+T
Alternatively, you can open the terminal through the GUI. Go to the sidebar and click the Unity
button on the side bar. In the search prompt, type "terminal". It will bring up the Terminal
icon under "Applications". Click the icon to open the terminal.
Learning to use the command line can be tricky and can take a while to get
really good at it. However,learning even the basics can significantly boost your
productivity. For a good command line tutorial visit:
http://cli.learncodethehardway.org/book/
Check your Python Installation
Python should already be installed by default with your operating system. We will be
using Python version 2.7.6 but any 2.x.x version will work. To check the default version
of Python currently installed, type the following command in the terminal:
$ python
This command will launch the Python interactive shell which shows the default version
of Python installed. The output should look similar to Figure 1 below:
Figure 1: The Python interactive shell showing Python version 2.7.6
To close the Python interactive shell, type:
>>> exit()
7. 7
To learn more about Python, visit: http://www.python.org and check out
the official documentation.
For a great tutorial that covers Python from the ground up, visit:
http://learnpythonthehardway.org/
Set up your virtual environment
When working on multiple projects, it is important to keep your Python installations separate for
each project. One project might use one version of a package while another project might use
another version of the same package. This would be a problem if you just had one version of the
package installed globally that all of the projects used. Instead,you will use whats called a
virtual environment.
Install pip
pip is a tool we will use to install and manage Python packages. To install pip, type:
$ sudo apt-get install -y python-pip
Now we can start installing Python packages.
Installing software requires root permissions. sudo is a commonly used tool
for granting users other than root permissions to do things like install software.
You will be prompted for the same password you use to log into your Ubuntu
user account. You will not be asked for your password again when using sudo
if you have used it in the last 5 minutes.
Install virtualenv and virtualenvwrapper
virtualenv is a Python package that allows us to create self-contained virtual
environments in which we can install packages without conflicting with other
environments on our system. virtualenvwrapper is another package that adds additional
functionality to virtualenv in order to make it easier to use.
To install virtualenvwrapper, which will also install virtualenv, type:
$ sudo pip install virtualenvwrapper
Then, we need to set some environment variables to tell virtualenvwrapper where
to store, find, and run information. Open up ~/.bashrc by typing:
8. 8
$ gedit ~/.bashrc
gedit is simple text editor to use, but it is not fully featured. Consider getting
familiar with a more robust text editor like Emacs
(http://www.gnu.org/software/emacs/) or Vim (http://www.vim.org/).
The .bashrc file contains all the configuration settings for the terminal. Any
settings added to this file will be loaded every time you open a terminal
window.
At the end of the file, add the following lines:
$
$
$
export WORKON_HOME=~/Envs
mkdir -p $WORKON_HOME
source /usr/local/bin/virtualenvwrapper.sh
Save the file by pressing CTRL+S. Close the file. Then, reload the terminal
window by typing:
$ source ~/.bashrc
Start a virtualenv
To create a new virtualenv, type:
$ mkvirtualenv test_env
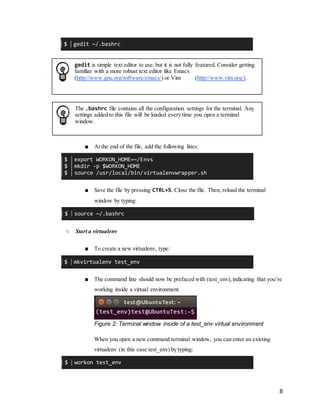
The command line should now be prefaced with (test_env),indicating that youre
working inside a virtual environment.
Figure 2: Terminal window inside of a test_env virtual environment
When you open a new command terminal window, you can enter an existing
virtualenv (in this case test_env) by typing:
$ workon test_env
9. 9
For the official virtualenv documentation, visit:
http://virtualenv.readthedocs.org/en/latest/
Setup version control
Version control allows us to work on multiple versions of our code at the same time. We use git
as our source management system.
Git Immersion is a great tutorial for becoming familiar with using Git:
http://gitimmersion.com/
Github also has a detailed help section: https://help.github.com/
To install git, type:
$ sudo apt-get install -y git
Then, set up your git configuration with your name and email information. This
information will show up in the git logs and on Github. Type:
$
$
git config --global user.name "YOUR NAME"
git config --global user.email "YOUR EMAIL"
Set up SSH with Github
Github is a web-based service that allows us to host our code in a centralized location. By using
git locally, we can pull changes,push updates, and review our code on Github. Github uses SSH
keys to securely identify trusted computers without the need for passwords.
SSH stands for Secure Shell. It is an encrypted network protocol that allows two
networked computers to securely connect to one another and authenticate each
others identities. Github uses SSH to identify users and to transmit data
securely between users local machines and their servers.
10. 10
If you do not have a Github account already, sign up for one at: https://github.com/
Then, add your newly generated SSH key to your Github account. On the menu bar, click
on the Account Settings icon (it is in the upper right-hand corner of the screen).
Figure 3. Github account settings
To generate an SSH key, type:
$ ssh-keygen -t rsa -C "your_email@example.com"
The command prompt will ask for the file to store the key in. Press Enter to store the
key at the default location. The prompt will also ask for a passphrase. Enter a passphrase
that you will remember. It should be at least 12 characters long contain upper and
lowercase letters, numbers and symbols.
Figure 3: Output of ssh-keygen command
Next, add the SSH key to the ssh-agent by typing:
$
$
eval "$(ssh-agent -s)"
ssh-add ~/.ssh/id_rsa
Copy the contents of the key to your clipboard by typing:
$
$
sudo apt-get install -y xclip
xclip -sel clip < ~/.ssh/id_rsa.pub
The clipboard may time out after about 10 minutes. If so, you will need to recopy
the contents of the key using the above command.
11. 11
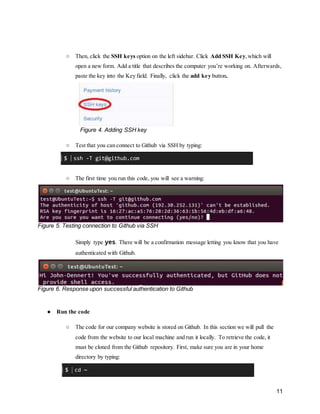
Then, click the SSH keys option on the left sidebar. Click Add SSH Key,which will
open a new form. Add a title that describes the computer youre working on. Afterwards,
paste the key into the Key field. Finally, click the add key button.
Figure 4. Adding SSH key
Test that you can connect to Github via SSH by typing:
$ ssh -T git@github.com
The first time you run this code, you will see a warning:
Figure 5. Testing connection to Github via SSH
Simply type yes. There will be a confirmation message letting you know that you have
authenticated with Github.
Figure 6. Response upon successful authentication to Github
Run the code
The code for our company website is stored on Github. In this section we will pull the
code from the website to our local machine and run it locally. To retrieve the code, it
must be cloned from the Github repository. First, make sure you are in your home
directory by typing:
$ cd ~
12. 12
To retrieve the code, type:
$ git clone git@github.com:stemchan/google-flask.git
A new folder should show up in your home directory containing the new project. Change
folders directory by typing :
$ cd ~/google-flask
Then, install the packages required for the project. The packages and their versions are
stored in the requirements.txt file. Type the following:
$ pip install -r requirements.txt
Once the packages have installed successfully, you can now run the project and view the
website that the code generates. To start the server, type:
$ python google-flask.py
To test that the project is running successfully, go to a web browser and go to the url:
localhost:5000. The company homepage should appear (see Figure 6).
Figure 6. Company homepage
The terminal should display the following information:
Figure 7. Terminal output when running the server
To stop the server,press: CTRL+C in the terminal.
13. 13
Summary
After completing these instructions, you should have a Python development environment setup on
your computer. Now that you have this environment, you will be able to write, run, and contribute to the
companys codebase.
14. 14
Troubleshooting
pip error: permission denied
A common error many people make when first using their development environment is not
paying attention to their use of their virtual environment. If you receive an error saying you
do not have permissions to install a package with pip, it means that you are not in your virtual
environment.
Solution:Make sure you run this command every time you start work on the dev environment in a
new terminal window:
$ workon test_env
Permission Denied (publickey)
There are a number of things that could potentially go wrong when creating a secure
connection with Github.
Solution: Make sure to read the Section 5 carefully to ensure that you have properly set up SSH.
If the issue still persists, refer to this help page by Github: https://help.github.com/articles/error-
permission-denied-publickey