Stale check
âĒDownload as PPTX, PDFâĒ
0 likesâĒ838 views

This document provides instructions for setting up and marking checks as stale in Microsoft Dynamics NAV 2013 R2. It describes how to configure the stale check period in the bank account card, post a bank payment voucher to issue a check, and mark a check as stale after the specified period by updating fields in the check ledger entries.


Stale check
- 1. Microsoft Dynamics NAV 2013 R2
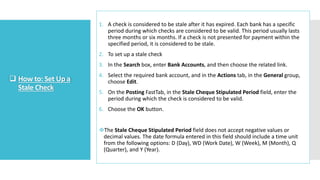
- 2. ïą How to: Set Up a Stale Check 1. A check is considered to be stale after it has expired. Each bank has a specific period during which checks are considered to be valid. This period usually lasts three months or six months. If a check is not presented for payment within the specified period, it is considered to be stale. 2. To set up a stale check 3. In the Search box, enter Bank Accounts, and then choose the related link. 4. Select the required bank account, and in the Actions tab, in the General group, choose Edit. 5. On the Posting FastTab, in the Stale Cheque Stipulated Period field, enter the period during which the check is considered to be valid. 6. Choose the OK button. ïķThe Stale Cheque Stipulated Period field does not accept negative values or decimal values. The date formula entered in this field should include a time unit from the following options: D (Day), WD (Work Date), W (Week), M (Month), Q (Quarter), and Y (Year).
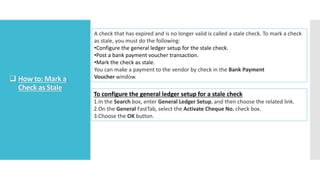
- 3. ïą How to: Mark a Check as Stale A check that has expired and is no longer valid is called a stale check. To mark a check as stale, you must do the following: âĒConfigure the general ledger setup for the stale check. âĒPost a bank payment voucher transaction. âĒMark the check as stale. You can make a payment to the vendor by check in the Bank Payment Voucher window. To configure the general ledger setup for a stale check 1.In the Search box, enter General Ledger Setup, and then choose the related link. 2.On the General FastTab, select the Activate Cheque No. check box. 3.Choose the OK button.
- 4. To post a bank payment voucher transaction 1.In the Search box, enter Bank Payment Voucher, and then choose the related link. 2.Fill in the required fields as described in the following table. Field Description Batch Name The required journal batch name. Document Type Select Payment as the document type. Account Type Select Vendor as the account type. Account Number The number of the vendor account to which you will post the general journal line entries. Debit Amount The total debit amount, including VAT, that is provided in the journal line. Bal. Account Type Select Bank Account as the balancing account type. Bal. Account No. Select the bank account number as the balancing account number. Bank Payment Type Select Computer Check as the bank payment type. You can choose the Computer Check option or the Manual Check option if the Bal. Account Type or Account Typeis Bank Account. Cheque Date The date of issue for the check.
- 5. 3.On the Navigate tab, in the Narration group, choose Line Narration. 4.In the Line Narration window, in the Narration field, enter the text for the line narration. 5.You can enter a maximum of 50 alphanumeric characters. 6.Choose the OK button. 7.On the Navigate tab, in the Narration group, choose Voucher Narration. 8.In the Voucher Narration window, in the Narration field, enter the text for the voucher narration. 9.You can enter a maximum of 50 alphanumeric characters. 10.Choose the OK button.
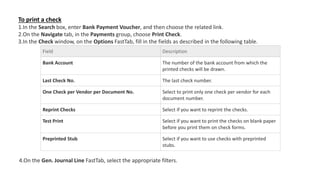
- 6. To print a check 1.In the Search box, enter Bank Payment Voucher, and then choose the related link. 2.On the Navigate tab, in the Payments group, choose Print Check. 3.In the Check window, on the Options FastTab, fill in the fields as described in the following table. Field Description Bank Account The number of the bank account from which the printed checks will be drawn. Last Check No. The last check number. One Check per Vendor per Document No. Select to print only one check per vendor for each document number. Reprint Checks Select if you want to reprint the checks. Test Print Select if you want to print the checks on blank paper before you print them on check forms. Preprinted Stub Select if you want to use checks with preprinted stubs. 4.On the Gen. Journal Line FastTab, select the appropriate filters.
- 7. Note To run the batch job, you must select Journal Template Name, Journal Batch Name, and Posting Date as filters. Enter the journal template name value, journal batch name value, and posting date value respectively. 5.Choose Print to print the report or choose Preview to view it on the screen. 6.In the Actions tab, in the Posting group, choose Post. The Stale Cheque Expiry Date field is automatically updated in the Check Ledger Entries and Bank Ledger Entries windows, based on the values in the Cheque Date and Stale Cheque Stipulated Period fields in the Bank Account Card window.
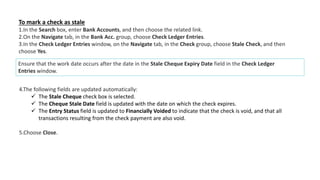
- 8. To mark a check as stale 1.In the Search box, enter Bank Accounts, and then choose the related link. 2.On the Navigate tab, in the Bank Acc. group, choose Check Ledger Entries. 3.In the Check Ledger Entries window, on the Navigate tab, in the Check group, choose Stale Check, and then choose Yes. Ensure that the work date occurs after the date in the Stale Cheque Expiry Date field in the Check Ledger Entries window. 4.The following fields are updated automatically: ïž The Stale Cheque check box is selected. ïž The Cheque Stale Date field is updated with the date on which the check expires. ïž The Entry Status field is updated to Financially Voided to indicate that the check is void, and that all transactions resulting from the check payment are also void. 5.Choose Close.