Steps for thinglink
Download as PPTX, PDF0 likes730 views
The document provides step-by-step instructions for creating a Thinglink image with information tagged onto a chosen animal photo. It outlines 6 steps: selecting a photo and saving it to the desktop; logging into Thinglink and uploading the photo; finding information on assigned websites to tag; copying URLs; adding tags by pasting URLs and descriptions; and repeating to add more tags before saving and logging out. Students should contact Mrs. Dixon or Mrs. Newton if they have any questions.
1 of 7
Download to read offline


Recommended
Power Point for the Novice
Power Point for the Novicelib2012
Ã˝
Power Point for the Novice provides a step-by-step guide for creating a PowerPoint presentation. It discusses the benefits of using PowerPoint, such as helping audiences understand and connect with a message through visual aids. The document then outlines the steps for setting up a PowerPoint, adding slides, inserting images and charts, using transitions and animations, and viewing a presentation. Tips are provided about saving work frequently and that there are multiple ways to accomplish tasks in PowerPoint.Tips and tools for creating flipcharts
Tips and tools for creating flipchartsManuel S. Herrera
Ã˝
This document provides tips and tools for creating flipcharts and using various features on the ActivInspire software. It explains how to use tools like the page browser, resource browser, object browser, and property browser. It also provides instructions for setting up questions and polls, registering voting devices, and exporting results.DC Tutorial
DC TutorialDiscoveryCast, Inc.
Ã˝
This document provides instructions for participating in an online event using the DiscoveryCast platform. It explains how to navigate the different pages to share and build on ideas, view ideas submitted by others, and get help. The key activities include completing a profile, submitting original ideas on specific questions, building on existing ideas by clicking on them, viewing ideas in different visual formats like a word cloud and idea map, and providing feedback throughout the event. Participation over multiple shorter sessions rather than one long session is recommended.Apps and Extensions...it's a Smash NCTIES 16
Apps and Extensions...it's a Smash NCTIES 16Suzanne Blaszak
Ã˝
1) The document discusses how to "smash" or combine multiple Google apps, extensions, and tools to create new products and enhance functionality.
2) Examples of app and extension combinations presented include embedding a Newsela text into Google Docs along with reading comprehension questions, and creating a PowToon presentation and customizing it using a MindMup mind map.
3) The focus is on building students' app fluency by teaching them to leverage different extensions and apps together in Google's Chrome browser or on Chromebooks to develop creative works.Pinterest
PinterestMichelle Davies (Hryvnak)
Ã˝
Pinterest is a virtual bulletin board that allows users to organize and share images and ideas they find online. Users can pin images to digital boards on specific topics or interests from websites or their own device. Pins can then be repinned by other users to spread content virally. Signups currently require an invite from an existing member. Pinterest is growing in popularity as a social network and can be used for planning events like weddings or redecorating. Tools exist to help users more easily pin content and track their influence on the site.Storytellingtools 2014
Storytellingtools 2014Buffy Andrews
Ã˝
The document discusses various tools that can help journalists tell stories, including Google Maps, StorymapJS, Dipity, TimelineJS, Soundcite, Easel.ly, ThingLink, Piktochart and others. It provides step-by-step instructions for how to use each tool to create interactive maps, timelines, infographics and more. The tools can be used alone or combined to engage audiences and enhance online reporting and storytelling.Glogon 
Glogon Poway High School
Ã˝
This document provides instructions for creating and publishing a "Glog," which is an online poster that allows users to add various multimedia elements like images, video, sound, and hyperlinks. It describes how to set up a Glog account, choose a template and background, add text, images, videos, audio, and other elements, and then save and publish the completed Glog.3 d bookstcea2
3 d bookstcea2KatHewett
Ã˝
This document provides instructions for creating 3D illustrations in Photoshop and publishing them online. It explains how to take an original illustration, save left and right eye versions with slight warping, overlay them and remove the red channel to create an anaglyph 3D image. Websites like Zooburst and tools like augmented reality are mentioned for publishing the images online. Resources for creating eBooks like Story Jumper, CreateSpace and Storybird are also listed.3 d bookstcea
3 d bookstceaKatHewett
Ã˝
This document provides instructions for creating 3D illustrations in Photoshop and publishing them online. It explains how to take an original illustration, save left and right eye versions with slight warping, overlay them and remove the red channel to create an anaglyph 3D image. Websites like Zooburst and tools like augmented reality are mentioned for publishing the images online. Resources for creating eBooks like Story Jumper, CreateSpace and Storybird are also listed.Pinterest for Teachers
Pinterest for TeachersKaren Richardson
Ã˝
Pinterest is an online pinboard that allows users to organize and share interests. Teachers are using Pinterest to gather and organize educational materials for their classrooms. The document provides instructions on setting up an account and boards, adding pins, following other boards and people, and examples of what teachers are pinning, including lesson plans, assessments, websites, videos, and professional development resources. It concludes with rules for using Pinterest respectfully and sources for finding other educators on the site.Facebook pages: guide to set-up, tips, tricks and metrics
Facebook pages: guide to set-up, tips, tricks and metricsmyvideoshorts IRL
Ã˝
This document provides an overview of how to set up and manage a Facebook page. It discusses adding cover images, profile pictures, tabs, photos, videos, bios and more. It also covers inviting friends, ads, targeting audiences, scheduling posts, pinning posts, highlighting posts, creating events, insights and metrics like reach, engaged users, things people are talking about and like sources. The document aims to help users understand how to build their Facebook page and community.How work Pinterest 
How work Pinterest Keller Williams Realty Devon Wayne
Ã˝
Pinterest is a virtual bulletin board where users can organize images and content by topic on pinboards. The document provides instructions on how businesses can use Pinterest to market their products and drive customers to their website. It explains how to set up a Pinterest account, create pinboards, and pin or repin images using the browser button. The goal is to engage customers by pinning visually appealing, topic-relevant content and including hashtags and links back to the business website.Glogster instructions
Glogster instructionsiamslempy
Ã˝
1. To register as a teacher on Glogster, go to http://www.glogster.com/edu and complete the registration fields, checking the box for Student's Accounts and specifying the number of accounts needed.
2. To create a new Glog, log in at http://www.glogster.com/edu, select "New Glog" from the profile page, name the glog, and click "Save and Publish".
3. Content can be added to a Glog by clicking buttons to add backgrounds, graphics, text boxes, images, videos, sounds or glog walls and clicking again to place the content. Pinterest
PinterestBex Lewis
Ã˝
Pinterest is a photo sharing website that allows users to create virtual pinboards to organize and curate images from around the internet. The document discusses how Pinterest can be used for pedagogical and research purposes by allowing users to collect images into theme-based boards and share their findings with others. It provides instructions for setting up an account, pinning images, creating boards, and re-pinning images from other users.How to Build a Great Class Website Using Weebly
How to Build a Great Class Website Using Weeblymrmacmillan
Ã˝
This document provides instructions for creating a basic class website or blog using the Weebly platform in 9 steps:
1. Choose a hosting platform like Weebly and name your site.
2. Select an easy to read theme that is appropriate for your audience of students and parents.
3. Decide on an organizational layout based on who the site is for and what content they will see.
4. Add pages for different content sections and rearrange the page order.
5. Add basic elements like text, photos, videos and games using the element toolbar.
6. Embed multimedia like YouTube videos by copying the URL.
7. Add interactive games by copying embed codes fromBasic skills
Basic skillsnewman_danwilletts
Ã˝
This document provides instructions for basic skills in PowerPoint, including how to add shapes, clipart, and edit the slide master. It describes dragging the mouse to add a shape, searching online and inserting clipart images, and accessing the slide master to apply formatting globally. Students are assigned tasks to create a presentation about themselves using these skills and collecting images from the internet and home.How to make arrows 4 door blue car side view power point slides and ppt diagr...
How to make arrows 4 door blue car side view power point slides and ppt diagr...∫›∫›fl£Team.net
Ã˝
A 4 door blue compact car was involved in a rear impact collision. The document does not provide any other details about the collision, the vehicles involved, or any damage or injuries that may have resulted.Digital portfolio 2 navigation, html, blog, logo
Digital portfolio 2 navigation, html, blog, logoSung Woo Yoo
Ã˝
1) The document provides instructions for creating a logo and website using Muse and Photoshop. It outlines steps for adding text, images, navigation, forms and other elements to pages.
2) Tutorials and examples are referenced for creating logos with drawing or text in Photoshop, designing navigation menus and formatting pages in Muse.
3) The document coaches working with layers, styles, effects and exporting files in Muse and Photoshop.Oh, the Things You Can Build!
Oh, the Things You Can Build!Barbara McQueen
Ã˝
Education has changed since Covid struck. Teachers, students, and everyone inbetween have been required to find online methods for communicating and getting tasks done. One option for educators has been immersing their students in learning situations through virtual world activities. While some teachers are excited by the possibilities, others are overwhelmed by yet another technology being heaped on their already overladen plates. But using virtual worlds and creating the items you might need for lessons there, doesn't need to be intimidating.
This presentation is meant to help teachers and students over some of their perceived hurdles while creating many lessons for teaching idioms. Participants at the conference, or people who would like to review or process the information separately, can work through the step-by-step slides outlining best building practices at their own pace. The goal is to turn a daunting task into an enjoyable one.
Participants who attend the conference in Kitely in OpenSim will also be given a chance to tour Edutopia 1 and see many other teaching ideas via a car rally. The car rally is meant to showcase additional teaching tactics, and the car rally is also an example of another type of lesson teachers could immediately use with their students.
Finally, useful links are given to the presenter, her virtual worlds, and machinima posted on YouTube that further illustrate out-of-the-box teaching ideas.Storybird step-by-step
Storybird step-by-stepMayte Pelegrin Salas
Ã˝
The document provides step-by-step instructions for using the Storybird website. It explains how to register for an account, log in, create storybirds, invite collaborators, publish stories, and set up a class on Storybird including adding students and assigning projects.Lecture 4: ITS488 Digital Content Creation with Unity - Game and VR Programming 
Lecture 4: ITS488 Digital Content Creation with Unity - Game and VR Programming Kobkrit Viriyayudhakorn
Ã˝
This document provides instructions for creating a basketball shooting game in Unity with multiple scenes. It describes how to set up score counting across multiple targets, create prefabs, and move between scenes on key presses or timer events. The steps include adding targets, collision detection scripts, a global score counter, and level manager for scene transitions. Images and text are added to canvas elements for menus. Buttons are created and linked to level loading methods to trigger scene changes. Exercise tasks expand on these concepts to complete the game functionality.Thing link
Thing linkCoachElrod
Ã˝
This document provides instructions for using the Web 2.0 tool ThingLink in the classroom. ThingLink allows users to create interactive images and videos by adding tags with additional text, links, images or videos. The document outlines how to sign up for a free ThingLink account and walks through the steps to create an interactive image, including uploading an image, adding tags, and sharing the completed image. Examples of how teachers have used ThingLink in lessons on the Civil War are also provided.Dmc 2 2.0-training_presentation[1]![Dmc 2 2.0-training_presentation[1]](https://cdn.slidesharecdn.com/ss_thumbnails/dmc2-2-0trainingpresentation1-120916195041-phpapp01-thumbnail.jpg?width=560&fit=bounds)
Dmc 2 2.0-training_presentation[1]kailagoodrich
Ã˝
This document provides training on how to use the Digital Media Center (DMC) website. It explains that courses, systems, and sections each have their own "journal" comprised of "articles" like a blog. Users can add categories to articles to create links. The document then guides users through uploading pictures, documents, and hyperlinks to their articles. It also shares the username and password for first years to login, and provides a slideshare account to embed PowerPoint files.How to make a Glog with Glogster, tutorial
How to make a Glog with Glogster, tutorialHoudini Howard
Ã˝
Originally created for use with:
Poetry Glog, Language Arts Lesson Plan
However, this can be used to demonstrate how to create Glogs for any class. Student practice power_point
Student practice power_pointJudy Arzt
Ã˝
This document provides instructions for practicing various PowerPoint features including:
1. Custom animations to make objects enter one at a time using dissolve entrance. It also covers reordering the animation sequence and using dimming.
2. Inserting motion paths to make an object move across the screen.
3. Inserting hyperlinks to other slides or to trigger sounds.
4. Formatting slides by adding shapes, changing fill colors, inserting arrows, and applying transitions in the slide sorter view.Student practice power_point
Student practice power_pointJudy Arzt
Ã˝
This document provides instructions for practicing various PowerPoint features including:
1. Custom animations to make objects enter one at a time using dissolve entrance. It also covers reordering animation sequences and using dimming.
2. Inserting motion paths to make an object move across the screen.
3. Inserting hyperlinks to other slides or to trigger sounds.
4. Formatting slides with shapes, colors, arrows and transitions. The document guides the user through exercises to practice these PowerPoint skills.Name of animal powerpoint
Name of animal powerpointcaila-bishop
Ã˝
This document provides instructions for creating a 3 slide PowerPoint presentation about an animal. Students will add a title slide with the animal name, a second slide describing where the animal lives, and a third slide listing 3 amazing facts. The directions guide students through adding text, clip art images, formatting, and saving the completed presentation.Voki avatars
Voki avatarstymchatyn
Ã˝
The document provides instructions for creating an avatar using the Voki online application in order to learn about avatars and how they can be used for teaching. It includes step-by-step directions for customizing an avatar's appearance, voice, background, and publishing the avatar. The purpose is to explore how avatars could be incorporated into lessons for activities like introductions, role playing, or simulations.More Related Content
Similar to Steps for thinglink (20)
3 d bookstcea
3 d bookstceaKatHewett
Ã˝
This document provides instructions for creating 3D illustrations in Photoshop and publishing them online. It explains how to take an original illustration, save left and right eye versions with slight warping, overlay them and remove the red channel to create an anaglyph 3D image. Websites like Zooburst and tools like augmented reality are mentioned for publishing the images online. Resources for creating eBooks like Story Jumper, CreateSpace and Storybird are also listed.Pinterest for Teachers
Pinterest for TeachersKaren Richardson
Ã˝
Pinterest is an online pinboard that allows users to organize and share interests. Teachers are using Pinterest to gather and organize educational materials for their classrooms. The document provides instructions on setting up an account and boards, adding pins, following other boards and people, and examples of what teachers are pinning, including lesson plans, assessments, websites, videos, and professional development resources. It concludes with rules for using Pinterest respectfully and sources for finding other educators on the site.Facebook pages: guide to set-up, tips, tricks and metrics
Facebook pages: guide to set-up, tips, tricks and metricsmyvideoshorts IRL
Ã˝
This document provides an overview of how to set up and manage a Facebook page. It discusses adding cover images, profile pictures, tabs, photos, videos, bios and more. It also covers inviting friends, ads, targeting audiences, scheduling posts, pinning posts, highlighting posts, creating events, insights and metrics like reach, engaged users, things people are talking about and like sources. The document aims to help users understand how to build their Facebook page and community.How work Pinterest
How work Pinterest Keller Williams Realty Devon Wayne
Ã˝
Pinterest is a virtual bulletin board where users can organize images and content by topic on pinboards. The document provides instructions on how businesses can use Pinterest to market their products and drive customers to their website. It explains how to set up a Pinterest account, create pinboards, and pin or repin images using the browser button. The goal is to engage customers by pinning visually appealing, topic-relevant content and including hashtags and links back to the business website.Glogster instructions
Glogster instructionsiamslempy
Ã˝
1. To register as a teacher on Glogster, go to http://www.glogster.com/edu and complete the registration fields, checking the box for Student's Accounts and specifying the number of accounts needed.
2. To create a new Glog, log in at http://www.glogster.com/edu, select "New Glog" from the profile page, name the glog, and click "Save and Publish".
3. Content can be added to a Glog by clicking buttons to add backgrounds, graphics, text boxes, images, videos, sounds or glog walls and clicking again to place the content. Pinterest
PinterestBex Lewis
Ã˝
Pinterest is a photo sharing website that allows users to create virtual pinboards to organize and curate images from around the internet. The document discusses how Pinterest can be used for pedagogical and research purposes by allowing users to collect images into theme-based boards and share their findings with others. It provides instructions for setting up an account, pinning images, creating boards, and re-pinning images from other users.How to Build a Great Class Website Using Weebly
How to Build a Great Class Website Using Weeblymrmacmillan
Ã˝
This document provides instructions for creating a basic class website or blog using the Weebly platform in 9 steps:
1. Choose a hosting platform like Weebly and name your site.
2. Select an easy to read theme that is appropriate for your audience of students and parents.
3. Decide on an organizational layout based on who the site is for and what content they will see.
4. Add pages for different content sections and rearrange the page order.
5. Add basic elements like text, photos, videos and games using the element toolbar.
6. Embed multimedia like YouTube videos by copying the URL.
7. Add interactive games by copying embed codes fromBasic skills
Basic skillsnewman_danwilletts
Ã˝
This document provides instructions for basic skills in PowerPoint, including how to add shapes, clipart, and edit the slide master. It describes dragging the mouse to add a shape, searching online and inserting clipart images, and accessing the slide master to apply formatting globally. Students are assigned tasks to create a presentation about themselves using these skills and collecting images from the internet and home.How to make arrows 4 door blue car side view power point slides and ppt diagr...
How to make arrows 4 door blue car side view power point slides and ppt diagr...∫›∫›fl£Team.net
Ã˝
A 4 door blue compact car was involved in a rear impact collision. The document does not provide any other details about the collision, the vehicles involved, or any damage or injuries that may have resulted.Digital portfolio 2 navigation, html, blog, logo
Digital portfolio 2 navigation, html, blog, logoSung Woo Yoo
Ã˝
1) The document provides instructions for creating a logo and website using Muse and Photoshop. It outlines steps for adding text, images, navigation, forms and other elements to pages.
2) Tutorials and examples are referenced for creating logos with drawing or text in Photoshop, designing navigation menus and formatting pages in Muse.
3) The document coaches working with layers, styles, effects and exporting files in Muse and Photoshop.Oh, the Things You Can Build!
Oh, the Things You Can Build!Barbara McQueen
Ã˝
Education has changed since Covid struck. Teachers, students, and everyone inbetween have been required to find online methods for communicating and getting tasks done. One option for educators has been immersing their students in learning situations through virtual world activities. While some teachers are excited by the possibilities, others are overwhelmed by yet another technology being heaped on their already overladen plates. But using virtual worlds and creating the items you might need for lessons there, doesn't need to be intimidating.
This presentation is meant to help teachers and students over some of their perceived hurdles while creating many lessons for teaching idioms. Participants at the conference, or people who would like to review or process the information separately, can work through the step-by-step slides outlining best building practices at their own pace. The goal is to turn a daunting task into an enjoyable one.
Participants who attend the conference in Kitely in OpenSim will also be given a chance to tour Edutopia 1 and see many other teaching ideas via a car rally. The car rally is meant to showcase additional teaching tactics, and the car rally is also an example of another type of lesson teachers could immediately use with their students.
Finally, useful links are given to the presenter, her virtual worlds, and machinima posted on YouTube that further illustrate out-of-the-box teaching ideas.Storybird step-by-step
Storybird step-by-stepMayte Pelegrin Salas
Ã˝
The document provides step-by-step instructions for using the Storybird website. It explains how to register for an account, log in, create storybirds, invite collaborators, publish stories, and set up a class on Storybird including adding students and assigning projects.Lecture 4: ITS488 Digital Content Creation with Unity - Game and VR Programming
Lecture 4: ITS488 Digital Content Creation with Unity - Game and VR Programming Kobkrit Viriyayudhakorn
Ã˝
This document provides instructions for creating a basketball shooting game in Unity with multiple scenes. It describes how to set up score counting across multiple targets, create prefabs, and move between scenes on key presses or timer events. The steps include adding targets, collision detection scripts, a global score counter, and level manager for scene transitions. Images and text are added to canvas elements for menus. Buttons are created and linked to level loading methods to trigger scene changes. Exercise tasks expand on these concepts to complete the game functionality.Thing link
Thing linkCoachElrod
Ã˝
This document provides instructions for using the Web 2.0 tool ThingLink in the classroom. ThingLink allows users to create interactive images and videos by adding tags with additional text, links, images or videos. The document outlines how to sign up for a free ThingLink account and walks through the steps to create an interactive image, including uploading an image, adding tags, and sharing the completed image. Examples of how teachers have used ThingLink in lessons on the Civil War are also provided.Dmc 2 2.0-training_presentation[1]
Dmc 2 2.0-training_presentation[1]kailagoodrich
Ã˝
This document provides training on how to use the Digital Media Center (DMC) website. It explains that courses, systems, and sections each have their own "journal" comprised of "articles" like a blog. Users can add categories to articles to create links. The document then guides users through uploading pictures, documents, and hyperlinks to their articles. It also shares the username and password for first years to login, and provides a slideshare account to embed PowerPoint files.How to make a Glog with Glogster, tutorial
How to make a Glog with Glogster, tutorialHoudini Howard
Ã˝
Originally created for use with:
Poetry Glog, Language Arts Lesson Plan
However, this can be used to demonstrate how to create Glogs for any class. Student practice power_point
Student practice power_pointJudy Arzt
Ã˝
This document provides instructions for practicing various PowerPoint features including:
1. Custom animations to make objects enter one at a time using dissolve entrance. It also covers reordering the animation sequence and using dimming.
2. Inserting motion paths to make an object move across the screen.
3. Inserting hyperlinks to other slides or to trigger sounds.
4. Formatting slides by adding shapes, changing fill colors, inserting arrows, and applying transitions in the slide sorter view.Student practice power_point
Student practice power_pointJudy Arzt
Ã˝
This document provides instructions for practicing various PowerPoint features including:
1. Custom animations to make objects enter one at a time using dissolve entrance. It also covers reordering animation sequences and using dimming.
2. Inserting motion paths to make an object move across the screen.
3. Inserting hyperlinks to other slides or to trigger sounds.
4. Formatting slides with shapes, colors, arrows and transitions. The document guides the user through exercises to practice these PowerPoint skills.Name of animal powerpoint
Name of animal powerpointcaila-bishop
Ã˝
This document provides instructions for creating a 3 slide PowerPoint presentation about an animal. Students will add a title slide with the animal name, a second slide describing where the animal lives, and a third slide listing 3 amazing facts. The directions guide students through adding text, clip art images, formatting, and saving the completed presentation.Voki avatars
Voki avatarstymchatyn
Ã˝
The document provides instructions for creating an avatar using the Voki online application in order to learn about avatars and how they can be used for teaching. It includes step-by-step directions for customizing an avatar's appearance, voice, background, and publishing the avatar. The purpose is to explore how avatars could be incorporated into lessons for activities like introductions, role playing, or simulations.Lecture 4: ITS488 Digital Content Creation with Unity - Game and VR Programming
Lecture 4: ITS488 Digital Content Creation with Unity - Game and VR Programming Kobkrit Viriyayudhakorn
Ã˝
Steps for thinglink
- 1. The following slides will give you step-by-step instructions for creating your Thinglink image. If you have any questions, please contact Mrs. Dixon or Mrs. Newton.
- 2. Step 1: Go to Google.com • Type your animal name in the search box and click “images”. • Select an image you like and save it to the desktop—label it with your animal name.
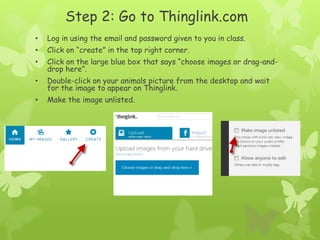
- 3. Step 2: Go to Thinglink.com • Log in using the email and password given to you in class. • Click on “create” in the top right corner. • Click on the large blue box that says “choose images or drag-and- drop here”. • Double-click on your animals picture from the desktop and wait for the image to appear on Thinglink. • Make the image unlisted.
- 4. Step 3: Locate Information Using the websites listed on the assignment wiki, find information you would like to “tag” onto your image.
- 5. Step 4: Copy and paste Copy the URL at the top of the website you want tagged. To do this, key Ctrl + c on your keyboard.
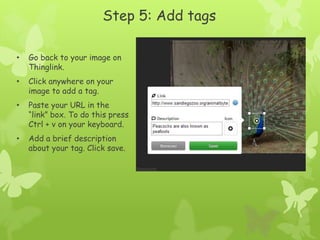
- 6. Step 5: Add tags • Go back to your image on Thinglink. • Click anywhere on your image to add a tag. • Paste your URL in the “link” box. To do this press Ctrl + v on your keyboard. • Add a brief description about your tag. Click save.
- 7. Step 6: Repeat • Add at least 2 more tag items to your image. • The title of your image needs to be your first name plus the first initial of your last name. Ex: Erin N. • Click the green “save” button. • Log out of Thinglink once you have saved your image.