


![http://newstar.vn
Trang 2
ChЖ°ЖЎng 14: WEBMIN
1) Giới thiệu WebMin
Webmin là phần mềm quản trị server linux qua giao diện đồ họa. Cho phép người người
quản trị dễ dà ng quản lý tà i nguyên và cấu hình các dịch vu thông qua dao diện web như:
User management, Disk managemet, Network, Iptables (Firewall), Cron, Apache, DNS….
Mặc định Web min sỠdụng cổng 10000 để giao tiếp.
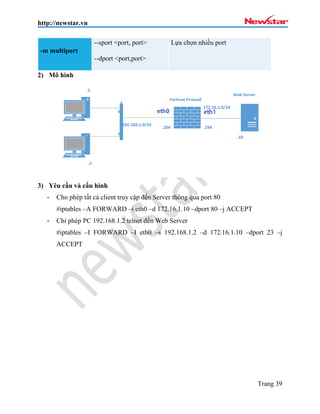
2) Mô hình triển khai:
3) CГ i Д‘бє·t
пЃ¶ CГ i trб»±c tiбєїp tб»« internet
ChГє ГЅ: Linux Server phбєЈi Д‘i Д‘Ж°б»Јc internet. TбєЇt Firewall (sбєЅ hб»Ќc б»џ chЖ°ЖЎng sau)
Bước 1: Tạo file webmin.repo tại thư mục /etc/yum.repos.d/
#vi /etc/yum.repos.d/webmin.repo
[Webmin]
name=Webmin Distribution Neutral
#baseurl=http://download.webmin.com/download/yum
mirrorlist=http://download.webmin.com/download/yum/mirrorlist
enabled=1
Bước 2: Import PGP Key của webmin
#rpm --import http://www.webmin.com/jcameron-key.asc
BЖ°б»›c 3: CГ i Д‘бє·t Webmin](https://image.slidesharecdn.com/newstar-lpi2-180323081126/85/T-H-C-LPI-2-4-320.jpg)


![http://newstar.vn
Trang 11
#vi /etc/samba/smb.conf
ThГЄm vГ o dГІng sau vГ o vб»‹ trГ dГІng sб»‘ 125
map to guest = bad user
Di chuyб»ѓn cuб»‘i file vГ thГЄm nб»™i dung sau
[Soft Newstar]
comment = Ung dung van phong
path = /soft
writable = yes
read only = yes
create mode = 0600
directory mode = 0700
guest ok = yes
CГЎc options:
guest ok: cho phép clients kết nối tới thu mục file được chia sẻ mà không cần password.
create mode: Quyền hạn của file khi được tạo file
directory mode: Quyền hạn của thư mục khi được tạo
Kiб»ѓm tra cấu hГ¬nh vб»«a thiбєїt lбєp
#testparm
Khởi động dịch vụ samba
#systemctl restart smb.service
Kiб»ѓm tra trбєЎng thГЎi samba
#smbstatus
A. Client Test (Windows):](https://image.slidesharecdn.com/newstar-lpi2-180323081126/85/T-H-C-LPI-2-13-320.jpg)
![http://newstar.vn
Trang 12
TrЖ°б»ќng hб»Јp 2: cбє§n chб»©ng thб»±c Д‘б»ѓ truy cбєp dб»Ї liệu chia sбє»
- Tạo thư mục chia sẻ
#mkdir /ketoan
- TбєЎo group kбєї toГЎn, vГ thГЄm user kt1 vГ o nhГіm nГ y
#groupadd ketoan
#useradd -g ketoan kt1
- TбєЎo password samba cho user kt1
#smbpasswd -a kt1
- Chỉnh sб»a file cấu hГ¬nh
#vi /etc/samba/smb.conf
[Phong Ke Toan]
comment = tai lieu p.ketoan
path = /ketoan
valid users = @ketoan
writable = yes
guest ok = no
(chГє ГЅ: xГіa cache user/pass truy cбєp trГЄn windows : net use * /delete)](https://image.slidesharecdn.com/newstar-lpi2-180323081126/85/T-H-C-LPI-2-14-320.jpg)


![http://newstar.vn
Trang 36
пѓј FILTER TABLE: dГ№ng Д‘б»ѓ lб»Ќc cГЎc gГіi tin, gб»“m cГЎc chain
- INPUT: lọc những gói tin đi và o hệ thống
- OUTPUT: lọc những gói tin đi ra từ hệ thống
- FORWARD: Lọc gói dữ liệu đi đến các server khác kết nối trên các NIC khác của
firewall
пѓј NAT: sб»a Д‘б»‹a chỉ gГіi tin gб»“m cГЎc chain
- PRE-ROUTING: Sб»a Д‘б»‹a chỉ Д‘Гch của gГіi tin trЖ°б»›c khi Д‘б»‹nh tuyбєїn
- POST-ROUTING:Sб»a Д‘б»‹a chỉ nguб»“n của gГіi tin sau khi gГіi tin Д‘ГЈ Д‘Ж°б»Јc Д‘б»‹nh tuyбєїn
- OUTPUT: NAT địa chỉ local để đi ra ngoà i.
пѓј MANGLE: dГ№ng Д‘б»ѓ chỉnh sб»a QOS bit trong phбє§n TCP Header của gГіi tin
Gб»“m cГЎc chain: PREROUTING, OUTPUT, FORWARD, INPUT, POSTROUTING.
Cấu trúc tổng quát của rule
iptables [-t <table-name>] <command><chain-name> <parameter-1><option-1>
<parameter-n><option-n>
Trong Д‘Гі:
Iptables: lГ tб»« khГіa bбєЇt buб»™c phбєЈi cГі.
-t: là tùy chọn để chọn tên table sỠdụng, thường kết hợp với <table-name>](https://image.slidesharecdn.com/newstar-lpi2-180323081126/85/T-H-C-LPI-2-38-320.jpg)
![http://newstar.vn
Trang 37
Nếu không dùng tùy chọn –t thì mặc định iptables sẽ sỠdụng Filter table
<command>:
-A Nб»‘i 1 rule vГ o chain
-D XГіa 1 rule ra khб»Џi chain
-I ChГЁn 1 rule vГ o chain
-R Thay thбєї rule
-L Xem cГЎc rule Д‘ГЈ Д‘Ж°б»Јc load
-N TбєЎo mб»™t chain mб»›i
-X XГіa 1 chain
-E Дђб»•i tГЄn chain
<chain-name>: lб»±a chб»Ќn cГЎc chain tЖ°ЖЎng б»©ng vб»›i cГЎc table
<Parameters>:
PARAMETERS MГґ tбєЈ
-p Protocol (tcp, udp, icmp
-s Source address [/mask]
-d Destination address [/mask]
-i TГЄn interface mГ packet nhбєn vГ o
-o TГЄn interface mГ packet sбєЅ gб»i ra](https://image.slidesharecdn.com/newstar-lpi2-180323081126/85/T-H-C-LPI-2-39-320.jpg)


More Related Content
What's hot (20)
Similar to Tб»° Hб»ЊC LPI 2 (20)


Tб»° Hб»ЊC LPI 2
- 2. TRUNG TÂM ĐÀO TẠO NEWSTAR ---------------------------------------- Quản trị hệ thống LINUX (LPI 2) Biên soạn: Huỳnh Thanh Tâm 8-2017
- 3. http://newstar.vn Trang 1 Mục Lục B. LBI 2 Chương 14: WEBMIN...................................................................................................................................2 Chương 15: VNC SERVER..............................................................................................................................4 Chương 16: DHCP SERVER ...........................................................................................................................7 Chương 17: SAMBA....................................................................................................................................10 Chương 18: NFS SERVER ............................................................................................................................13 Chương 19: DNS.........................................................................................................................................15 Chương 20: MAIL SERVER..........................................................................................................................23 Chương 21: SQUID PROXY.........................................................................................................................28 Chương 22: APACHE WEB SERVER ............................................................................................................33 Chương 23: IPTABLES.................................................................................................................................35
- 4. http://newstar.vn Trang 2 Chương 14: WEBMIN 1) Giới thiệu WebMin Webmin là phần mềm quản trị server linux qua giao diện đồ họa. Cho phép người người quản trị dễ dà ng quản lý tà i nguyên và cấu hình các dịch vu thông qua dao diện web như: User management, Disk managemet, Network, Iptables (Firewall), Cron, Apache, DNS…. Mặc định Web min sỠdụng cổng 10000 để giao tiếp. 2) Mô hình triển khai: 3) Cà i đặt  Cà i trực tiếp từ internet Chú ý: Linux Server phải đi được internet. Tắt Firewall (sẽ học ở chương sau) Bước 1: Tạo file webmin.repo tại thư mục /etc/yum.repos.d/ #vi /etc/yum.repos.d/webmin.repo [Webmin] name=Webmin Distribution Neutral #baseurl=http://download.webmin.com/download/yum mirrorlist=http://download.webmin.com/download/yum/mirrorlist enabled=1 Bước 2: Import PGP Key của webmin #rpm --import http://www.webmin.com/jcameron-key.asc Bước 3: Cà i đặt Webmin
- 5. http://newstar.vn Trang 3 #yum -y install webmin BЖ°б»›c 4: khб»џi Д‘б»™ng dб»‹ch vụ Webmin vГ cho khб»џi Д‘б»™ng cГ№ng HДђH #service webmin start #chkconfig webmin on BЖ°б»›c 5: kiб»ѓm tra truy cбєp tб»« Admin пЃ¶ CГ i Д‘бє·t tб»« rpm: BЖ°б»›c 1: Download webmin #wget http://prdownloads.sourceforge.net/webadmin/webmin-1.840-1.noarch.rpm BЖ°б»›c 2: CГ i dбє·t cГЎc gГіi thЖ° viện cбє§n thiбєїt #yum -y install perl perl-Net-SSLeay openssl perl-IO-Tty perl-Encode-Detect BЖ°б»›c 3: CГ i Д‘бє·t webmin #rpm -ivh webmin-1.840-1.noarch.rpm BГ i tбєp: - Chỉ cho phГ©p lб»›p 192.168.1.0/24 truy cбєp Д‘бєїn webmin. Cấm tất cбєЈ cГЎc IP khГЎc - PhГўn quyб»Ѓn truy cбєp cГЎc chб»©c nДѓng của Wemin cho tб»«ng user quбєЈn trб»‹
- 6. http://newstar.vn Trang 4 ChЖ°ЖЎng 15: VNC SERVER 1) Giб»›i thiệu VNC VNC – Virtual Network Computing lГ mб»™t cГґng cụ phб»• biбєїn Д‘б»ѓ cung cấp truy cбєp Server tб»« xa thГґng qua giao diện Д‘б»“ hб»Ќa.. 2) MГґ hГ¬nh 3) CГ i Д‘бє·t vГ cấu hГ¬nh BЖ°б»›c 1: CГ i dбє·t tigervnc-server tб»« internet #yum install tigervnc-server BЖ°б»›c 2: Cấu hГ¬nh cho phГ©p 2 user root vГ nam truy cбєp vГ o VNC-Server пѓј TбєЎo file cấu hГ¬nh vnc cho user root bбє±ng cГЎch copy file cấu hГ¬nh mбє«u của dб»‹ch vụ #cp /lib/systemd/system/vncserver@.service /etc/systemd/system/vncserver@:1.service пѓј Mб»џ file vГ chỉnh sб»a tГЄn user thГ nh root vГ Д‘б»•i Д‘Ж°б»ќng thЖ° mục home của user root #vi /etc/systemd/system/vncserver@:1.service (chỉnh sб»a theo nб»™i dung bГЄn dЖ°б»›is) ExecStart=/sbin/runuser -l root -c "/usr/bin/vncserver %i" PIDFile=/root/.vnc/%H%i.pid пѓј TбєЎo file cấu hГ¬nh vnc cho user nam #cp /lib/systemd/system/vncserver@.service /etc/systemd/system/vncserver@:2.service пѓј Mб»џ file vГ chỉnh sб»a tГЄn user thГ nh nam vГ Д‘б»•i Д‘Ж°б»ќng thЖ° mục home của user nam
- 7. http://newstar.vn Trang 5 #vi /etc/systemd/system/vncserver@:1.service (chỉnh sб»a theo nб»™i dung bГЄn dЖ°б»›is) ExecStart=/sbin/runuser -l nam -c "/usr/bin/vncserver %i" PIDFile=/home/nam/.vnc/%H%i.pid пѓј TбєЎo user nam #useradd nam пѓј Дђбє·t password VNC cho user root #vncpasswd пѓј Дђбє·t password VNC cho user nam #su nam #vncpasswd пѓј Reload lбєЎi dб»‹ch vụ #systemctl daemon-reload пѓј Khб»џi Д‘б»™ng dб»‹ch vụ vnc cho user nam vГ root #systemctl start vncserver@:1.service #systemctl start vncserver@:2.service пѓј Khб»џi Д‘б»™ng khi hệ thб»‘ng starup #systemctl enable vncserver@:1.service #systemctl enable vncserver@:2.service BЖ°б»›c 3: Kiб»ѓm tra hoat Д‘б»™ng của VNC. MГЎy admin download VNC-Viewer vГ truy cбєp bбє±ng user: root (192.168.1.7:1)
- 8. http://newstar.vn Trang 6 VNC bбє±ng user: nam
- 9. http://newstar.vn Trang 7 ChЖ°ЖЎng 16: DHCP SERVER 1) Giб»›i thiệu: DHCP (DYNAMIC HOST CONFIGURATION PROTOCOL) lГ dб»‹ch vụ cấp phГЎt Д‘б»‹a chỉ IP tб»± Д‘б»™ng cho cГЎc mГЎy tГnh hoбєЎt Д‘б»™ng theo mГґ hГ¬nh server-client, mГЎy cấu hГ¬nh DHCP Server phбєЈi Д‘Ж°б»Јc gГЎn IP tД©nh. ThГґng tin mГ client nhбєn Д‘Ж°б»Јc tб»« DHCP server gб»“m: IP, subnet mask, default gateway, DNS server, … CГЎc Д‘б»‹a chỉ IP trong mбєЎng LAN Д‘Ж°б»Јc Д‘бє·t theo RFC 1918: Class A: 10.0.0.0 – 10.255.255.255 (10/8 prefix) Class B: 172.16.0.0 – 172.31.255.255 (172.16/12 prefix) Class C: 192.168.0.0 – 192.168.255.255 ( 192.168/16 prefix) 2) MГґ hГ¬nh triб»ѓn khai (ChГє ГЅ: tбєЇt dhcp trГЄn VMWare) 3) CГ i Д‘бє·t - Thiбєїt lбєp Д‘б»‹a chỉ IP tД©nh cho DHCP Server: 192.168.1.254/24 - CГ i tб»« internet: #yum install dhcp - CГ i tб»« CDROM: #rpm –ivh dhcp-4.1.1-25P1.el6.i686.rpm 4) Cấu hГ¬nh A. DHCP-Server BЖ°б»›c 1:copy file cấu hГ¬nh
- 10. http://newstar.vn Trang 8 #cp /usr/share/doc/dhcp-4.2.5/dhcpd.conf.example /etc/dhcp/dhcpd.conf Chọn y Bước 2:Tùy chỉnh các thông số #vi /etc/dhcp/dhcpd.conf Bước 3: Xóa nội dung từ dòng 23 đến cuối file Bước 4: Thêm nội dung sau và o cuối file subnet 192.168.1.0 netmask 255.255.255.0{ option routers 192.168.1.1; option subnet-mask 255.255.255.0; option domain-name-servers 8.8.8.8; range 192.168.1.100 192.168.1.200; default-lease-time 21600; max-lease-time 43200; } Khởi động lại dịch vụ #systemctl start dhcpd Cho dịch vụ khởi động cùng với HĐH # systemctl enable dhcpd B. DHCP Client Windows OS - ipconfig /release - ipconfig /renew - ipconfig Linux OS - dhclient eth0 - dhclient –r - ifconfig Thực hiện cấp ip theo Mac-Address:
- 11. http://newstar.vn Trang 9 subnet 192.168.1.0 netmask 255.255.255.0{ option routers 192.168.1.1; option subnet-mask 255.255.255.0; option domain-name-servers 8.8.8.8; range 192.168.1.100 192.168.1.200; default-lease-time 21600; max-lease-time 43200; host nsshare { hardware ethernet 00:50:56:c0:00:01; fixed-address 192.168.1.151; } }
- 12. http://newstar.vn Trang 10 ChЖ°ЖЎng 17: SAMBA 1) Giб»›i thiệu Samba laМЂ diМЈch vuМЈ cuМ‰a hГЄМЈ Д‘iГЄМЂu haМЂnh Linux, chaМЈy trГЄn nГЄМЂn giao thЖ°МЃc SMB (Server Message Block) cho pheМЃp chia seМ‰ file hГЄМЈ thГґМЃng, maМЃy in vЖЎМЃi caМЃc maМЃy chaМЈy hệ Д‘iб»Ѓu hГ nh Windows Samba Server port numbers: 137/tcp; 137/udp; 138/tcp; 138/udp; 139/udp; 139/udp; 445/tcp; 445/udp 2) MГґ hГ¬nh 3) CГ i Д‘бє·t SAMBA Server пѓј CГ i tб»« internet: #yum install samba пѓј CГ i tб»« Д‘Д©a CD: #rpm –ivh samba-3.5.10-114.el6.i686.rpm 4) Cấu hГ¬nh SAMBA Server TrЖ°б»ќng hб»Јp 1: KhГґng cбє§n username/password Д‘б»ѓ truy cбєp dб»Ї liệu chia sбє» - TбєЎo mб»™t thЖ° mục Д‘б»ѓ thб»±c hiện share dб»Ї liệu. VГ dụ: TбєЎo thЖ° mục cГі tГЄn là “soft”. Trong thЖ° mục soft, tбєЎo thЖ° mục cГі tГЄn linux1 #mkdir /soft #mkdir /soft/linux2 PhГўn quyб»Ѓn thЖ° mục soft: #chmod 777 –R /soft/ - Cấu hГ¬nh Server:
- 13. http://newstar.vn Trang 11 #vi /etc/samba/smb.conf ThГЄm vГ o dГІng sau vГ o vб»‹ trГ dГІng sб»‘ 125 map to guest = bad user Di chuyб»ѓn cuб»‘i file vГ thГЄm nб»™i dung sau [Soft Newstar] comment = Ung dung van phong path = /soft writable = yes read only = yes create mode = 0600 directory mode = 0700 guest ok = yes CГЎc options: guest ok: cho phГ©p clients kбєїt nб»‘i tб»›i thu mục file Д‘Ж°б»Јc chia sбє» mГ khГґng cбє§n password. create mode: Quyб»Ѓn hбєЎn của file khi Д‘Ж°б»Јc tбєЎo file directory mode: Quyб»Ѓn hбєЎn của thЖ° mục khi Д‘Ж°б»Јc tбєЎo Kiб»ѓm tra cấu hГ¬nh vб»«a thiбєїt lбєp #testparm Khб»џi Д‘б»™ng dб»‹ch vụ samba #systemctl restart smb.service Kiб»ѓm tra trбєЎng thГЎi samba #smbstatus A. Client Test (Windows):
- 14. http://newstar.vn Trang 12 TrЖ°б»ќng hб»Јp 2: cбє§n chб»©ng thб»±c Д‘б»ѓ truy cбєp dб»Ї liệu chia sбє» - TбєЎo thЖ° mục chia sбє» #mkdir /ketoan - TбєЎo group kбєї toГЎn, vГ thГЄm user kt1 vГ o nhГіm nГ y #groupadd ketoan #useradd -g ketoan kt1 - TбєЎo password samba cho user kt1 #smbpasswd -a kt1 - Chỉnh sб»a file cấu hГ¬nh #vi /etc/samba/smb.conf [Phong Ke Toan] comment = tai lieu p.ketoan path = /ketoan valid users = @ketoan writable = yes guest ok = no (chГє ГЅ: xГіa cache user/pass truy cбєp trГЄn windows : net use * /delete)
- 15. http://newstar.vn Trang 13 ChЖ°ЖЎng 18: NFS SERVER 1) Giб»›i thiệu NFS(Network File System) lГ dб»‹ch vụ chia sбє» file trГЄn cГЎc hệ thб»‘ng Unix/Linux. DiМЈch vuМЈ NFS cho pheМЃp chia seМ‰ tГўМЈp tin cho nhiГЄМЂu ngЖ°ЖЎМЂi duМЂng trГЄn cuМЂng maМЈng vaМЂ ngЖ°ЖЎМЂi duМЂng coМЃ thГЄМ‰ thao taМЃc nhЖ° vЖЎМЃi tГўМЈp tin trГЄn chiМЃnh Д‘iМѓa cЖ°МЃng cuМ‰a miМЂnh 2) MГґ hГ¬nh 3) CГ i Д‘бє·t vГ cấu hГ¬nh A. Server BЖ°б»›c 1: CГ i cГЎc gГіi sau tб»« internet #yum install nfs-utils nfs-utils-lib portmap BЖ°б»›c 2:TбєЎo thЖ° mục chia sбє» #mkdir /soft #mkdir /giaitri #mkdir /data BЖ°б»›c 3: Cấu hГ¬nh thЖ° mục chia sбєЅ /soft #vi /etc/exports Cấu trГєc file exports nhЖ° sau: /ThЖ° mục chia sбє» host1(options) host2(option) CГЎc tГ№y chб»Ќn thГґng dụng: пѓј ro:thuб»™c tГnh chỉ Д‘б»Ќc пѓј rw:thuб»™c tГnh Д‘б»Ќc vГ ghi пѓј sync: Д‘б»“ng bб»™ dб»Ї liệu
- 16. http://newstar.vn Trang 14 пѓј root_squash: khГґng cho phГ©p sб» dụng hệ thб»‘ng vб»›i quyб»Ѓn hбєЎn root пѓј no_root_squash:ngЖ°б»Јc lбєЎi vб»›i root_squash пѓј … (DГ№ng #man exports Д‘б»ѓ xem cГЎc options khГЎc) Nб»™i dung file /etc/exports vб»›i mục Д‘Гch chỉ cho phГ©p cГЎc ip thuб»™c lб»›p mбєЎng 192.168.1.0/24 cГі quyб»Ѓn Д‘б»Ќc. /soft 192.168.1.0/24(rw,sync) /data 192.168.1.5(rw,sync) /giaitri 192.168.1.5(ro,root_squash,sync) BЖ°б»›c 4: Khб»џi Д‘б»™ng dб»‹ch vụ #service nfs start Reload lбєЎi toГ n bб»™ cấu hГ¬nh cho nfs #exportfs -a (Nбєїu chỉ muб»‘n cбєp nhбєt cГЎc entry vб»«a thГЄm ta dГ№ng lệnh #exportfs -r) B. Client (Linux) BЖ°б»›c 1: kiб»ѓm tra thГґng tin dб»‹ch vụ NFS vГ danh sГЎch cГЎc thЖ° mục Д‘Ж°б»Јc export trГЄn NFS Server #showmount –e 192.168.1.5 BЖ°б»›c 2: TбєЎo thЖ° mục Д‘б»ѓ lГ m mount point #mkdir /mnt/a1 #mkdir /mnt/a2 #mkdir /mnt/a3 BЖ°б»›c 2: thб»±c hiện mount thЖ° mục share vб»Ѓ mГЎy #mount –t nfs 192.168.1.5:/soft /mnt/a1 #mount –t nfs 192.168.1.5:/data /mnt/a2 #mount –t nfs 192.168.1.5:/giaitri /mnt/a3
- 17. http://newstar.vn Trang 15 ChЖ°ЖЎng 19: DNS 1) Giб»›i thiệu DNS (Domain Name System) lГ hệ thб»‘ng phГўn giбєЈi tГЄn miб»Ѓn Д‘Ж°б»Јc phГЎt minh vГ o nДѓm 1984 cho Internet, cho phГ©p thiбєїt lбєp tЖ°ЖЎng б»©ng giб»Їa Д‘б»‹a chỉ IP vГ tГЄn miб»Ѓn. 2) MГґ hГ¬nh sб» dụng 1 Server DNS dГ№ng Д‘б»ѓ phГўn giбєЈi tГЄn miб»Ѓn của 1 WebServer Chuбє©n bб»‹ hệ thб»‘ng: Server OS DNS Server (192.168.1.1) Centos 7.X WebServer (192.168.1.10) Centos 7.X client Win 7 or Win 8 (test) CГ i Д‘бє·t vГ cấu hГ¬nh DNS (192.168.1.1): BЖ°б»›c 1: Дђбє·t hostname cho Server DNS lГ : dns1.newstar.vn vГ restart lбєЎi Server #vi /etc/sysconfig/network HOSTNAME=dns1.newstar.vn #init 6
- 18. http://newstar.vn Trang 16 BЖ°б»›c 2: CГ i Д‘бє·t cГЎc gГіi bind* #yum install bind* BЖ°б»›c 3: Cấu hГ¬nh file named.conf #vi /etc/named.conf BЖ°б»›c 4: Cấu hГ¬nh cГЎc Zone cho DNS Server #vi /etc/named.rfc1912.zones (Xuб»‘ng cuб»‘i file cấu hГ¬nh zone phГўn giбєЈi thuбєn vГ phГўn giбєЈi nghб»‹ch) BЖ°б»›c 5: TбєЎo cГЎc file CSDL cho zone thuбєn vГ zone nghб»‹ch vб»«a khai bГЎo (copy file mбє«u tб»« chЖ°ЖЎng trГ¬nh cГ i Д‘бє·t vГ sб»a lбєЎi nб»™i dung cho phГ№ hб»Јp) #cp /var/named/named.localhost /var/named/newstar.vn.zone #cp /var/named/named.loopback /var/named/newstar.vn.rr.zone #vi /var/named/newstar.vn.zone
- 19. http://newstar.vn Trang 17 #vi /var/named/newstar.vn.rr.zone BЖ°б»›c 6: GГЎn quyб»Ѓn trГЄn 2 file zone vб»«a tбєЎo #cd /var/named/ #chown named:named newstar.vn.zone #chown named:named newstar.vn.rr.zone BЖ°б»›c 7: Restart dб»‹ch vụ named #service named restart #systemctl enable named CГ i Д‘бє·t Web Server (192.168.1.10) BЖ°б»›c 1: CГ i Д‘бє·t gГіi httpd #yum install httpd BЖ°б»›c 2: Chỉnh sб»a file httpd.conf #vi /etc/httpd/conf/httpd.conf (ThГЄm vГ o cuб»‘i file nб»™i dung sau) <VirtualHost *:80>
- 20. http://newstar.vn Trang 18 DocumentRoot /var/www/newstar ServerName newstar.vn ServerAlias www.newstar.vn </VirtualHost> BЖ°б»›c 3: TбєЎo file index.htm cГі nб»™i dung tГ№y ГЅ trong /var/www/newstar BЖ°б»›c 4: Restart dб»‹ch vụ # service httpd restart BЖ°б»›c 5: Trб»Џ DNS vб»Ѓ ip Server DNS #vi /etc/resolv.conf nameserver 192.168.1.1 TEST DNS trГЄn mГЎy Client VГ o terminal #nslookup newstar.vn #nslookup dns1.newstar.vn Truy cбєp web newstar.vn
- 21. http://newstar.vn Trang 19 B-Mô hình sỠdụng 2 Server DNS (primary secondary)  DNS Primary (192.168.1.1)  DNS Secondary (192.168.1.2)  Web Server (192.168.1.10) Cà i đặt gói bind cho 2 máy Primary và secondary: Cà i từ Internet: #yum install bind* Cấu hình cho DNS cho primary: Bước 1: Xem nội dung file named.conf #vi /etc/named.conf Bước 2: thêm nội dung và o file named.rfc1912.zones #vi /etc/named.rfc1912.zones Thêm và o cuối file zone "newstar.vn" IN { type master; file "newstar.vn.zone"; allow-transfer {192.168.1.2;}; allow-update {192.168.1.2;}; allow-query {any;}; }; zone "1.168.192.in-addr.arpa" IN { type master; file "newstar.vn.rr.zone"; allow-transfer {192.168.1.2;}; allow-update {192.168.1.2;}; allow-query {any;}; };
- 22. http://newstar.vn Trang 20 BЖ°б»›c 3: Copy vГ dб»•i tГЄn 2 file sau: #cp /var/named/named.localhost /var/named/newstar.vn.zone #cp /var/named/named.loopback /var/named/newstar.vn.rr.zone BЖ°б»›c 4: Chỉnh sб»a file cấu hГ¬nh cho file phГўn giбєЈi thuбєn newstar.vn.zone #vi /var/named/newstar.vn.zone (NS dГ№ng Д‘б»ѓ khai bГЎo mГЎy chủ DNS của 1 tГЄn miб»Ѓn) (A: ГЎnh xбєЎ tГЄn host vГ o 1 ip) $TTL 1D @ IN SOA dns1.newstar.vn. root.newstar.vn. ( 0 ; serial 1D ; refresh 1H ; retry 1W ; expire 3H ) ; minimum IN NS dns1.newstar.com. IN NS dns2.newstar.com. newstar.vn. IN A 192.168.1.10 www IN CNAME newstar.vn dns1 IN A 192.168.1.1 dns2 IN A 192.168.1.2 BЖ°б»›c 5: Cấu hГ¬nh file phГўn giбєЈi nghб»‹ch # vi /var/named/newstar.vn.rr.zone $TTL 1D @ IN SOA dns1.newstar.vn. root.newstar.vn. ( 0 ; serial 1D ; refresh 1H ; retry 1W ; expire
- 23. http://newstar.vn Trang 21 3H ) ; minimum IN NS dns1.newstar.vn. IN NS dns2. newstar.vn. 1 IN PTR dns1. newstar.vn. 2 IN PTR dns2. newstar.vn. 10 IN PTR newstar.vn. BЖ°б»›c 6: Khб»џi Д‘б»™ng dб»‹ch vụ named khi boot Server # chkconfig named on BЖ°б»›c 7: gГЎn nhГіm sб»џ hб»Їu cho user named vГ o cГЎc file vб»«a tбєЎo #chgrp named newstar* BЖ°б»›c 8: Khб»џi Д‘б»™ng deamon named cho quГЎ trГ¬nh lГ m việc #/etc/init.d/named start BЖ°б»›c 9: Cấu hГ¬nh file phГўn giбєЈi domain #vi /etc/resolv.conf (thГЄm vГ o dГІng sau) nameserver 192.168.1.1 BЖ°б»›c 10: Kiб»ѓm tra phГўn giбєЈi DNS #nslookup newstar.vn Cấu hГ¬nh Secondary DNS Server Khai bГЎo zone thuбєn vГ zone nghб»‹ch tб»« dns1.newstar.vn BЖ°б»›c 1: cấu hГ¬nh file dns #vi /etc/named.rfc1912.zones (ThГЄm vГ o cuб»‘i file dГІng sau) zone "newstar.vn" IN { type slave; file "slaves/newstar.vn.zone.bk"; masters {192.168.1.1;}; };
- 24. http://newstar.vn Trang 22 zone "1.168.192.in-addr.arpa" IN { type slave; file "slaves/newstar.vn.rr.zone.bk"; masters {192.168.1.1;}; }; BЖ°б»›c 2: Kiб»ѓm tra lбєЎi #ls –l /var/named/slaves/ BЖ°б»›c 3: Restart dich vụ # /etc/init.d/named restart BЖ°б»›c 4:Kiб»ѓm tra lбєЎi nб»™i dung thЖ° mục slaves #ls -l /var/named/slaves/ BЖ°б»›c 5: Xem nГґi dung zone thuбєn transfer tб»« master dns #vi /var/named/slaves/ newstar.vn.zone.bk BЖ°б»›c 6: Cấu hГ¬nh nameserver # vi /etc/resolv.conf (ThГЄm vГ o) nameserver 192.168.1.1 nameserver 192.168.1.2 BЖ°б»›c 7: Thб»±c hiện kiб»ѓm tra dns # nslookup newstar.vn BЖ°б»›c 8: tбєЇt mГЎy dns1 vГ thб»±c hiện kiб»ѓm tra lбєЎi dns (nslookup)
- 25. http://newstar.vn Trang 23 ChЖ°ЖЎng 20: MAIL SERVER (Postfix, Dovecot and SquirrelMail) 1) Giб»›i thiệu Mail server cho phГ©p user gб»i nhбєn thЖ° Д‘iện tб». Mail server sбєЅ quбєЈn lГЅ toГ n bб»™ cГЎc tГ i khoбєЈn email trong hệ thб»‘ng nб»™i bб»™. 2) CГ i Д‘бє·t BЖ°б»›c 1: Дђбє·t hostname cho Server Mail lГ : mail.newstar.vn #nmtui Update repository #yum install epel-release BЖ°б»›c 2: CГ i Д‘бє·t gГіi postfix #yum install postfix BЖ°б»›c 3: cấu hГ¬nh file postfix # vi /etc/postfix/main.cf (dГІng 76) myhostname = mail.newstar.vn (dГІng83 ) mydomain = newstar.vn (dГІng 99) myorigin = $mydomain (dГІng 113) inet_interfaces = all (dГІng 119) inet_protocols = all (dГІng 164 – comment) #mydestination = $myhostname, localhost.$mydomain, localhost (dГІng 165 - uncomment)
- 26. http://newstar.vn Trang 24 mydestination = $myhostname, localhost.$mydomain, localhost, newstar.vn (dòng 264) mynetworks = 168.100.189.0/28, 127.0.0.0/8, 0.0.0.0/0 (dòng 419 – bỏ dấu #) home_mailbox = Maildir/ Bước 4: start dịch vụ postfix #systemctl enable postfix #systemctl restart postfix Bước 5: Test postfix Bước 6: Cà i đặt gói dovecot # yum install dovecot Bước 7: cấu hình dovecot #vi /etc/dovecot/dovecot.conf (dòng 24) protocols = imap pop3 lmtp # vi /etc/dovecot/conf.d/10-mail.conf (dòng 24 – bỏ dấu #) mail_location = maildir:~/Maildir #vi /etc/dovecot/conf.d/10-auth.conf (dòng 10) disable_plaintext_auth = yes (dòng 100) auth_mechanisms = plain login # vi /etc/dovecot/conf.d/10-master.conf (dòng 91,92) user = postfix group = postfix
- 27. http://newstar.vn Trang 25 BЖ°б»›c 8: Start dб»‹ch vụ dovecot # systemctl restart dovecot # systemctl enable dovecot BЖ°б»›c 9: install squirrelmail # yum install squirrelmail # service httpd start #chkconfig httpd on BЖ°б»›c 10: cấu hГ¬nh Squirrelmail # cd /usr/share/squirrelmail/config/ ./conf.pl Chб»Ќn 1 Thiбєїt lбєp cГЎc thГґng sб»‘
- 28. http://newstar.vn Trang 26 Sau khi thiбєїt lбєp xong –chб»Ќn R Д‘б»ѓ quay lбєЎi menu Chб»Ќn 2 – thiбєїt lбєp cГЎc thГґng sб»‘ Chб»Ќn S Д‘б»ѓ lЖ°u Chб»Ќn Q Д‘б»ѓ thoГЎt BЖ°б»›c 11: cấu hГ¬nh http cho mail server #vi /etc/httpd/conf/httpd.conf (ThГЄm vГ o cuб»‘i file nб»™i dung sau)
- 29. http://newstar.vn Trang 27 Alias /squirrelmail /usr/share/squirrelmail <Directory /usr/share/squirrelmail> Options Indexes FollowSymLinks RewriteEngine On AllowOverride All DirectoryIndex index.php Order allow,deny Allow from all </Directory> Bước 12: Restart dịch vụ http # service httpd restart 3) Cấu hình DNS cho Mail Server a. File forward.zone b. File reverse.zone
- 30. http://newstar.vn Trang 28 ChЖ°ЖЎng 21: SQUID PROXY 1) Giб»›i thiệu: Squid lГ mб»™t proxy server, khбєЈ nДѓng của squid lГ tiбєїt kiệm bДѓng thГґng (bandwidth), cбєЈi tiбєїn việc bбєЈo mбєt, tДѓng tб»‘c Д‘б»™ truy cбєp web cho ngЖ°б»ќi sб» dụng. 2) MГґ hГ¬nh 3) Chuбє©n bб»‹ hệ thб»‘ng LoбєЎi OS Ghi chГє Squid Proxy Server Centos 6.x 2 card mбєЎng. Kбєїt nб»‘i Д‘Ж°б»Јc internet eth0: dhcp eth1: 192.168.1.1 Client XP or Centos 192.168.1.5,20 4) CГ i Д‘бє·t vГ cấu hГ¬nh Proxy Server BЖ°б»›c 1: CГ i Д‘бє·t Squid tб»« internet #yum install squid BЖ°б»›c 2: File cấu hГ¬nh #vi /etc/squid/squid.conf (Mбє·c Д‘б»‹nh Squid Proxy cho phГ©p tất cбєЈ cГЎc host trong LAN truy cбєp internet.) Start squid #services squid start
- 31. http://newstar.vn Trang 29 BЖ°б»›c 3: Cấu hГ¬nh phГa client. TrГЄn client ta cấu hГ¬nh proxy nhЖ° sau: Mб»џ IE, chб»Ќn Tools в†’ Internet Opitions, tб»« tab Connections chб»Ќn LAN Settings… ThГґng sб»‘ trong file squid.conf п‚· http_port 3128: Squid lбєЇng nghe trГЄn port 3128 YГЄu cбє§u: 1) Thay Д‘б»•i port squid lбєЇng nghe lГ 8080 2) IP của sбєїp CNTT: 192.168.1.2 - ДђЖ°б»Јc phГ©p truy cбєp vГ o tất cбєЈ cГЎc trang web ngoбєЎi trб»« trang nghe nhбєЎc, xem phim trong thб»ќi gian lГ m việc (sГЎng tб»« 8h:12h ; buб»•i chiб»Ѓu tб»« 13h:17h30 tб»« thб»© 2 -> thб»© 6). Thб»ќi gian nghỉ trЖ°a Д‘Ж°б»Јc phГ©p truy cбєp tất cбєЈ. - Cho phГ©p sб»‘ kбєїt nб»‘i tб»‘i Д‘a lГ 10 - Dung lЖ°б»Јng download tб»‘i Д‘a 30M - Dung lЖ°б»Јng upload tб»‘i Д‘a 30kb 3) IP phГІng CNTT 192.168.1.10-100 - Chỉ Д‘Ж°б»Јc truy cбєp vГ o cГЎc trang web: newstar.vn. dantri.com, 24h.com.vn. - Thб»ќi gian truy cбєp buб»“i sГЎng tб»« 8h:12h ; buб»•i chiб»Ѓu tб»« 13h:17h30. - Thб»ќi gian nghỉ trЖ°a cho phГ©p thГЄm quyб»Ѓn vГ o trang chiasenhac.com Д‘б»ѓ giбєЈi trГ
- 32. http://newstar.vn Trang 30 - Trong thб»ќi gian lГ m việc nбєїu truy cбєp vГ o cГЎc trang nghe nhбєЎc (chiasenhac.com; nhacso.net) thГ¬ tб»± Д‘б»™ng redirect Д‘бєїn website newstar.vn Thб»±c hiện cấu hГ¬nh: 1) #vi /etc/squid/squid.conf http_port 8080 #squid –k reconf Thay Д‘б»•i port trГЄn trГ¬nh duyệt web proxy setting của client vГ truy cбєp lбєЎi internet Tб»« yГЄu cбє§u 2 vГ 3: thб»±c hiện viбєїt cГЎc access-list sau: #cГЎc acl Д‘б»‹nh nghД©a cГЎc website cГі keyword trГЄn url acl deny-nhac dstdom_regex "/etc/squid/web/denynhac.txt" #cГЎc acl Д‘б»‹nh nghД©a cГЎc dбєЎng file acl deny-file-video-nhac url_regex -i /.mp3$/ .mp4$ /.avi$ /.flv$ /.wmv$/ .mp4$ #Д‘б»‹nh cГЎc acl vГ action cấm xem cГЎc video acl deny_rep_mime_flashvideo rep_mime_type video/flv acl deny_rep_mime_shockwave rep_mime_type ^application/x-shockwave-flash$ http_reply_access deny deny_rep_mime_flashvideo http_reply_access deny deny_rep_mime_shockwave #Acl Д‘б»‹nh nghД©a cГЎc trang Д‘Ж°б»Јc phГ©p truy cбєp acl allow-web-CNTT dstdomain "/etc/squid/web/webcntt.txt” #ACL cho phГ©p vГ o trang chia se nhac acl allow-mp3-cntt dstdomain “etc/squid/web/giaitricntt.txt” #ACL thiбєїt lбєp thб»ќi gian lГ m việc acl time-lam-viec time M T W H F 08:00-11:59 acl time-lam-viec-chieu time M T W H F 13:00-17:30
- 33. http://newstar.vn Trang 31 #ACL thiбєїt lбєp thб»ќi gian nghỉ trЖ°a acl time-nghi-trua time M T W H F 12:00-12:59 #ACL cho phГ©p sб»‘ kбєїt nб»‘i tб»‘i Д‘a lГ 10 acl sep-max maxconn 10 #ACL Д‘б»‹nh nghД©a IP của Sбєїp phГІng CNTT acl ip-sep src "/etc/squid/danhsachip/ip-sep.txt" #ACL Д‘б»‹nh nghД©a IP phГІng CNTT acl ip-cntt src "/etc/squid/danhsachip/ip-cntt.txt" #Thб»±c hiện yГЄu cбє§u quбєЈn lГЅ truy cбєp #ChГnh sГЎch cho sбєїp http_access deny ip-sep time-lam-viec deny-nhac http_access deny ip-sep time-lam-viec deny-file-video-nhac http_access deny ip-sep time-lam-viec-chieu deny-nhac http_access deny ip-sep time-lam-viec-chieu deny-file-video-nhac http_access deny ip-sep sep-max reply_body_max_size 30 MB ip-sep request_body_max_size 30 kb ip-sep http_access allow ip-sep #chГnh sГЎch cho phГІng CNTT http_access allow ip-cntt time-nghi-trua allow-giaitri-cntt http_access deny deny-nhac http_access deny deny-file-video-nhac http_access deny ip-cntt !allow-web-cntt http_access allow ip-cntt
- 34. http://newstar.vn Trang 32 #cấu hГ¬nh redirect deny_info http://newstar.vn deny-nhac http_access deny all #cấu hГ¬nh cache theo RAM vГ theo HDD; #Cache RAM chiбєїm 32 MB; #Cache Д‘Д©a sб» dụng Д‘б»‹nh lЖ°u trб»Ї theo kiб»ѓu ufs chiбєїm 512 MB vб»›i 16 thЖ° mục cấp 1 #vГ 256 thЖ° mục cho mб»—i thЖ° mục cấp 1 Д‘Гі. cache_dir ufs /var/spool/squid 100 16 256 cache_mem 50 MB #Thuбєt toГЎn cache Д‘Д©a lГ heap LFUDA (Least Frequently Used with Dynamic Aging). #Thuбєt toГЎn cache ram lГ heap GDSF (Greedy-Dual Size Frequency) cache_replacement_policy heap LFUDA memory_replacement_policy heap GDSF Nб»™i dung cГЎc file .txt Д‘ГЈ Д‘б»‹nh nghД©a trong squid.conf TГЄn file Nб»™i dung denynhac.txt nhac music mp3 giaitricntt.txt .chiasenhac.com webcntt.txt .newstar.vn .24h.com.vn .dantri.com.vn ip-cntt.txt 192.168.1.0/24 ip-sep.txt 192.168.1.5
- 35. http://newstar.vn Trang 33 ChЖ°ЖЎng 22: APACHE WEB SERVER 1) MГґ hГ¬nh triб»ѓn khai 2) CГ i Д‘бє·t BЖ°б»›c 1: cГ i Д‘бє·t cГЎc gГіi httpd #yum install httpd BЖ°б»›c 2: Khб»џi Д‘б»™ng dб»‹ch vụ #systemctl start httpd #chkconfig httpd on BЖ°б»›c 3: Kiб»ѓm tra apache Truy cбєp http://192.168.1.7 Thay Д‘б»•i trang mбє·c Д‘б»‹nh của apache BЖ°б»›c 4: download template website vГ copy vГ o thЖ° mục /var/www/html
- 36. http://newstar.vn Trang 34 BЖ°б»›c 5: Truy cбєp http://192.168.1.7
- 37. http://newstar.vn Trang 35 ChЖ°ЖЎng 23: IPTABLES 1) Giб»›i thiệu IPTABLES lГ hệ thб»‘ng firewall tiГЄu chuбє©n Д‘Ж°б»Јc tГch hб»Јp trong hбє§u hбєїt hệ Д‘iб»Ѓu hГ nh Linux. IPTABLES theo dГµi luб»“ng dб»Ї liệu vГ o ra cГЎc interface, lб»Ќc gГіi dб»±a vГ o cГЎc thГґng tin của header tбєЎi cГЎc tбє§ng của Data link, Network, Transport của mГґ hГ¬nh OSI Cấu trГєc Iptables gб»“m 3 Table, mб»—i table cГі cГЎc Chain, mб»—i chain chб»©a cГЎc Rule do ngЖ°б»ќi quбєЈn trб»‹ cấu hГ¬nh
- 38. http://newstar.vn Trang 36 пѓј FILTER TABLE: dГ№ng Д‘б»ѓ lб»Ќc cГЎc gГіi tin, gб»“m cГЎc chain - INPUT: lб»Ќc nhб»Їng gГіi tin Д‘i vГ o hệ thб»‘ng - OUTPUT: lб»Ќc nhб»Їng gГіi tin Д‘i ra tб»« hệ thб»‘ng - FORWARD: Lб»Ќc gГіi dб»Ї liệu Д‘i Д‘бєїn cГЎc server khГЎc kбєїt nб»‘i trГЄn cГЎc NIC khГЎc của firewall пѓј NAT: sб»a Д‘б»‹a chỉ gГіi tin gб»“m cГЎc chain - PRE-ROUTING: Sб»a Д‘б»‹a chỉ Д‘Гch của gГіi tin trЖ°б»›c khi Д‘б»‹nh tuyбєїn - POST-ROUTING:Sб»a Д‘б»‹a chỉ nguб»“n của gГіi tin sau khi gГіi tin Д‘ГЈ Д‘Ж°б»Јc Д‘б»‹nh tuyбєїn - OUTPUT: NAT Д‘б»‹a chỉ local Д‘б»ѓ Д‘i ra ngoГ i. пѓј MANGLE: dГ№ng Д‘б»ѓ chỉnh sб»a QOS bit trong phбє§n TCP Header của gГіi tin Gб»“m cГЎc chain: PREROUTING, OUTPUT, FORWARD, INPUT, POSTROUTING. Cấu trГєc tб»•ng quГЎt của rule iptables [-t <table-name>] <command><chain-name> <parameter-1><option-1> <parameter-n><option-n> Trong Д‘Гі: Iptables: lГ tб»« khГіa bбєЇt buб»™c phбєЈi cГі. -t: lГ tГ№y chб»Ќn Д‘б»ѓ chб»Ќn tГЄn table sб» dụng, thЖ°б»ќng kбєїt hб»Јp vб»›i <table-name>
- 39. http://newstar.vn Trang 37 Nбєїu khГґng dГ№ng tГ№y chб»Ќn –t thГ¬ mбє·c Д‘б»‹nh iptables sбєЅ sб» dụng Filter table <command>: -A Nб»‘i 1 rule vГ o chain -D XГіa 1 rule ra khб»Џi chain -I ChГЁn 1 rule vГ o chain -R Thay thбєї rule -L Xem cГЎc rule Д‘ГЈ Д‘Ж°б»Јc load -N TбєЎo mб»™t chain mб»›i -X XГіa 1 chain -E Дђб»•i tГЄn chain <chain-name>: lб»±a chб»Ќn cГЎc chain tЖ°ЖЎng б»©ng vб»›i cГЎc table <Parameters>: PARAMETERS MГґ tбєЈ -p Protocol (tcp, udp, icmp -s Source address [/mask] -d Destination address [/mask] -i TГЄn interface mГ packet nhбєn vГ o -o TГЄn interface mГ packet sбєЅ gб»i ra
- 40. http://newstar.vn Trang 38 -j Chuyб»ѓn packet Д‘бєїn target khi thб»Џa Д‘iб»Ѓu kiện của rule Target cГі sбєµn: - ACCEPT: iptables chấp nhбєn chuyб»ѓn data Д‘бєїn Д‘Гch. - DROP: iptables khГіa nhб»Їng packet. - LOG: thГґng tin của packet sбєЅ gб»џi vГ o syslog - REJECT: ngДѓn chбє·n packet vГ gб»џi thГґng bГЎo cho sender - DNAT: thay Д‘б»•i Д‘б»‹a chỉ Д‘Гch (--to-destination) - SNAT: Thay Д‘б»•i Д‘б»‹a chỉ source (--to-source) <Options (match)> parameters Match options MГґ tбєЈ -p tcp --dport Thiбєїt lбєp destination port --sport Thiбєїt lбєp source port --syn GГіi TCP vб»›i cб»ќ SYN bбєt lГЄn --tcp-flags thiбєїt lбєp flags (SYN,ACK,FIN,RST) -p udp --dport --sport -p icmp -- icmp-type Thiбєїt lбєp loбєЎi icmp (echo-request, echo-reply, …) #iptable –p icmp –h (Д‘б»ѓ xem thГЄm)
- 41. http://newstar.vn Trang 39 -m multiport --sport <port, port> --dport <port,port> Lб»±a chб»Ќn nhiб»Ѓu port 2) MГґ hГ¬nh 3) YГЄu cбє§u vГ cấu hГ¬nh - Cho phГ©p tất cбєЈ client truy cбєp Д‘бєїn Server thГґng qua port 80 #iptables –A FORWARD –i eth0 –d 172.16.1.10 –dport 80 –j ACCEPT - Chỉ phГ©p PC 192.168.1.2 telnet Д‘бєїn Web Server #iptables –I FORWARD –I eth0 –s 192.168.1.2 –d 172.16.1.10 –dport 23 –j ACCEPT