際際滷

際際滷Share a Scribd company logo
Unica Campaign SOP
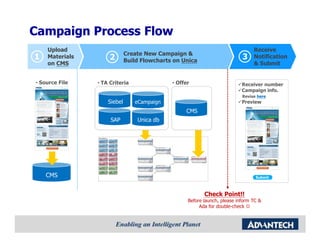
Campaign Process Flow
    Upload                                                                      Receive
                             Create New Campaign &
1   Materials        2       Build Flowcharts on Unica
                                                                           3    Notification
    on CMS                                                                      & Submit


 Source File    TA Criteria                 Offer                       Receiver number
                                                                           Campaign info.
                                                                           Revise here
                    Siebel      eCampaign                                  Preview
                                                  CMS
                     SAP         Unica db


    CMS                                                                          Submit


                                                          Check Point!!
                                                   Before launch, please inform TC &
                                                        Ada for double-check
Create New Campaign
      on Unica
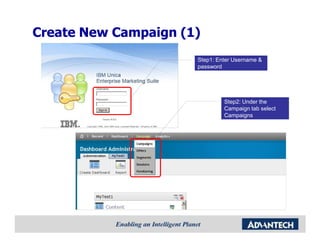
Create New Campaign (1)
                      Step1: Enter Username &
                      password


                               Step2: Under the
                               Campaign tab select
                               Campaigns
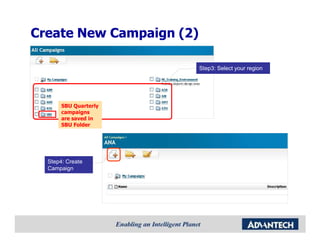
Create New Campaign (2)

                          Step3: Select your region


       SBU Quarterly
       campaigns
       are saved in
       SBU Folder


  Step4: Create
  Campaign
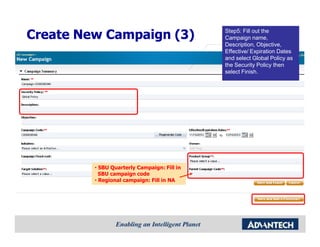
Step5: Fill out the
Create New Campaign (3)                      Campaign name,
                                             Description, Objective,
                                             Effective/ Expiration Dates
                                             and select Global Policy as
                                             the Security Policy then
                                             select Finish.


          SBU Quarterly Campaign: Fill in
           SBU campaign code
          Regional campaign: Fill in NA
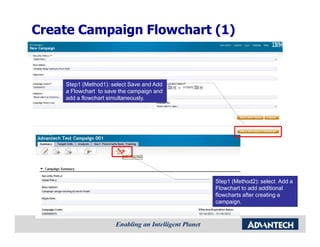
Create Campaign Flowchart (1)


    Step1 (Method1): select Save and Add
    a Flowchart to save the campaign and
    add a flowchart simultaneously.


                                           Step1 (Method2): select Add a
                                           Flowchart to add additional
                                           flowcharts after creating a
                                           campaign.
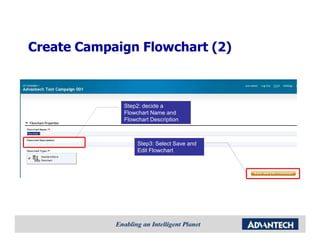
Create Campaign Flowchart (2)


             Step2: decide a
             Flowchart Name and
             Flowchart Description


                  Step3: Select Save and
                  Edit Flowchart
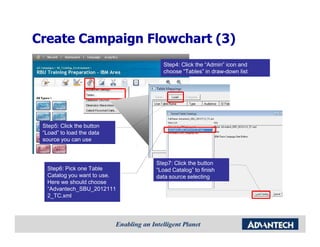
Create Campaign Flowchart (3)
                               Step4: Click the Admin icon and
                               choose Tables in draw-down list


 Step5: Click the button
 Load to load the data
 source you can use


                             Step7: Click the button
  Step6: Pick one Table      Load Catalog to finish
  Catalog you want to use.   data source selecting
  Here we should choose
  Advantech_SBU_2012111
  2_TC.xml
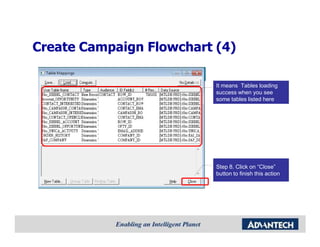
Create Campaign Flowchart (4)

                          It means Tables loading
                          success when you see
                          some tables listed here


                          Step 8. Click on Close
                          button to finish this action
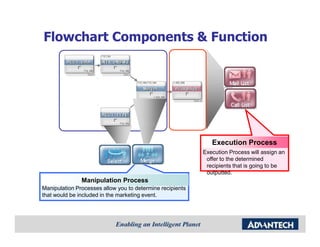
Flowchart Components & Function


                                                              Execution Process
                                                           Execution Process will assign an
                                                            offer to the determined
                                                            recipients that is going to be
                                                            outputted.
               Manipulation Process
Manipulation Processes allow you to determine recipients
that would be included in the marketing event.
Build Campaign Flowchart
     on Unica: TA Criteria

 Method 1: Define TA criteria by Select Process
 Method 2 : Pick up your TA criteria by Flowchart Template

 Combine your TA criteria by Merge Process
RBU can define campaign TA by the
following methods :
 Method 1 : Define TA using Select Process
    Use the Select Process to define a TA from scratch.

 Method 2 : Define TA with tailored criteria using Flowchart
 Template
 Template
    Use predefined flowchart template to define TA. Additional rules
     can be applied or removed for each processes within the
     flowchart to output a tailored recipient list. For example
     additional rules such as specifying the recipient with a certain
     account balance amount, account type or from a certain a
     regionetc
Method 1     Method 2


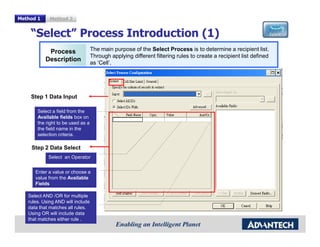
    Select Process Introduction (1)
            Process                The main purpose of the Select Process is to determine a recipient list.
                                   Through applying different filtering rules to create a recipient list defined
           Description
                                   as Cell.


    Step 1 Data Input

       Select a field from the
       Available fields box on
       the right to be used as a
       the field name in the
       selection criteria.

    Step 2 Data Select
            Select an Operator


      Enter a value or choose a
      value from the Available
      Fields

   Select AND /OR for multiple
   rules. Using AND will include
   data that matches all rules.
   Using OR will include data
   that matches either rule .
Method 1        Method 2


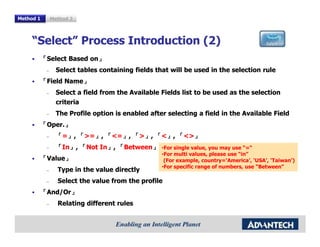
     Select Process Introduction (2)
           Select Based on
                         on
                 Select tables containing fields that will be used in the selection rule
           Field Name
                  Name
                 Select a field from the Available Fields list to be used as the selection
                  criteria
                 The Profile option is enabled after selecting a field in the Available Field
           Oper.
            Oper.
                 =, >=, <=, >, <, <>
                        >=   <=             <>
                 In, Not In, Between For single value, you may use =
                   In       In   Between
           Value
                                                    For multi values, please use in
            Value                                   (For example, country=America, USA, Taiwan)
                                                    For specific range of numbers, use Between
                 Type in the value directly
                 Select the value from the profile
           And/Or
            And/Or
                 Relating different rules
Method 1     Method 2


    Select Process  Profile function (1)
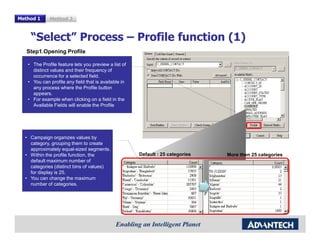
   Step1.Opening Profile

    The Profile feature lets you preview a list of
     distinct values and their frequency of
     occurrence for a selected field.
    You can profile any field that is available in
     any process where the Profile button
     appears.
    For example when clicking on a field in the
     Available Fields will enable the Profile


   Campaign organizes values by
    category, grouping them to create
    approximately equal-sized segments.
   Within the profile function, the                  Default : 25 categories   More then 25 categories
    default maximum number of
    categories (distinct bins of values)
    for display is 25.
   You can change the maximum
    number of categories.
Method 1       Method 2


    Select Process  Profile function (2)
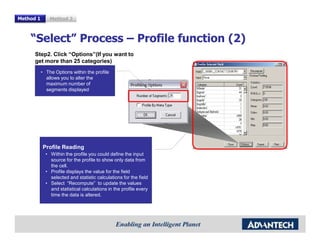
      Step2. Click Options(If you want to
      get more than 25 categories)
            The Options within the profile
             allows you to alter the
             maximum number of
             segments displayed


           Profile Reading
              Within the profile you could define the input
               source for the profile to show only data from
               the cell.
              Profile displays the value for the field
               selected and statistic calculations for the field
              Select Recompute to update the values
               and statistical calculations in the profile every
               time the data is altered.
Method 1     Method 2


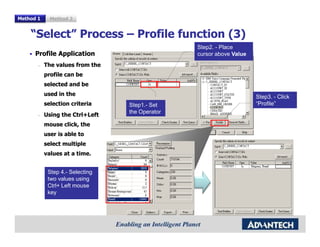
    Select Process  Profile function (3)
                                                Step2. - Place
      Profile Application                       cursor above Value
          The values from the
           profile can be
           selected and be
           used in the                                               Step3. - Click
           selection criteria    Step1.- Set                         Profile
                                 the Operator
          Using the Ctrl+Left
           mouse click, the
           user is able to
           select multiple
           values at a time.


            Step 4.- Selecting
            two values using
            Ctrl+ Left mouse
            key
Method 1   Method 2


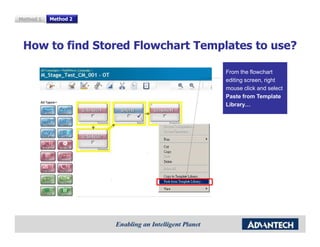
 How to find Stored Flowchart Templates to use?

                                   From the flowchart
                                   editing screen, right
                                   mouse click and select
                                   Paste from Template
                                   Library
Method 1    Method 2


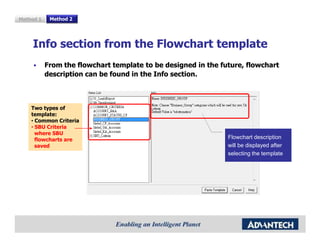
    Info section from the Flowchart template
           From the flowchart template to be designed in the future, flowchart
           description can be found in the Info section.


    Two types of
    template:
     Common Criteria
     SBU Criteria
      where SBU
      flowcharts are                                           Flowchart description
      saved                                                    will be displayed after
                                                               selecting the template
Method 1   Method 2


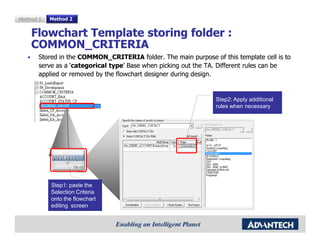
    Flowchart Template storing folder :
    COMMON_CRITERIA
       Stored in the COMMON_CRITERIA folder. The main purpose of this template cell is to
       serve as a categorical type Base when picking out the TA. Different rules can be
                  categorical type
       applied or removed by the flowchart designer during design.


                                                                Step2: Apply additional
                                                                rules when necessary


           Step1: paste the
           Selection Criteria
           onto the flowchart
           editing screen
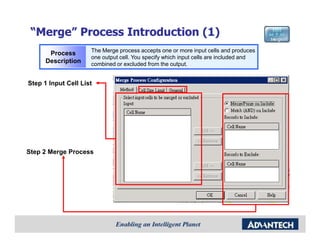
Merge Process Introduction (1)
                     The Merge process accepts one or more input cells and produces
       Process
                     one output cell. You specify which input cells are included and
      Description    combined or excluded from the output.


Step 1 Input Cell List


Step 2 Merge Process
Merge Process Introduction (2)
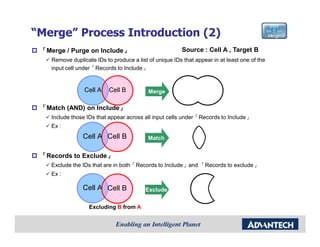
 Merge / Purge on Include                              Source : Cell A , Target B
    Remove duplicate IDs to produce a list of unique IDs that appear in at least one of the
    input cell underRecords to Include


                 Cell A    Cell B          Merge

 Match (AND) on Include
    Include those IDs that appear across all input cells underRecords to Include
    Ex :
                Cell A Cell B              Match


 Records to Exclude
    Exclude the IDs that are in bothRecords to Includeand Records to exclude
    Ex :

                Cell A Cell B             Exclude


                   Excluding B from A
Build Campaign Flowchart
      on Unica: Offer
Mail/Call List Process Introduction (1)
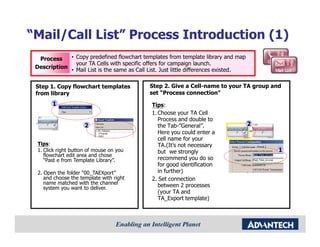
  Process     Copy predefined flowchart templates from template library and map
               your TA Cells with specific offers for campaign launch.
 Description
              Mail List is the same as Call List. Just little differences existed.

 Step 1. Copy flowchart templates            Step 2. Give a Cell-name to your TA group and
 from library                                set Process connection
        1                                     Tips:
                                              1. Choose your TA Cell
                                                 Process and double to
                      2                          the Tab-General.                   2
                                                 Here you could enter a
                                                 cell name for your
  Tips:                                          TA.(Its not necessary
  1. Click right button of mouse on you          but we strongly                          1
     flowchart edit area and chose
     Past e from Template Library.             recommend you do so
                                                 for good identification
  2. Open the folder 00_TAEXport               in further)
     and choose the template with right       2. Set connection
     name matched with the channel               between 2 processes
     system you want to deliver.
                                                 (your TA and
                                                 TA_Export template)
Mail/Call List Process Introduction (2)
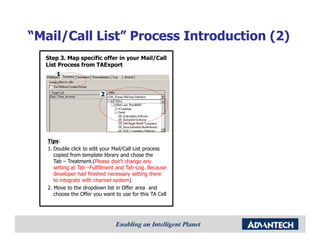
  Step 3. Map specific offer in your Mail/Call
  List Process from TAExport
      1


                          2


   Tips:
   1. Double click to edit your Mail/Call List process
      copied from template library and chose the
      Tab  Treatment.(Please dont change any
      setting at Tab Fulfillment and Tab-Log. Because
      developer had finished necessary setting there
      to integrate with channel system)
   2. Move to the dropdown list in Offer area and
      choose the Offer you want to use for this TA Cell

More Related Content

UNICA SOP (RBU)

  • 2. Campaign Process Flow Upload Receive Create New Campaign & 1 Materials 2 Build Flowcharts on Unica 3 Notification on CMS & Submit Source File TA Criteria Offer Receiver number Campaign info. Revise here Siebel eCampaign Preview CMS SAP Unica db CMS Submit Check Point!! Before launch, please inform TC & Ada for double-check
  • 4. Create New Campaign (1) Step1: Enter Username & password Step2: Under the Campaign tab select Campaigns
  • 5. Create New Campaign (2) Step3: Select your region SBU Quarterly campaigns are saved in SBU Folder Step4: Create Campaign
  • 6. Step5: Fill out the Create New Campaign (3) Campaign name, Description, Objective, Effective/ Expiration Dates and select Global Policy as the Security Policy then select Finish. SBU Quarterly Campaign: Fill in SBU campaign code Regional campaign: Fill in NA
  • 7. Create Campaign Flowchart (1) Step1 (Method1): select Save and Add a Flowchart to save the campaign and add a flowchart simultaneously. Step1 (Method2): select Add a Flowchart to add additional flowcharts after creating a campaign.
  • 8. Create Campaign Flowchart (2) Step2: decide a Flowchart Name and Flowchart Description Step3: Select Save and Edit Flowchart
  • 9. Create Campaign Flowchart (3) Step4: Click the Admin icon and choose Tables in draw-down list Step5: Click the button Load to load the data source you can use Step7: Click the button Step6: Pick one Table Load Catalog to finish Catalog you want to use. data source selecting Here we should choose Advantech_SBU_2012111 2_TC.xml
  • 10. Create Campaign Flowchart (4) It means Tables loading success when you see some tables listed here Step 8. Click on Close button to finish this action
  • 11. Flowchart Components & Function Execution Process Execution Process will assign an offer to the determined recipients that is going to be outputted. Manipulation Process Manipulation Processes allow you to determine recipients that would be included in the marketing event.
  • 12. Build Campaign Flowchart on Unica: TA Criteria Method 1: Define TA criteria by Select Process Method 2 : Pick up your TA criteria by Flowchart Template Combine your TA criteria by Merge Process
  • 13. RBU can define campaign TA by the following methods : Method 1 : Define TA using Select Process Use the Select Process to define a TA from scratch. Method 2 : Define TA with tailored criteria using Flowchart Template Template Use predefined flowchart template to define TA. Additional rules can be applied or removed for each processes within the flowchart to output a tailored recipient list. For example additional rules such as specifying the recipient with a certain account balance amount, account type or from a certain a regionetc
  • 14. Method 1 Method 2 Select Process Introduction (1) Process The main purpose of the Select Process is to determine a recipient list. Through applying different filtering rules to create a recipient list defined Description as Cell. Step 1 Data Input Select a field from the Available fields box on the right to be used as a the field name in the selection criteria. Step 2 Data Select Select an Operator Enter a value or choose a value from the Available Fields Select AND /OR for multiple rules. Using AND will include data that matches all rules. Using OR will include data that matches either rule .
  • 15. Method 1 Method 2 Select Process Introduction (2) Select Based on on Select tables containing fields that will be used in the selection rule Field Name Name Select a field from the Available Fields list to be used as the selection criteria The Profile option is enabled after selecting a field in the Available Field Oper. Oper. =, >=, <=, >, <, <> >= <= <> In, Not In, Between For single value, you may use = In In Between Value For multi values, please use in Value (For example, country=America, USA, Taiwan) For specific range of numbers, use Between Type in the value directly Select the value from the profile And/Or And/Or Relating different rules
  • 16. Method 1 Method 2 Select Process Profile function (1) Step1.Opening Profile The Profile feature lets you preview a list of distinct values and their frequency of occurrence for a selected field. You can profile any field that is available in any process where the Profile button appears. For example when clicking on a field in the Available Fields will enable the Profile Campaign organizes values by category, grouping them to create approximately equal-sized segments. Within the profile function, the Default : 25 categories More then 25 categories default maximum number of categories (distinct bins of values) for display is 25. You can change the maximum number of categories.
  • 17. Method 1 Method 2 Select Process Profile function (2) Step2. Click Options(If you want to get more than 25 categories) The Options within the profile allows you to alter the maximum number of segments displayed Profile Reading Within the profile you could define the input source for the profile to show only data from the cell. Profile displays the value for the field selected and statistic calculations for the field Select Recompute to update the values and statistical calculations in the profile every time the data is altered.
  • 18. Method 1 Method 2 Select Process Profile function (3) Step2. - Place Profile Application cursor above Value The values from the profile can be selected and be used in the Step3. - Click selection criteria Step1.- Set Profile the Operator Using the Ctrl+Left mouse click, the user is able to select multiple values at a time. Step 4.- Selecting two values using Ctrl+ Left mouse key
  • 19. Method 1 Method 2 How to find Stored Flowchart Templates to use? From the flowchart editing screen, right mouse click and select Paste from Template Library
  • 20. Method 1 Method 2 Info section from the Flowchart template From the flowchart template to be designed in the future, flowchart description can be found in the Info section. Two types of template: Common Criteria SBU Criteria where SBU flowcharts are Flowchart description saved will be displayed after selecting the template
  • 21. Method 1 Method 2 Flowchart Template storing folder : COMMON_CRITERIA Stored in the COMMON_CRITERIA folder. The main purpose of this template cell is to serve as a categorical type Base when picking out the TA. Different rules can be categorical type applied or removed by the flowchart designer during design. Step2: Apply additional rules when necessary Step1: paste the Selection Criteria onto the flowchart editing screen
  • 22. Merge Process Introduction (1) The Merge process accepts one or more input cells and produces Process one output cell. You specify which input cells are included and Description combined or excluded from the output. Step 1 Input Cell List Step 2 Merge Process
  • 23. Merge Process Introduction (2) Merge / Purge on Include Source : Cell A , Target B Remove duplicate IDs to produce a list of unique IDs that appear in at least one of the input cell underRecords to Include Cell A Cell B Merge Match (AND) on Include Include those IDs that appear across all input cells underRecords to Include Ex : Cell A Cell B Match Records to Exclude Exclude the IDs that are in bothRecords to Includeand Records to exclude Ex : Cell A Cell B Exclude Excluding B from A
  • 24. Build Campaign Flowchart on Unica: Offer
  • 25. Mail/Call List Process Introduction (1) Process Copy predefined flowchart templates from template library and map your TA Cells with specific offers for campaign launch. Description Mail List is the same as Call List. Just little differences existed. Step 1. Copy flowchart templates Step 2. Give a Cell-name to your TA group and from library set Process connection 1 Tips: 1. Choose your TA Cell Process and double to 2 the Tab-General. 2 Here you could enter a cell name for your Tips: TA.(Its not necessary 1. Click right button of mouse on you but we strongly 1 flowchart edit area and chose Past e from Template Library. recommend you do so for good identification 2. Open the folder 00_TAEXport in further) and choose the template with right 2. Set connection name matched with the channel between 2 processes system you want to deliver. (your TA and TA_Export template)
  • 26. Mail/Call List Process Introduction (2) Step 3. Map specific offer in your Mail/Call List Process from TAExport 1 2 Tips: 1. Double click to edit your Mail/Call List process copied from template library and chose the Tab Treatment.(Please dont change any setting at Tab Fulfillment and Tab-Log. Because developer had finished necessary setting there to integrate with channel system) 2. Move to the dropdown list in Offer area and choose the Offer you want to use for this TA Cell