際際滷

際際滷Share a Scribd company logo
ESAD304                                                                                                 Carly Peart
                                        Using Photography within Art

Although I did this project with a Year 4 class it could easily be achieved with any Key Stage 2 class.
Additionally, by working in smaller groups and with more TAs, it could also potentially be achieved with a KS1
class but may need to be done over several sessions.

This project was done over a two hour session, however alternatively you may want to break it down
over several sessions, spending time on:

      -     Looking at the artwork itself and deciding what theme to take from there
      -     Investigating cameras
      -     Taking the photos and uploading them
      -     Manipulating the images
      -     Working on the images further in their sketchbooks


However if time is limited, prior to this, you may just want to spend a session getting to know the software
(refer to Step 6) and how to manipulate the images so they are comfortable with this and its not new to them.

Resources

Resources required for this project:                        Access to computers
                                                            Printer (preferably colour)
Example of artists work (starting point)                    Sketchbooks
Examples of interesting photographs *                       Scissors
Digital cameras (preferably 1 between 2)                    Glue
Cables or card-readers to upload images                     Pencils


* Not essential

Step 1

Introduce artwork/image to be used as an initial starting point. I used an example of my own artwork;
however there are many other artists you may draw from.


Discuss what methods/materials/techniques may have gone in to creating this piece of art.

          How do you think we could replicate that, or do something similar?


                                                        1
ESAD304                                                                                                 Carly Peart
          What do you think their theme/starting point was?

          What makes the piece interesting to look at?

          How has the artist considered composition?

Step 2

Discuss with children about their understanding of cameras;

      Have they ever used a camera? If so, what sort of camera? (Digital, SLR, manual, disposable etc...

      Do they know the different types of camera? Maybe theyve seen some old cameras at museums, or
      even at home!

Handing out the digital cameras, go over basics of how to use them, showing them;

          How to turn on/off

          How to take a photo

          Hot to zoom in/out

Extension/Challenge: If working with Gifted and Talented, or wishing to challenge children, you may wish to
look more closely into some of the settings, e.g. fast shutter speed, portrait images, light sensitivity etc...
Discuss when and why you would need certain settings.

Step 3

Discuss what you will be photographing. We chose the theme of Our School so discussed what sort of images
we could take that would be visually interesting. Weather permitting, why not take the children outside and
make the most of the outdoors (risk assessment). Perhaps have some examples of what you want from them
composition wise.

Composition:

      Can we use zoom to make an object more visually interesting?
      Can we think about the position of an object to make it more interesting to look at?
      Do we have to photograph the whole object or could we select a smaller aspect?


Step 4

In pairs or small groups, send children out with Digital camera

Discuss boundaries/rules:

          Being responsible with the camera
          Taking turns
          Staying within the designate area as set by you
          Clear about how many photos you want them to take (I suggested 1 or 2 per person)
          Time limit; when do you want them back?


Perhaps designate your TA to work with a lower ability group or with a higher ability group to stretch them,
whilst you have overall supervision of the children.

                                                         2
ESAD304                                                                                                 Carly Peart
Step 5

Once they have taken their photos, the children will be eager to see them! So return to the classroom or ICT
suite (as appropriate), allowing the children to log on to the computers.

We then used cables (that come with the camera) or a card-reader to upload the photos off the camera onto
the computer. Where possible, encourage the children to do this process themselves to gain experience, many
of them may be competent at doing this, others however may not.

          Cable: Attach cable to computer and camera. Follow individual camera instructions. Otherwise turn
          camera on. The option to transfer the images should come up automatically, otherwise open the folder
          in My Computer, and copy and paste them into a class folder.

          Card-reader: Insert memory stick from camera into reader. Attach via USB port in computer. The option
          to transfer the images should come up automatically, otherwise open the folder in My Computer, and
          copy and paste them into a class folder.

If you can, try saving them in a general class folder as opposed to individual accounts (much easier to access!).

Step 6

Once images have been uploaded, demonstrate on the IWB where the children can access their images. Go
through these steps slowly to ensure all children are at the same stage.

Children should open up the software they are going to use. We used 2Simple; Photo Simple, but you may
have similar software. Basically youre using a photo manipulation package aimed at children, however you
may want to try using Photo Shop however this is a more advanced package.

Once software is open, open up the photo.


  Overview of 2Simple Software.


                                                                  Brief snapshot of 2Simple: Photo Simple.


Step 7


                                                        3
ESAD304                                                                                                    Carly Peart
Once the children have opened up their image, they can then start to manipulate it how they wish; e.g.
distorting the image, changing the colours, orientation, contrast, etc... Encourage them to play around with it
as they wish.

Step 8

The next few stages no longer involve the use of ICT so you may want to leave it there, and either print them
off or leave them on the school server. However, we chose to continue it into sketchbook work and expand it.

Print off images (preferably in colour if allowed).

      Thinking back to composition and the artwork we looked at initially, how could we change the
      composition of our photograph?

      How could we cut it up to change how it looks?

      Where can we add drawing to enhance the image? E.g. filling in the gaps between images, maybe
      adding colour, or crossing over bits of the image.

Try to have as little input as possible at this stage to encourage the children to be as creative and original as
possible; they will probably come up with plenty of ideas you hadnt even thought of!

Step 9  Assessment and Display

Once the children had all completed their work, they laid them out on the tables. Each child then went around
the classroom to observe all the different outcomes. Once everyone had had a chance to look at everyone
elses work we re-grouped as a class and had a discussion; teacher prompted questioning; however encourage
the children to ask each other questions about their work. Here are a few suggestions:

          Which piece did you particularly like? Why?

          Which image did you think was most powerful? How do you think they achieved that?

          Can you tell who had most experience with a camera? Why do you think this?

          How do you think you could have changed your own composition?

          How could we have done the process differently? Do you think using a different type of camera would
          have made a difference?

The children then recorded a few words about their own work in their sketchbooks alongside the final image
as a personal record of achievement/development.

You may then wish to display the work produced by colour-photocopying the images from the sketchbooks
and possibly displaying these alongside the original photos they produced to see the differences.


                                                         4

More Related Content

Using photography within art

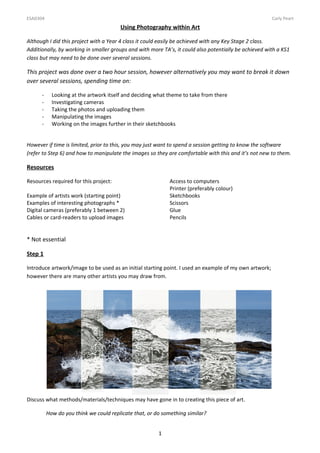
  • 1. ESAD304 Carly Peart Using Photography within Art Although I did this project with a Year 4 class it could easily be achieved with any Key Stage 2 class. Additionally, by working in smaller groups and with more TAs, it could also potentially be achieved with a KS1 class but may need to be done over several sessions. This project was done over a two hour session, however alternatively you may want to break it down over several sessions, spending time on: - Looking at the artwork itself and deciding what theme to take from there - Investigating cameras - Taking the photos and uploading them - Manipulating the images - Working on the images further in their sketchbooks However if time is limited, prior to this, you may just want to spend a session getting to know the software (refer to Step 6) and how to manipulate the images so they are comfortable with this and its not new to them. Resources Resources required for this project: Access to computers Printer (preferably colour) Example of artists work (starting point) Sketchbooks Examples of interesting photographs * Scissors Digital cameras (preferably 1 between 2) Glue Cables or card-readers to upload images Pencils * Not essential Step 1 Introduce artwork/image to be used as an initial starting point. I used an example of my own artwork; however there are many other artists you may draw from. Discuss what methods/materials/techniques may have gone in to creating this piece of art. How do you think we could replicate that, or do something similar? 1
  • 2. ESAD304 Carly Peart What do you think their theme/starting point was? What makes the piece interesting to look at? How has the artist considered composition? Step 2 Discuss with children about their understanding of cameras; Have they ever used a camera? If so, what sort of camera? (Digital, SLR, manual, disposable etc... Do they know the different types of camera? Maybe theyve seen some old cameras at museums, or even at home! Handing out the digital cameras, go over basics of how to use them, showing them; How to turn on/off How to take a photo Hot to zoom in/out Extension/Challenge: If working with Gifted and Talented, or wishing to challenge children, you may wish to look more closely into some of the settings, e.g. fast shutter speed, portrait images, light sensitivity etc... Discuss when and why you would need certain settings. Step 3 Discuss what you will be photographing. We chose the theme of Our School so discussed what sort of images we could take that would be visually interesting. Weather permitting, why not take the children outside and make the most of the outdoors (risk assessment). Perhaps have some examples of what you want from them composition wise. Composition: Can we use zoom to make an object more visually interesting? Can we think about the position of an object to make it more interesting to look at? Do we have to photograph the whole object or could we select a smaller aspect? Step 4 In pairs or small groups, send children out with Digital camera Discuss boundaries/rules: Being responsible with the camera Taking turns Staying within the designate area as set by you Clear about how many photos you want them to take (I suggested 1 or 2 per person) Time limit; when do you want them back? Perhaps designate your TA to work with a lower ability group or with a higher ability group to stretch them, whilst you have overall supervision of the children. 2
  • 3. ESAD304 Carly Peart Step 5 Once they have taken their photos, the children will be eager to see them! So return to the classroom or ICT suite (as appropriate), allowing the children to log on to the computers. We then used cables (that come with the camera) or a card-reader to upload the photos off the camera onto the computer. Where possible, encourage the children to do this process themselves to gain experience, many of them may be competent at doing this, others however may not. Cable: Attach cable to computer and camera. Follow individual camera instructions. Otherwise turn camera on. The option to transfer the images should come up automatically, otherwise open the folder in My Computer, and copy and paste them into a class folder. Card-reader: Insert memory stick from camera into reader. Attach via USB port in computer. The option to transfer the images should come up automatically, otherwise open the folder in My Computer, and copy and paste them into a class folder. If you can, try saving them in a general class folder as opposed to individual accounts (much easier to access!). Step 6 Once images have been uploaded, demonstrate on the IWB where the children can access their images. Go through these steps slowly to ensure all children are at the same stage. Children should open up the software they are going to use. We used 2Simple; Photo Simple, but you may have similar software. Basically youre using a photo manipulation package aimed at children, however you may want to try using Photo Shop however this is a more advanced package. Once software is open, open up the photo. Overview of 2Simple Software. Brief snapshot of 2Simple: Photo Simple. Step 7 3
  • 4. ESAD304 Carly Peart Once the children have opened up their image, they can then start to manipulate it how they wish; e.g. distorting the image, changing the colours, orientation, contrast, etc... Encourage them to play around with it as they wish. Step 8 The next few stages no longer involve the use of ICT so you may want to leave it there, and either print them off or leave them on the school server. However, we chose to continue it into sketchbook work and expand it. Print off images (preferably in colour if allowed). Thinking back to composition and the artwork we looked at initially, how could we change the composition of our photograph? How could we cut it up to change how it looks? Where can we add drawing to enhance the image? E.g. filling in the gaps between images, maybe adding colour, or crossing over bits of the image. Try to have as little input as possible at this stage to encourage the children to be as creative and original as possible; they will probably come up with plenty of ideas you hadnt even thought of! Step 9 Assessment and Display Once the children had all completed their work, they laid them out on the tables. Each child then went around the classroom to observe all the different outcomes. Once everyone had had a chance to look at everyone elses work we re-grouped as a class and had a discussion; teacher prompted questioning; however encourage the children to ask each other questions about their work. Here are a few suggestions: Which piece did you particularly like? Why? Which image did you think was most powerful? How do you think they achieved that? Can you tell who had most experience with a camera? Why do you think this? How do you think you could have changed your own composition? How could we have done the process differently? Do you think using a different type of camera would have made a difference? The children then recorded a few words about their own work in their sketchbooks alongside the final image as a personal record of achievement/development. You may then wish to display the work produced by colour-photocopying the images from the sketchbooks and possibly displaying these alongside the original photos they produced to see the differences. 4