Using Storica to record and experience life
- 1. @2013 TecVis LP Using Storica to experience your life
- 2. @2013 TecVis LP@2013 TecVis LP Starting up 1. Install Storica from Google Play 2. Start Storica 3. Follow instructions on screen to install the recording platform, AIRS Press Google Play button
- 3. @2013 TecVis LP Configure recording Install AIRS from Google Play Get back to Storica with your phone’s key the button!
- 4. @2013 TecVis LP Configure recording Press Settings button to auto-configure the recording Press Finish button to exit installation Recording shortcut added to home screen
- 5. @2013 TecVis LP Add AIRS widgets to screen Add free-text annotations to capture interesting moments during the day Select or input current mood Input your blood pressure
- 6. @2013 TecVis LP Recording Start recording Check recording through the drop- off window Add your own data using the AIRS widgets
- 7. @2013 TecVis LP Stop Recording Press Exit to stop AIRS (under options for the drop-off window) OR Go into the AIRS app to stop it
- 8. @2013 TecVis LP Start Storica Select a day in the calendar OR Explore data recorded over a month
- 9. @2013 TecVis LP The Day View Choose from Story View Photo View Map View Detailed View Annotate your recordings with text or audio
- 10. @2013 TecVis LP The Story View Personalised story background (see section on customising Storica) Move between story events created based on certain triggers Click icons for more information Prev/Next Play
- 11. @2013 TecVis LP The Photo View Captures a richer context around the photos you take: see your location, mood, environmental conditions and more... Click icons for more information @ 2013 TecVis LP
- 12. @2013 TecVis LP The Map View Map-based view of your recordings See story events on a map Press Play button for 3D fly-over of your track @ 2013 TecVis LP
- 13. @2013 TecVis LP Exploring location markers Press special marker for more info Press icons for more contextual information Press marker again for address
- 14. @2013 TecVis LP The Detailed View See detailed visualisations of various recorded data Zoom in/out Define own time range
- 15. @2013 TecVis LP The Month View Open Month View and explore your recorded data through the provided visualisations OR Interrogate recorded data through building your own queries
- 16. @2013 TecVis LP Customising Storica Open Settings with Options key Define personal settings about you Define your own units Change colours Define your own location markers Customise the various views
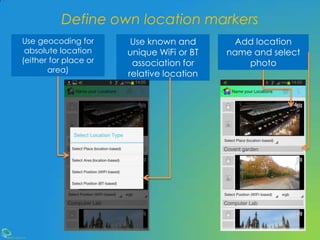
- 17. @2013 TecVis LP Define own location markers Use geocoding for absolute location (either for place or area) Use known and unique WiFi or BT association for relative location Add location name and select photo
- 18. @2013 TecVis LP Sharing from Storica Share any part of Storica (story, map, photo or timelines) on your favourite social network, via email or to other devices! @ 2013 TecVis LP
- 19. @2013 TecVis LP Enjoy Storica! Have anything to say? Find us at contact@tecvis.co.uk


