ºÝºÝߣ

ºÝºÝߣShare a Scribd company logo
Creating good quality, widescreen, HD (720p) sized video from your VIDEO4 footage.


Essentially what we do is crop the source video from the Video4, stretch it slightly and re-encode to 1280x720 which is HD
dimensions. Note that the video is not HD quality but when submitting a 720p dimensioned video to Youtube (and maybe
other hosting sites) it is treated as such and gets processed by a higher quality encoder.

Initial Video Capture & Preparation

If we are going to end up with a widescreen video our video must be capable of being cropped top & bottom so a suitable
layout must be created.

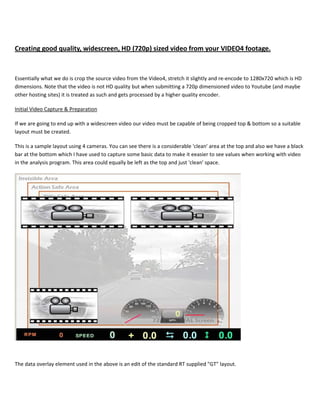
This is a sample layout using 4 cameras. You can see there is a considerable 'clean' area at the top and also we have a black
bar at the bottom which I have used to capture some basic data to make it eeasier to see values when working with video
in the analysis program. This area could equally be left as the top and just 'clean' space.


The data overlay element used in the above is an edit of the standard RT supplied "GT" layout.
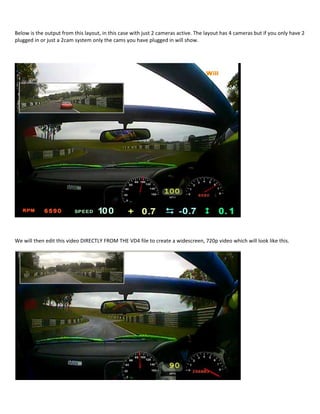
Below is the output from this layout, in this case with just 2 cameras active. The layout has 4 cameras but if you only have 2
plugged in or just a 2cam system only the cams you have plugged in will show.


We will then edit this video DIRECTLY FROM THE VD4 file to create a widescreen, 720p video which will look like this.
PROCESS INVOLVED

Software Required

1) VirtualDub - http://www.driver-coaching.com/files/VirtualDub.zip

2) Xvid Codec (if required) - http://www.xvid.org/Downloads.15.0.html

Install VirtualDub in it's own folder on your HDD (or you can run it from a USB drive) - The sample script uses XVid as the
output format which is very widely supported, many systems will already have this installed, if not follow the link above to
download and install OR you can use a different output codec by selecting it in Video->Compression

STEPS REQUIRED

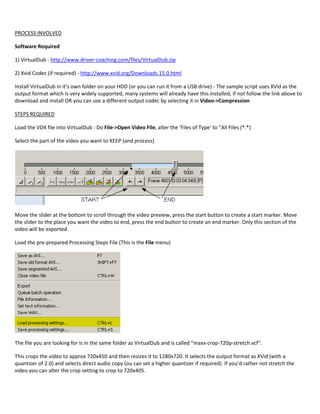
Load the VD4 file into VirtualDub : Do File->Open Video File, alter the 'Files of Type' to "All Files (*.*)

Select the part of the video you want to KEEP (and process)


Move the slider at the bottom to scroll through the video preview, press the start button to create a start marker. Move
the slider to the place you want the video to end, press the end button to create an end marker. Only this section of the
video will be exported.

Load the pre-prepared Processing Steps File (This is the File menu)


The file you are looking for is in the same folder as VirtualDub and is called "maxx-crop-720p-stretch.vcf".

This crops the video to approx 720x450 and then resizes it to 1280x720. It selects the output format as XVid (with a
quantizer of 2.0) and selects direct audio copy (ou can set a higher quantizer if required). If you’d rather not stretch the
video you can alter the crop setting to crop to 720x405.
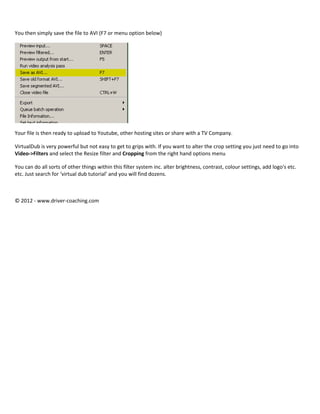
You then simply save the file to AVI (F7 or menu option below)


Your file is then ready to upload to Youtube, other hosting sites or share with a TV Company.

VirtualDub is very powerful but not easy to get to grips with. If you want to alter the crop setting you just need to go into
Video->Filters and select the Resize filter and Cropping from the right hand options menu

You can do all sorts of other things within this filter system inc. alter brightness, contrast, colour settings, add logo's etc.
etc. Just search for ‘virtual dub tutorial’ and you will find dozens.


© 2012 - www.driver-coaching.com

More Related Content

VIDEO4 - Creating Widescreen (720p) footage direct from VD4 files

  • 1. Creating good quality, widescreen, HD (720p) sized video from your VIDEO4 footage. Essentially what we do is crop the source video from the Video4, stretch it slightly and re-encode to 1280x720 which is HD dimensions. Note that the video is not HD quality but when submitting a 720p dimensioned video to Youtube (and maybe other hosting sites) it is treated as such and gets processed by a higher quality encoder. Initial Video Capture & Preparation If we are going to end up with a widescreen video our video must be capable of being cropped top & bottom so a suitable layout must be created. This is a sample layout using 4 cameras. You can see there is a considerable 'clean' area at the top and also we have a black bar at the bottom which I have used to capture some basic data to make it eeasier to see values when working with video in the analysis program. This area could equally be left as the top and just 'clean' space. The data overlay element used in the above is an edit of the standard RT supplied "GT" layout.
  • 2. Below is the output from this layout, in this case with just 2 cameras active. The layout has 4 cameras but if you only have 2 plugged in or just a 2cam system only the cams you have plugged in will show. We will then edit this video DIRECTLY FROM THE VD4 file to create a widescreen, 720p video which will look like this.
  • 3. PROCESS INVOLVED Software Required 1) VirtualDub - http://www.driver-coaching.com/files/VirtualDub.zip 2) Xvid Codec (if required) - http://www.xvid.org/Downloads.15.0.html Install VirtualDub in it's own folder on your HDD (or you can run it from a USB drive) - The sample script uses XVid as the output format which is very widely supported, many systems will already have this installed, if not follow the link above to download and install OR you can use a different output codec by selecting it in Video->Compression STEPS REQUIRED Load the VD4 file into VirtualDub : Do File->Open Video File, alter the 'Files of Type' to "All Files (*.*) Select the part of the video you want to KEEP (and process) Move the slider at the bottom to scroll through the video preview, press the start button to create a start marker. Move the slider to the place you want the video to end, press the end button to create an end marker. Only this section of the video will be exported. Load the pre-prepared Processing Steps File (This is the File menu) The file you are looking for is in the same folder as VirtualDub and is called "maxx-crop-720p-stretch.vcf". This crops the video to approx 720x450 and then resizes it to 1280x720. It selects the output format as XVid (with a quantizer of 2.0) and selects direct audio copy (ou can set a higher quantizer if required). If you’d rather not stretch the video you can alter the crop setting to crop to 720x405.
  • 4. You then simply save the file to AVI (F7 or menu option below) Your file is then ready to upload to Youtube, other hosting sites or share with a TV Company. VirtualDub is very powerful but not easy to get to grips with. If you want to alter the crop setting you just need to go into Video->Filters and select the Resize filter and Cropping from the right hand options menu You can do all sorts of other things within this filter system inc. alter brightness, contrast, colour settings, add logo's etc. etc. Just search for ‘virtual dub tutorial’ and you will find dozens. © 2012 - www.driver-coaching.com