Wooden cladding
- 2. INTRODUCTION âĒ Wood is a product that combines inspiration, beauty, performance and environmental advantage. âĒ Wood is a renewable resource; âĒ Wood products store carbon dioxide; âĒ Comparatively, the manufacture of most wood products requires smaller amounts of energy; and âĒ Residues generated through the processing of wood can be reused in a variety of positive ways. âĒ Timber performs strongly in the acoustic arena - whether the objective is to enhance sound or reduce sound âĒ While timber is indeed a combustible material, in construction it has significant insulating properties and burns in a slow, predictable and measurable way
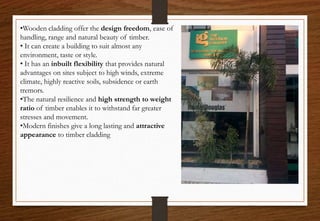
- 3. âĒWooden cladding offer the design freedom, ease of handling, range and natural beauty of timber. âĒ It can create a building to suit almost any environment, taste or style. âĒ It has an inbuilt flexibility that provides natural advantages on sites subject to high winds, extreme climate, highly reactive soils, subsidence or earth tremors. âĒThe natural resilience and high strength to weight ratio of timber enables it to withstand far greater stresses and movement. âĒModern finishes give a long lasting and attractive appearance to timber cladding
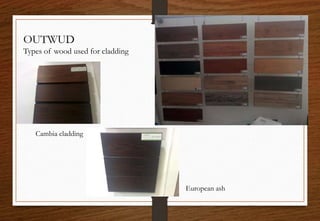
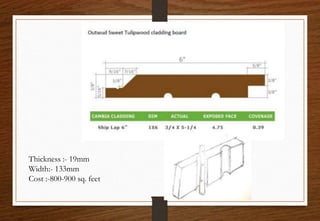
- 4. OUTWUD Types of wood used for cladding European ash Cambia cladding
- 5. Thickness :- 19mm Width:- 133mm Cost :-800-900 sq. feet
- 6. CLADDING BOARD SELECTION When specifying cladding boards there are a number of points that should be considered: âĒThe appearance required by the architectural style âĒAvailability and cost âĒEase of installation and maintenance âĒPrevailing climate and thermal performance required for the building âĒThe need, if any, for above average structural strength, which some specific types of cladding will provide âĒLocal government regulations or statutory requirements âĒDesigners should be fully informed when making their decision. Specific advice is available from suppliers or Timber Advisory Services.
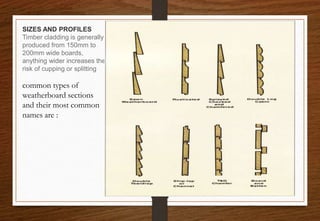
- 7. SIZES AND PROFILES Timber cladding is generally produced from 150mm to 200mm wide boards, anything wider increases the risk of cupping or splitting common types of weatherboard sections and their most common names are :
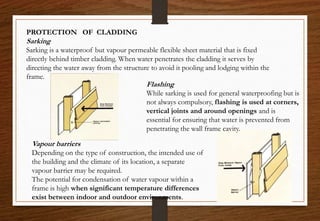
- 8. PROTECTION OF CLADDING Sarking Sarking is a waterproof but vapour permeable flexible sheet material that is fixed directly behind timber cladding. When water penetrates the cladding it serves by directing the water away from the structure to avoid it pooling and lodging within the frame. Vapour barriers Depending on the type of construction, the intended use of the building and the climate of its location, a separate vapour barrier may be required. The potential for condensation of water vapour within a frame is high when significant temperature differences exist between indoor and outdoor environments. Flashing While sarking is used for general waterproofing but is not always compulsory, flashing is used at corners, vertical joints and around openings and is essential for ensuring that water is prevented from penetrating the wall frame cavity.
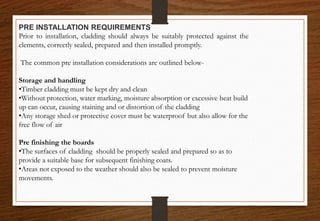
- 9. PRE INSTALLATION REQUIREMENTS Prior to installation, cladding should always be suitably protected against the elements, correctly sealed, prepared and then installed promptly. The common pre installation considerations are outlined below- Storage and handling âĒTimber cladding must be kept dry and clean âĒWithout protection, water marking, moisture absorption or excessive heat build up can occur, causing staining and or distortion of the cladding âĒAny storage shed or protective cover must be waterproof but also allow for the free flow of air Pre finishing the boards âĒThe surfaces of cladding should be properly sealed and prepared so as to provide a suitable base for subsequent finishing coats. âĒAreas not exposed to the weather should also be sealed to prevent moisture movements.
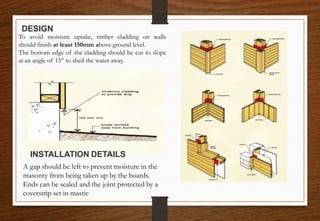
- 10. DESIGN To avoid moisture uptake, timber cladding on walls should finish at least 150mm above ground level. The bottom edge of the cladding should be cut to slope at an angle of 15° to shed the water away. A gap should be left to prevent moisture in the masonry from being taken up by the boards. Ends can be sealed and the joint protected by a coverstrip set in mastic INSTALLATION DETAILS
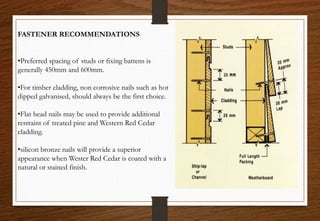
- 11. FASTENER RECOMMENDATIONS âĒPreferred spacing of studs or fixing battens is generally 450mm and 600mm. âĒFor timber cladding, non corrosive nails such as hot dipped galvanised, should always be the first choice. âĒFlat head nails may be used to provide additional restraint of treated pine and Western Red Cedar cladding. âĒsilicon bronze nails will provide a superior appearance when Wester Red Cedar is coated with a natural or stained finish.
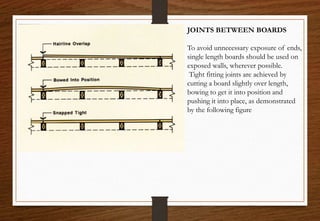
- 12. JOINTS BETWEEN BOARDS To avoid unnecessary exposure of ends, single length boards should be used on exposed walls, wherever possible. Tight fitting joints are achieved by cutting a board slightly over length, bowing to get it into position and pushing it into place, as demonstrated by the following figure
- 13. FINISHES AND MAINTENANCE âĒThe regular application of water repellent finishes reduces the effects of swelling and shrinkage caused by moisture content changes. âĒOngoing sunlight exposure will change the surface color of uncoated timber to silver grey. The graying of timber cladding will vary depending on the degree and level of exposure. âĒ Timber specified for such applications should be a naturally durable species or CCA preservative treated softwood. All timber, however, requires some finishing and regular maintenance to offer an extended service life. âĒWhether a natural, stain finish or paint system is used, the manufacturer's recommendations for application must be followed precisely to ensure the most long lasting result is achieved.
