ݺߣ

ݺߣShare a Scribd company logo
10 Main Features of Macbook Pro
1) Smart folders in Finder
Smart folders aren’t real folders: They’re more like labels in Gmail,
tagging certain files with certain search criteria. As the files on disk
change, so the Smart Folders are updated automatically, making them
perfect for quickly calling up groups of files from disk.
In Finder pick File then New Smart Folder and enter your search terms.
Use the plus icon underneath to add extra filters, like file types, or tags,
or the date the file was last opened. When you’re done, click Save, and
choose where to save and pin the folder for easy access.
2) Run Windows with Boot Camp
Boot Camp has been around as a macOS feature for over a decade
now, making the process of getting Windows running on a Mac machine
much more straightforward than you would initially expect:Apple has a
full guide to the feature and how you can set it up.
It’s honestly not that difficult—there’s a Boot Camp Assistant that you
can quickly find from Spotlight (Cmd+Space) that takes you through the
process and prepares a slice of your hard drive for Windows to run on.
You do need a valid copy of Windows though.
3) Create virtual desktops
Virtual desktops give you more digital elbow room for your programs and
windows, and Apple’s desktop operating system has supported them in
the form of Spaces for much longer than Microsoft’s has. You can find
them via Mission Control (hit F3 to launch it or set it as a hot corner).
Up at the top of the screen you can see your current desktops—click the
plus icon to add a new one, and drag open windows where they need to
go. The Dock and Menu Bar persist over all your Spaces, and Ctrl+Left
Arrow and Ctrl+Right Arrow will jump between them.
4) Autocomplete words as you type
Hidden away in macOS are a bunch of clever keyboard shortcuts that
can help you power through whatever it is you happen to be doing, but
one of the handiest is the integrated autocomplete function, which you
can bring up in most apps by hitting Option+Escape.
You’ll see a list of potential matches come up on screen, which is helpful
if you’re not sure how to spell something. It doesn’t work in web
browsers or places where autocomplete already exists, but it does work
in Mail, Notes, Pages, and various other application
5) Record iOS and macOS screen activity in QuickTime
Recording screen activity on devices is often fraught with
complexity and difficulty, but not so on macOS, where all you
need is QuickTime. If you choose File then New Screen
Recording, you can record your Mac’s screen activity by
clicking on the red record button.
If you’ve got an iPhone, iPad, or iPad Touch hooked up via
USB, you can record what’s happening on this screen instead,
by selecting it as the input option using the drop-down menu
next to the record button. It’s a breeze to use and useful in all
kinds of situations.
6) Activate your screen’s hot corners
If you click the Apple menu, open up System Preferences,
then choose Desktop & Screen Saver and switch to the
Screen Saver tab, you’ll see a Hot Corners option down in the
lower right—this lets you assign the four screen corners to
particular system actions.
Those actions include opening the Launchpad screen or the
Notification Center, putting your computer to sleep, starting or
disabling the current screensaver, hopping straight to the
desktop, and so on. When a hot corner is configured, just move
your mouse cursor over to it to trigger the action.
7) Ping files wirelessly with AirDrop
It’s easy to forget about AirDrop, and it doesn’t always work
flawlessly, but it’s often the fastest and most convenient way to
get files between Apple-branded devices. The feature has been
around since 2010 and is now baked into the fabric of both
macOS and iOS.
To use it on your Mac, find the sharing options in the app you’re
in, or Ctrl+click on a file in Finder then choose Share and
AirDrop. On another macOS machine, look in the AirDrop
section of Finder; on iOS the file should pop up in the relevant app,
if AirDrop is enabled.
8) Stream music and movies around the home
iTunes comes with some effective sharing tools built right in:
Open the iTunes menu, choose Preferences and enable
sharing under Sharing. Your library can then be accessed
under the Shared Libraries section of iTunes on other Macs
on the same local network.
Home Sharing (File then Home Sharing) works differently—it
lets you download as well as stream content, and it works with
iOS devices and the Apple TV as well as iTunes on Macs, but it
requires you to sign into the same Apple ID on all the devices
you want to use.
9) Sign documents in Preview
From Preview, open the Tools menu then choose Annotate, Signature
and Manage Signatures to produce a handwritten scribble in digital
form—one which you can then append to anything you open up inside
Preview, like PDFs that need to be signed.
You can either hold a piece of paper up to your Mac’s webcam or use
the trackpad to create your digital signature, which is then saved in a list.
To drop a signature into a document or an image, go back into the same
Signature menu and pick the scribble you want to use.
10) Automate repetitive tasks
Automator is one of the most useful utilities included in macOS,
but it’s well hidden and might put some people off because it
looks difficult to use. In fact, launch it from Spotlight
(Cmd+Space) and you’ll find there’s nothing to be scared of.
We won’t dive into a full guide here, but any repeated macOS
task you do can be handled by Automator—file conversions,
photo renaming, opening multiple webpages, combining PDFs,
running backups, and so on. The official Apple guide is a good
resource to start with.
apple service center chennai Mac service center in chennai ipod service center in Chennai
apple watch service center chennai apple ipad service center in Chennai
apple iphone service center in chennai Apple laptop service center in chennai

More Related Content

What's hot (20)

PPT
03 Windows Basics
Buffalo Seminary
PPT
Computer Basics
Fayetteville Free Library
PPTX
Windows 8.1 Guide
Corcelll
PPT
10 WIndows Basics
Buffalo Seminary
PPT
Basic Computer Skills Seminar
Meridian Career Institute
DOC
Studentdictionary
Anonymous426060
PPT
Windows basic
Alvin Maderista
PPT
Introduction to windows
msaleemfuuast
PPT
Windows xp basics army greent
Jamie C
PPTX
Windows and its components
AAi Irene
PPT
Windows Basic
Jack Frost
PPTX
Basic computer skills
THickox
PPTX
Lesson1 windows xp
guevarra_2000
PPT
Lecture windows xp 3
Shafaq Saleem
PPT
Part 3 elements of windows
Government of India
PPT
Computers For Beginners: What's on your Desktop?
Jennifer Springfield
PPT
Getting Started with Computers
Jennifer Springfield
PPT
Windows operating system part 1 (Introduction to Computer)
Elijah Kplawore
PPT
Using A Mac
Mike Cummins
PPTX
1.0 QuickBooks Fundementals : Day 02 Windows :2.1 windows
Veerendra Singh
03 Windows Basics
Buffalo Seminary
Windows 8.1 Guide
Corcelll
10 WIndows Basics
Buffalo Seminary
Basic Computer Skills Seminar
Meridian Career Institute
Studentdictionary
Anonymous426060
Windows basic
Alvin Maderista
Introduction to windows
msaleemfuuast
Windows xp basics army greent
Jamie C
Windows and its components
AAi Irene
Windows Basic
Jack Frost
Basic computer skills
THickox
Lesson1 windows xp
guevarra_2000
Lecture windows xp 3
Shafaq Saleem
Part 3 elements of windows
Government of India
Computers For Beginners: What's on your Desktop?
Jennifer Springfield
Getting Started with Computers
Jennifer Springfield
Windows operating system part 1 (Introduction to Computer)
Elijah Kplawore
Using A Mac
Mike Cummins
1.0 QuickBooks Fundementals : Day 02 Windows :2.1 windows
Veerendra Singh

Similar to 10 main features of macbook pro (20)

PDF
Macbook pro 13-inch_mid2012_qs
Creygan
PDF
The mac users_guide
Flora Runyenje
PPTX
Mac User Group Marina Dzougoutov
Shannon Augustine, M.S.
KEY
Mac OS X Tips & Tricks
Benjamin Kreeger
PPT
Magic Tricks
pollockburke
PPT
MAgiC Tricks
pollockburke
PPTX
Mac osx basics
Richa Jain
KEY
MacBook Pro Out of the Box - Secondary Faculty
Chinese International School
PPTX
OS X Lion resources
Desiree Caskey
PDF
The mac users_guide
JimmySSiluvayyan
PPT
This seasons-apple
iansyst
PDF
Snow leopard Basics
Desiree Caskey
PDF
Mac OSX Keyboard Shortcuts.pdf
shaileshsharma988350
PPTX
Mac basics
mikulecky
PPT
Mac Tricks
Jennifer Brinson
PPT
Mac orientation
Lori Roe
PPTX
Mac os administration
Sayed Ahmed
PDF
iOS 5.0 Concept preview
appletips
Macbook pro 13-inch_mid2012_qs
Creygan
The mac users_guide
Flora Runyenje
Mac User Group Marina Dzougoutov
Shannon Augustine, M.S.
Mac OS X Tips & Tricks
Benjamin Kreeger
Magic Tricks
pollockburke
MAgiC Tricks
pollockburke
Mac osx basics
Richa Jain
MacBook Pro Out of the Box - Secondary Faculty
Chinese International School
OS X Lion resources
Desiree Caskey
The mac users_guide
JimmySSiluvayyan
This seasons-apple
iansyst
Snow leopard Basics
Desiree Caskey
Mac OSX Keyboard Shortcuts.pdf
shaileshsharma988350
Mac basics
mikulecky
Mac orientation
Lori Roe
Mac os administration
Sayed Ahmed
iOS 5.0 Concept preview
appletips
Ad

10 main features of macbook pro

  • 1. 10 Main Features of Macbook Pro 1) Smart folders in Finder Smart folders aren’t real folders: They’re more like labels in Gmail, tagging certain files with certain search criteria. As the files on disk change, so the Smart Folders are updated automatically, making them perfect for quickly calling up groups of files from disk. In Finder pick File then New Smart Folder and enter your search terms. Use the plus icon underneath to add extra filters, like file types, or tags, or the date the file was last opened. When you’re done, click Save, and choose where to save and pin the folder for easy access.
  • 2. 2) Run Windows with Boot Camp Boot Camp has been around as a macOS feature for over a decade now, making the process of getting Windows running on a Mac machine much more straightforward than you would initially expect:Apple has a full guide to the feature and how you can set it up. It’s honestly not that difficult—there’s a Boot Camp Assistant that you can quickly find from Spotlight (Cmd+Space) that takes you through the process and prepares a slice of your hard drive for Windows to run on. You do need a valid copy of Windows though. 3) Create virtual desktops Virtual desktops give you more digital elbow room for your programs and windows, and Apple’s desktop operating system has supported them in the form of Spaces for much longer than Microsoft’s has. You can find them via Mission Control (hit F3 to launch it or set it as a hot corner). Up at the top of the screen you can see your current desktops—click the plus icon to add a new one, and drag open windows where they need to go. The Dock and Menu Bar persist over all your Spaces, and Ctrl+Left Arrow and Ctrl+Right Arrow will jump between them.
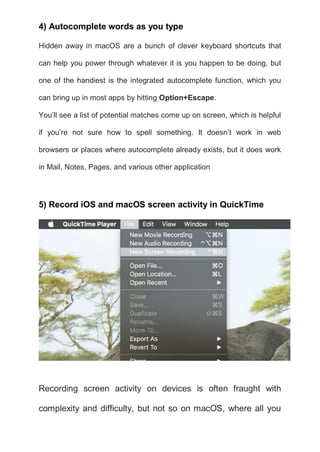
  • 3. 4) Autocomplete words as you type Hidden away in macOS are a bunch of clever keyboard shortcuts that can help you power through whatever it is you happen to be doing, but one of the handiest is the integrated autocomplete function, which you can bring up in most apps by hitting Option+Escape. You’ll see a list of potential matches come up on screen, which is helpful if you’re not sure how to spell something. It doesn’t work in web browsers or places where autocomplete already exists, but it does work in Mail, Notes, Pages, and various other application 5) Record iOS and macOS screen activity in QuickTime Recording screen activity on devices is often fraught with complexity and difficulty, but not so on macOS, where all you
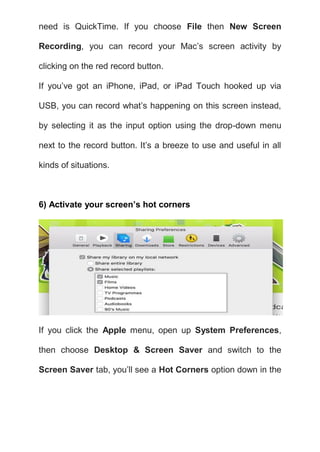
  • 4. need is QuickTime. If you choose File then New Screen Recording, you can record your Mac’s screen activity by clicking on the red record button. If you’ve got an iPhone, iPad, or iPad Touch hooked up via USB, you can record what’s happening on this screen instead, by selecting it as the input option using the drop-down menu next to the record button. It’s a breeze to use and useful in all kinds of situations. 6) Activate your screen’s hot corners If you click the Apple menu, open up System Preferences, then choose Desktop & Screen Saver and switch to the Screen Saver tab, you’ll see a Hot Corners option down in the
  • 5. lower right—this lets you assign the four screen corners to particular system actions. Those actions include opening the Launchpad screen or the Notification Center, putting your computer to sleep, starting or disabling the current screensaver, hopping straight to the desktop, and so on. When a hot corner is configured, just move your mouse cursor over to it to trigger the action. 7) Ping files wirelessly with AirDrop It’s easy to forget about AirDrop, and it doesn’t always work flawlessly, but it’s often the fastest and most convenient way to get files between Apple-branded devices. The feature has been around since 2010 and is now baked into the fabric of both macOS and iOS. To use it on your Mac, find the sharing options in the app you’re in, or Ctrl+click on a file in Finder then choose Share and AirDrop. On another macOS machine, look in the AirDrop section of Finder; on iOS the file should pop up in the relevant app, if AirDrop is enabled.
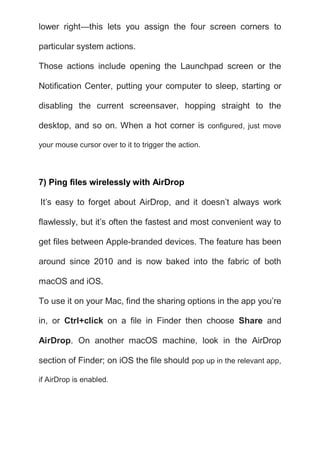
  • 6. 8) Stream music and movies around the home iTunes comes with some effective sharing tools built right in: Open the iTunes menu, choose Preferences and enable sharing under Sharing. Your library can then be accessed under the Shared Libraries section of iTunes on other Macs on the same local network. Home Sharing (File then Home Sharing) works differently—it lets you download as well as stream content, and it works with iOS devices and the Apple TV as well as iTunes on Macs, but it requires you to sign into the same Apple ID on all the devices you want to use.
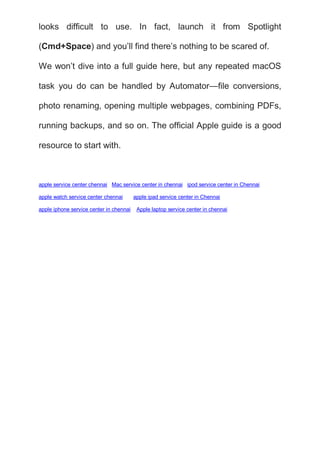
  • 7. 9) Sign documents in Preview From Preview, open the Tools menu then choose Annotate, Signature and Manage Signatures to produce a handwritten scribble in digital form—one which you can then append to anything you open up inside Preview, like PDFs that need to be signed. You can either hold a piece of paper up to your Mac’s webcam or use the trackpad to create your digital signature, which is then saved in a list. To drop a signature into a document or an image, go back into the same Signature menu and pick the scribble you want to use. 10) Automate repetitive tasks Automator is one of the most useful utilities included in macOS, but it’s well hidden and might put some people off because it
  • 8. looks difficult to use. In fact, launch it from Spotlight (Cmd+Space) and you’ll find there’s nothing to be scared of. We won’t dive into a full guide here, but any repeated macOS task you do can be handled by Automator—file conversions, photo renaming, opening multiple webpages, combining PDFs, running backups, and so on. The official Apple guide is a good resource to start with. apple service center chennai Mac service center in chennai ipod service center in Chennai apple watch service center chennai apple ipad service center in Chennai apple iphone service center in chennai Apple laptop service center in chennai