This document provides instructions for using various features in Windows XP, including:
1. Organizing files by type and grouping related items makes files easier to find. Publishing class projects to the web automatically copies files to a designated folder online.
2. Pictures and audio files can be easily shared by attaching them to emails or burning them to CDs using built-in Windows tools. Photos can also be printed with multiple images per page.
3. Remote assistance options allow requesting help from an IT person, who can then connect to the computer remotely to help troubleshoot issues.
The Start Menu in Windows 10 replaces the Start Screen from Windows 8 and acts as a navigation hub containing frequently used apps, shortcuts, and live tiles that display real-time updates. It provides access to File Explorer, Settings, Power options, and an alphabetical list of all installed apps. The Start Menu can be customized by rearranging tiles, creating groups, resizing tiles and the Start Menu itself, turning off live updates, and pinning/unpinning apps.
Remove clearscreen player – malware removalharoNaroum
Ìý
CLEARSCREEN PLAYER will be presented on the browser if computer is compromised with potentially unwanted program or adware. In normal situation, ads shown by CLEARSCREEN PLAYER are usually targeted based on collected data from victims. This adware monitors your browsing habit such as web site you have visited, interested category, and anything that is relevant to your online interests.
Windows XP is built on the foundation of Windows NT and 2000 for greater stability compared to previous versions of Windows. The Control Panel in XP allows switching between Category and Classic views. Automatic Windows updates can be configured to download and install updates automatically. Desktop icons hidden in XP can be displayed by customizing the desktop properties. Networking is easy in XP, which automatically configures for networks. XP's built-in firewall protects the system from intruders attempting to access open ports. Access time can be restricted for user accounts. Old programs can run in Compatibility Mode. Remote Desktop allows accessing the work computer from anywhere. System Restore allows reverting to prior system states by restoring from restore points. Disk Cleanups should be run weekly
If you have visited a website, and you show the error ‘This site can’t be reached the connection was reset error’ or ERR_CONNECTION_RESET. This means that a connection could not be established correctly. The issue is usually on the users’ end, and the occasion is it a problem with the website itself. To know how to fix the connection was reset error.
This document provides instructions for installing and using various apps and features in Windows 8. It begins by listing the minimum system requirements for installing Windows 8 and provides instructions for upgrading from Windows 7. It then covers how to use the default apps that come with Windows 8 like Internet Explorer, Mail, People and Calendar. It also provides directions for accessing settings and personalization options, installing apps from the Windows Store, using OneDrive for cloud storage, and sharing files.
Juno email troubleshooting steps is mentioned in this slide. Contact Juno email technical support phone number or juno email customer support phone number. Juno Customer service phone number is available 24/7.
This document provides instructions for a digital photo class that teaches participants how to:
1. Transfer digital photos from a camera to a computer using a cable and the Microsoft Scanner and Camera Wizard.
2. Create an online photo album on Shutterfly and upload photos.
3. Email a selected photo from the album to another person.
The goal is for participants to establish an online photo album on Shutterfly and email one photo to someone.
This document provides an overview of basic computer functions and how to navigate Windows. It explains how to access programs from the Start menu, customize desktop and taskbar settings, organize files and folders using Windows Explorer, and use common file types and extensions. Basic computer hardware like ports for CDs, USB drives, and memory cards are also outlined. The document aims to help users get the most from their computer.
The document describes the key components of a computer system:
1) The input unit controls input devices like keyboards and scanners that are used to enter data into the computer.
2) The central processing unit (CPU) directs the flow of data by storing input in memory and retrieving output.
3) The output unit controls output devices like monitors and printers to present output to the user in a readable format.
This is the official manual of the Company Messenger from APPbyYOU. It provides an overview of the standard functions. You can develop your own widgets, mini-apps and in the future chatbots with the additional App-Framework ("messenger as a platform"). The additional App-Editor gives you the opportunity to customize the Company-Messenger to your corporate identity (CI).
How to fix the error this site can’t be reachedPearl Lemon
Ìý
Sometimes you face the error 'This site can’t be reached.’ You may also see ERR_CONNECTION_RESET. This means that your connection could not be established properly. How the connection was reset. So, follow the steps in the troubleshooter, and see if that fixes the problem.
The document provides instructions for troubleshooting various technology issues including wireless connectivity, mapped drives, creating folders, backing up documents and favorites, checking document properties, using Outlook, monitoring mailbox size, using webmail, troubleshooting interactive whiteboards, cropping pictures, and preventing viruses. It discusses verifying wireless switches are on, adding wireless connections, what mapped drives show, how to create and organize folders, how to back up files and favorites to external media, what document properties show, how to access and manage Outlook and webmail, common interactive board issues and solutions, how to locate and use the crop tool in Picture Manager, and top ways to prevent viruses like keeping definitions updated and not downloading risky files.
Adobe Acrobat Connect is software used to create online presentations, trainings, and meetings. It allows users to share their screen, PowerPoint files, and invite attendees to view or collaborate. Meetings take place in "pods" which organize different sharing and collaboration tools. Users create meeting rooms by logging into their Connect Pro account and filling out a meeting name and URL. They can then share their screen, PowerPoint files, and invite others to join by sharing the meeting URL.
PowerPoint Presentation NetMeeting 3.X and MessengerVideoguy
Ìý
The document provides information on using NetMeeting and MSN Messenger to conduct online meetings and communicate via instant messaging. It describes how to host and join meetings on NetMeeting, conduct chat sessions, use the whiteboard, share programs and desktops, and request control of shared items. It also outlines features of MSN Messenger like seeing who is online, exchanging instant messages, voice and video calls, file sharing, using the whiteboard, and organizing contacts into groups. The presentation was provided by Microsoft employee Todd Whitlock and includes links to additional resources.
This document provides steps to limit the amount of personal information collected by Microsoft Windows 10 and regain privacy. It recommends turning off settings like advertisement ID, location tracking, key logging, access to contacts and files. Users should disable Cortana since all her data is sent to Microsoft and choose to be notified before updates are installed to schedule a restart time. Following these steps can help protect users' privacy by limiting what information Microsoft collects and controls.
This document is the user guide for Family Tree Explorer Premium genealogy software. It provides instructions on installation, activation, importing family trees from other programs, creating new family trees, and using the various tools and features in Family Tree Explorer Premium. The guide includes a comparison of the different versions of Family Tree Explorer, detailing the key differences between the Premium, Standard, and Viewer editions.
This document provides an overview of the basics of using Microsoft Windows XP, including how to start and shut down Windows XP, explore the desktop and start menu, open and close programs, manipulate windows, use menus and dialog boxes, and get help. It describes the key elements of the Windows XP graphical user interface and how to navigate, select, and interact with items on the desktop using a mouse or pointing device.
This document provides instructions for scheduling and hosting a WebEx meeting. It outlines the steps to schedule a meeting by signing into WebEx, entering meeting details and attendee emails. It also describes how to join a scheduled meeting by clicking the email link and downloading the WebEx client. Hosts can share their screen, view all webcams, and enable audio calling with the provided phone number or computer. Contact information is provided for assistance.
The document provides instructions for importing family data created in other genealogy programs into Family Tree Explorer. It explains that the other program must be able to export data in the GEDCOM file format. The import process involves selecting the GEDCOM file to import, choosing import settings, and addressing any warnings about missing or invalid data. The status report helps identify data fields that did not import correctly so they can be manually re-entered.
The document provides step-by-step instructions for creating a Facebook account, editing videos using Capcut, creating a Twitter account, using Skype, installing and using Zoom, sharing your screen on Zoom meetings, scheduling Zoom meetings, enabling waiting rooms on Zoom, creating a PowerPoint presentation, inserting videos into PowerPoint, and using Skype.
Blackboard IM is an instant messaging tool integrated with Blackboard Learn that automatically connects students and instructors enrolled in the same courses, allowing for collaboration through features like video chat, screen sharing, and a whiteboard. To use Blackboard IM, users login to their Blackboard Learn course site, select the Blackboard IM tool, and download the launcher; they can then communicate with classmates via personal chat windows or share screens and draw on a shared whiteboard.
Bluetooth V8.3 VPECKER Easydiag OBDII Full Diagnostic Tool with Special Function Support WINDOWS 10
http://www.buyobdtoolshop.com/wholesale/bluetooth-vpecker-easydiag.html
The document discusses the main components of a Windows operating system. It describes the desktop, taskbar, start menu, minimize/maximize/close buttons, My Computer icon, recycle bin, shortcuts, and multitasking capabilities. The key components include the desktop for folders and shortcuts, the taskbar for listing open apps and files, the start menu for accessing programs, and buttons for controlling windows. The recycle bin stores deleted files temporarily and shortcuts provide quick access to programs without navigating folders.
1. Windows 7 improves User Account Control (UAC) by reducing complexity and only notifying the default user of changes made by run software, not Windows settings.
2. HomeGroup makes sharing files and printers on a home network easy by automatically sharing music, pictures, videos, and documents between Windows 7 PCs on the network after joining the HomeGroup.
3. Parental controls allow restricting specific users' access to programs and time on the computer through settings in the Control Panel.
The document provides an introduction to basic computer parts and functions, including how to use a mouse and navigate the Windows desktop. It explains the main components of a computer like the monitor, CPU, keyboard and mouse. It then describes how to use the mouse and practice mouse skills. The document outlines the main areas of the Windows desktop, such as the Start button, icons, taskbar and quick launch bar. It concludes by explaining how to properly shut down a computer.
This document provides instructions for various features in Microsoft Teams meetings and channels. It explains how to schedule a Teams meeting, start a meeting and share the invite link, change member settings, add channels and invite people, make participants presenters or attendees, use features like raise hand and polls during meetings.
This document provides instructions for troubleshooting various technology issues and performing common computer tasks. It includes how to:
1) Turn on the wireless switch and add a wireless network connection.
2) Map a network drive, create folders, and back up documents and favorites to external storage.
3) Check document properties, size mailboxes in Outlook, and use webmail remotely.
4) Troubleshoot issues with student desktops, mini-switches, Activboards, and cropping pictures. It also provides tips to prevent viruses and ensure virus definitions are up to date.
The document introduces Windows Technical Preview, an early pre-release build of the next version of Windows. It discusses four key ways this preview differs from previous releases: it is a subset of the full build, bits are released earlier in development, it expects more user feedback, and it uses ongoing development-feedback cycles. It then explains how to enroll in the Windows Insider Program to access the preview builds and provides an overview of new features in the Technical Preview like the return of the Start menu and windowed apps.
Windows 10 Technical Preview - http://f2suporte.blogspot.comWlademir RS
Ìý
The document introduces Windows Technical Preview, an early pre-release build of the next version of Windows. It discusses four key ways this preview differs from previous releases: it is a subset of the full build, bits are released earlier in development, it expects more user feedback, and it uses ongoing development-feedback cycles. It then explains how to enroll in the Windows Insider Program to access the preview builds and provides an overview of new features in the Technical Preview like the return of the Start menu and windowed apps.
Help! My PC Just Died & Our Techie Is On Vacation!Kathy Lussier
Ìý
A presentation offering troubleshooting tips for non-techies working in libraries. The intended audience may be dealing with public access PCs with special security and with files in multiple formats.
TeamViewer is software that allows users to remotely control computers on a local network or worldwide, enabling file transfers and desktop sharing. It can be used to provide technical assistance to others by controlling their machine. The document outlines how to install TeamViewer, create an account, and then connect to another computer using a partner's ID and password.
The document provides tips for customizing desktop and display settings on Windows computers. It includes instructions for setting desktop backgrounds, creating screen savers with text or photos, organizing files using folders, configuring user accounts, and performing other common computer tasks like changing mouse pointers and rotating screen displays. Step-by-step guides are given for each task.
I am an authorized Consultant for Dukane. This folder contains product information about the AV solutions from Dukane.
Bill McIntosh
Phone :843-442-8888
Email : WKMcIntosh@Comcast.net
The document provides an overview of keyboard shortcuts and features in Windows 7. It lists shortcuts for navigating and managing windows, using the taskbar and start menu, searching files and folders, personalizing settings, and maintaining the computer. Additional sections summarize how to use Aero Peek and Snap to view and arrange windows, pin items to jump lists, add and use desktop gadgets, and join or create a homegroup to share files and printers.
The document provides an overview of keyboard shortcuts and features in Windows 7. It lists shortcuts for navigating and managing windows, using the taskbar and start menu, searching files, customizing appearance and sounds, and maintaining the computer. Additional sections summarize using libraries, gadgets, jump lists, homegroups, and personalization options in Windows 7.
I am an authorized Consultant for Dukane. This folder contains product information about the AV solutions from Dukane.
Bill McIntosh
Phone :843-442-8888
Email : WKMcIntosh@Comcast.net
How to Use Jing for More Effective Communication Using Screencasting?mikelmindsetmaster
Ìý
Jing is a software from TechSmith which let you make a video screencast while narrating as audio. It will give more clarification of instructions and make smooth communication.
This document provides a 6-step guide to remove pop-up ads from a computer. The steps include uninstalling any malicious programs, resetting browser settings in Internet Explorer, Firefox and Chrome, using AdwCleaner to remove adware, using Junkware Removal Tool to remove browser hijackers, scanning with Malwarebytes Anti-Malware, and using HitmanPro to double check for infections. Each step provides detailed instructions for performing tasks like downloading utilities, running scans, and removing any detected threats.
1. Open the Notepad and Paint applications from the Start menu.
2. Enter text into Notepad and minimize Paint.
3. Minimize Notepad and pin Notepad to the Start menu and taskbar.
4. Drag the Notepad and Paint windows together onto the desktop so they are side by side.
This report is about a functionality in computer that is ad-hoc wireless network which is very suitable for especially university students who have tasks or group activities and discussion about projects so I hope it will be helpful for them but it needs internet and works as alternative of USB.
Solve Stop Code Memory Management on Windows.pptxGevitaChinnaiah
Ìý
This document provides 9 methods for fixing the MEMORY_MANAGEMENT stop code error in Windows 10. It begins by explaining what memory management is and some potential causes of the error, such as software issues, hardware conflicts, RAM errors, or outdated drivers. The 9 methods provided to resolve the error include scanning for malware, running the Windows Memory Diagnostic tool, updating drivers, checking for disk errors, repairing system files, clearing temporary files, uninstalling recently installed applications, installing pending Windows updates, and resetting Windows 10.
The document provides instructions for using basic Windows features like the desktop, taskbar, start menu, files and folders. It describes how to launch programs, switch between tasks, customize the desktop appearance, use help and support, and manage files by copying, moving, deleting and creating folders. It also covers settings for the date/time, display properties and monitors.
1. Windows XP 101: Using Windows XP Professional in the Classroom
2. Showing or Hiding System Icons Showing or Hiding System Icons To show or hide System icons Right-click the taskbar, and then click Properties . On the Notification area tab, click Customize . In the Customize Notifications dialog box, right-click the Behavior of an item that you want to show or hide. Click the down arrow to either Hide when inactive, Always hide, or Always show .
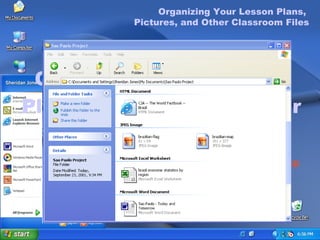
3. Organizing Your Lesson Plans, Pictures, and Other Classroom Files Organizing Your Lesson Plans, Pictures, and Other Classroom Files To list documents by type, and then organize into groups: On the Start menu, click My Documents , and then open the folder containing the documents you want to view. On the View menu, click Arrange Icons by Type . On the Arrange Icons By Type menu, select Show In Groups.
4. Publishing Class Projects to the Web Publishing Class Projects to the Web To publish to the Web (cont.) Type your password in the Password text box, and then click Next to continue. To complete the Password Wizard, click Finish . In the File Destination dialog box, select a folder in which you want to publish your files, or click Create a new folder to make a new folder. Click Next . Your document is automatically copied to the destination Web site. Click Finish to close the Web Publishing Wizard. To publish to the Web On the Start menu, click My Documents . Click to select the document that you want to publish to the Web. In the File Tasks menu, click Publish this file to the Web . The Web Publishing Wizard starts. Click Next to continue. The Destination Web Site page appears. The Passport Wizard starts. Click Next to continue . Click to select Yes, use an existing e-mail account , and then click Next . Type your e-mail address in the E-mail address or Passport box, and then click Next to continue.
5. Changing the Viewing Options in My Pictures Changing the Viewing Options in My Pictures Changing the Viewing Options in My Pictures On the Start menu, click My Pictures . On the View menu, click Filmstrip .
6. E-mail Project Pictures To E-mail Project Pictures In the File and Folder menu on the sidebar, select e-mail this file Choose make all my pictures smaller , click OK. Picture automatically is attached to default email client. E-mail Project Pictures
7. Printing Project Pictures To Print Project Pictures In the Picture Tasks menu on the sidebar, select Print This Picture Click Next on Photo Printing Wizard. Select pictures you wish to print, click Next. Choose the printer you wish to print to, click Next. In Layout Selection, select the 4 x 6 in, 3-up option. Click Next. Click Finish. Printing Project Pictures
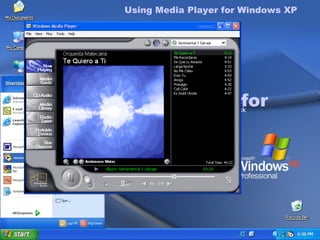
8. Using Media Player for Windows XP Using Media Player for Windows XP To use Media Player for Windows XP On the Start menu, click Windows Media Player . Place a CD in your CD-ROM drive. Click the Now Playing tab to view information about your CD. If your CD does not start automatically, click the Play icon.
9. Copying Audio Files To CD To Copy Audio Files To CD In Windows Media Player, Choose Copy to CD or Device. Choose audio files to burn to CD, click Okay. Copying Audio Files To CD
10. Using the Search Companion For Classroom Projects Using the Search Companion For Classroom Projects To use the Search Companion On the Start menu, click Internet Explorer . Click the Search icon on the toolbar to open Search Companion . Type Sao Paolo in the text box, and then click Search . Select Automatically Send Your Search To Other Search Engines
11. Using Windows Messenger Using Windows Messenger To place a call by using Windows Messenger On the Start menu, point to All Programs, and click Windows Messenger. The Windows Messenger dialog box opens. Click the link to sign in . Click the Call icon . Click to select the name of the IT staff member that you want from your Contacts list, and then click Computer . A message appears that confirms that you have placed a call correctly. After your call connects, you can begin your conversation immediately .
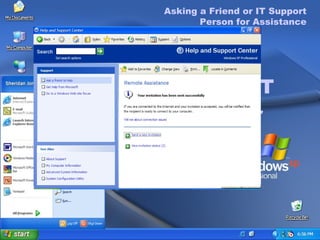
12. Asking a Friend or IT Support Person for Assistance To Ask a Friend or IT Support Person for Remote Assistance On the Start menu, click Help and Support . In the Ask for Assistance list, click Get Support . In the Support Options menu, click Ask a Friend to Help . Click Invite Someone to Help You . Select to send your invitation As an e-mail Message . Type recipient’s e-mail address and a message in the Message text box, and click Continue . Asking a Friend or IT Support Person for Assistance To complete the Request for Help invitation (cont.) Set the expiration time for the invitation. The default time is one hour. Type a password in the Password text box, type it again in the Confirm Password text box, and then click Send Invitation . A message appears informing you that your invitation has been sent successfully.
13. Installing the Remote Desktop Web Connection To install the Remote Desktop Web Connection On the Start menu, click Control Panel . Click Add or Remove Programs . Click Add/Remove Windows Components . In the Windows Components Wizard dialog box, select Internet Information Services , and then click Details . In the Subcomponents of Internet Information Services (IIS) list, select World Wide Web Service , and then click Details . In the Subcomponents for World Wide Web Service list, select the Remote Desktop Web Connection check box, and then click OK . In the Windows Components Wizard , click Next to continue. To install the Remote Desktop Web Connection (cont.) Insert your Windows XP installation CD into the CD ROM drive of your computer, or click OK to browse to the installation files. Click Finish to close the Windows Components Wizard, and click Close to close the Add or Remove Programs dialog box. Installing a Remote Desktop Web Connection
14. Connecting to Your Classroom or Office Computer from a Remote Location To enable a Remote Desktop connection on your primary workstation On the Start menu, right-click My Computer , and then click Properties to open the System Properties dialog box. Click the Remote tab. In the Remote Desktop pane, select the Allow users to connect remotely to this computer check box, and then click Select Remote Users . You can add or remove users as you want, and then click OK to close the Remote Desktop Users dialog box. Click Apply , and then click OK to close the System Properties dialog box. Connecting to Your Classroom or Office Computer from a Remote Location
15. To connect to Remote Desktop On the Start menu, point to All Programs . Point to Accessories , point to Communications , and click Remote Desktop Connection . Type the information for the computer you want to connect to in the Computer text box, and then click Connect .
#3: To show or hide System icons Right-click the taskbar, and then click Properties . On the Notification area tab, click Customize . In the Customize Notifications dialog box, right-click the Behavior of an item that you want to show or hide. Click the down arrow to either Hide when inactive, Always hide, or Always show .
#4: To list documents by type, and then organize into groups: On the Start menu, click My Documents , and then open the folder containing the documents you want to view. On the View menu, click Arrange Icons by Type . On the Arrange Icons By Type menu, select Show In Groups.
#5: To publish to the Web On the Start menu, click My Documents . Click to select the document that you want to publish to the Web. In the File Tasks menu, click Publish this file to the Web . The Web Publishing Wizard starts. Click Next to continue. The Destination Web Site page appears. The Passport Wizard starts. Click Next to continue . Click to select Yes, use an existing e-mail account , and then click Next . Type your e-mail address in the E-mail address or Passport box, and then click Next to continue. Type your password in the Password text box, and then click Next to continue. To complete the Password Wizard, click Finish . In the File Destination dialog box, select a folder in which you want to publish your files, or click Create a new folder to make a new folder. Click Next . Your document is automatically copied to the destination Web site. Click Finish to close the Web Publishing Wizard.
#6: To use My Pictures On the Start menu, click My Pictures . On the View menu, click Filmstrip .
#7: To E-mail Project Pictures In the File and Folder menu on the sidebar, select e-mail this file Choose make all my pictures smaller , click OK. Picture automatically is attached to default email client.
#8: To Print Project Pictures In the Picture Tasks menu on the sidebar, select Print This Picture Click Next on Photo Printing Wizard. Select pictures you wish to print, click Next. Choose the printer you wish to print to, click Next. In Layout Selection, select the 4 x 6 in, 3-up option. Click Next. Click Finish.
#9: To use Media Player for Windows XP On the Start menu, click Windows Media Player . Place a CD in your CD-ROM drive. Click the Now Playing tab to view information about your CD. If your CD does not start automatically, click the Play icon.
#10: To Copy Audio Files To CD In Windows Media Player, Choose Copy to CD or Device. Choose audio files to burn to CD, click Okay.
#11: To use the Search Companion On the Start menu, click Internet Explorer . Click the Search icon on the toolbar to open Search Companion . Type Sao Paolo in the text box, and then click Search . Select Automatically Send Your Search To Other Search Engines
#12: To place a call by using Windows Messenger On the Start menu, point to All Programs, and click Windows Messenger. The Windows Messenger dialog box opens. Click the link to sign in . Click the Call icon . Click to select the name of the IT staff member that you want from your Contacts list, and then click Computer . A message appears that confirms that you have placed a call correctly. After your call connects, you can begin your conversation immediately .
#13: To Ask a Friend or IT Support Person for Remote Assistance On the Start menu, click Help and Support . In the Ask for Assistance list, click Get Support . In the Support Options menu, click Ask a Friend to Help You . Click Invite Someone to Help You . Select to send your invitation As an e-mail message , and then click Continue . Type the recipient’s e-mail address and your message in the Message text box, and click Continue . Set the expiration time for the invitation. The default time is one hour. Type a password in the Password text box, type it again in the Confirm Password text box, and then click Send Invitation . A message appears informing you that your invitation has been sent successfully.
#14: To install the Remote Desktop Web Connection On the Start menu, click Control Panel . Click Add or Remove Programs . Click Add/Remove Windows Components . In the Windows Components Wizard dialog box, select Internet Information Services , and then click Details . In the Subcomponents of Internet Information Services (IIS) list, select World Wide Web Service , and then click Details . In the Subcomponents for World Wide Web Service list, select the Remote Desktop Web Connection check box, and then click OK . In the Windows Components Wizard , click Next to continue. Insert your Windows XP installation CD into the CD ROM drive of your computer, or click OK to browse to the installation files. Click Finish to close the Windows Components Wizard, and click Close to close the Add or Remove Programs dialog box.
#15: To enable a Remote Desktop connection on your primary workstation On the Start menu, right-click My Computer , and then click Properties to open the System Properties dialog box. Click the Remote tab. In the Remote Desktop pane, select the Allow users to connect remotely to this computer check box, and then click Select Remote Users . You can add or remove users as you want, and then click OK to close the Remote Desktop Users dialog box. Click Apply , and then click OK to close the System Properties dialog box.
#16: To connect to Remote Desktop On the Start menu, point to All Programs . Point to Accessories , point to Communications , and click Remote Desktop Connection . Type the information for the computer you want to connect to in the Computer text box, and then click Connect .