Colouring in Photoshop
0 likes255 views
The document outlines the process of combining photographic elements with hand-drawn images using Photoshop for a personal project aimed at creating an animation. It describes steps, such as scanning drawings, manipulating layers, adding colors, and incorporating shadows and highlights to enhance the composition. The entire process involves patience and practice to achieve visually appealing results.
1 of 4
Downloaded 15 times
Ad
Recommended
Mtm by dalibor lekin
Mtm by dalibor lekinNomer Adona
╠²
This document summarizes the steps taken to create a 3D rendering of a chair and lamp scene using SketchUp and Photoshop. Key steps included importing models, creating realistic materials, setting up lighting and camera, rendering with adjustments to improve quality, and post-processing in Photoshop including adding a gradient light layer to enhance realism. The purpose was to practice replicating the look of real photos as inspiration for simple scenes within the hardware limitations of an aging computer.Mini The Making of H hauz _VRAY 1.6 beta rendering challenge winner
Mini The Making of H hauz _VRAY 1.6 beta rendering challenge winnerNomer Adona
╠²
1. The document describes the process of creating a 3D scene in SketchUp with a large number of vegetation proxies. Various 3D models were converted to VRay proxy format and imported.
2. Materials were applied to objects like glass, wood, and water to create realistic reflections. Lighting was set up using an HDRI, VRaySun, and dome light.
3. After rendering, post-processing in Photoshop included levels, curves, and Color Efex Pro filters to enhance colors and details and add a vignette effect.The making of iwasa house by ernesto delgado
The making of iwasa house by ernesto delgadoNomer Adona
╠²
This document summarizes the process of creating the Iwasa House scene in SketchUp and VRay. [1] The author first modeled the ground mesh and placed base building geometry. [2] Grass and tree components were then modeled and placed in the scene using the Smart Drop plugin. [3] Materials were applied including textures for concrete, leaves, grass, and ivy. Rendering was done in VRay and post-production involved high pass filtering, adding water, sky, vignetting, and text.Winston ellosca kitchen
Winston ellosca kitchenNomer Adona
╠²
This document provides instructions for making a simple kitchen model in SketchUp and rendering it using VRay. It includes steps for modeling basic components, applying textures and materials, lighting setup, render settings, and post-processing in Photoshop. Tips are also provided on making models detailed, avoiding dead space, and ensuring passion for the work.MTM3 Leo Valenzuela
MTM3 Leo ValenzuelaNomer Adona
╠²
After modeling a bungalow house in 3D and texturing it, the document discusses setting up lighting and camera in the scene. It then explains material and texture settings used like concrete, wood and glass. The Vray render settings are listed, followed by post-production steps in Photoshop like adding sky, plants and color balancing. Vignette and lens effects are applied to make the image more realistic, before adding a frame and watermark for presentation.Post Processing A 3 D Render
Post Processing A 3 D RenderDaniel Kreimer
╠²
The artist rendered an image for 14 hours, then made additional passes for ambient occlusion, depth of field, fog, and selecting letters. They used Photoshop to merge layers and apply filters to create effects like fog and depth. Several color correction, blur, and distortion adjustments were made through adjustment layers and masks to refine highlights, shadows, and add a film-like quality to the final rendered image.Cartooning yourself using photoshop
Cartooning yourself using photoshopcristy nazareno
╠²
This document provides a step-by-step guide on how to create a cartoon effect from a photograph using Photoshop. It covers various techniques such as applying filters, adjusting settings, and using layers for painting and shading. The instructions include adding effects like torn edges, smoothing lines, applying color, and creating a background, culminating in a polished cartoon image.Leo valenzuela mtm 2
Leo valenzuela mtm 2Muhammad Rijal Muttaqien
╠²
The document describes the process of creating an exterior night scene 3D rendering. It involves modeling elements in Sketchup, applying textures and materials, setting up exterior lighting with IES files, configuring render settings in Vray, and enhancing the raw rendering in Photoshop. Key steps include modeling a scene with textures and colors, setting the camera and shadows, creating glass, paint, and stone materials with reflection and bump maps, lighting the scene with wall lamps using IES profiles, rendering with optimized Vray settings, and improving the image in Photoshop through adjustments to brightness, color balance, and additions of glow effects and a background sky.6. production reflection
6. production reflectionMatthewBurniston
╠²
Matt Burniston created clouds in a production process by rendering clouds on a canvas, overlaying blue and purple tones, and adding further clouds and contrast. Stars were generated using noise at specific settings, selected with the magic wand tool, and given a glow by duplicating and blurring layers. A scrolling background was made using three strip slides - two originals and one flipped center slide - seen as a ratio of the canvas and creating an infinite scroll. The experimentation resulted in keeping a health bar. Main sprites were drawn and shaded in layers of differing opacities using selected darker tones painted around to build up shading and texture.Computer Techniques In Photoshop 1
Computer Techniques In Photoshop 1moncrief
╠²
1. The document provides instructions for using Photoshop to convert photographs into digital silkscreens based on Andy Warhol's techniques. It describes how to manipulate images, add layers and effects, and save work.
2. Key steps include using filters, modes, and adjustments to break continuous-tone images into high-contrast "line art" by applying effects like threshold, unsharp mask, and mezzotint.
3. Techniques for converting images to halftones and dithering patterns are described to simulate tones through patterns of dots for screenprinting. Testing printouts is advised to refine the effects.Photoshop
Photoshopmopish
╠²
This document provides instructions for using clipping masks, channel mixing for black and white images, adding color overlays, cloning and patching tools for corrections, and replacing colors in Photoshop. It demonstrates how to create a clipping mask to contain lines within an image, mix channels to achieve a balanced black and white result, overlay an orange layer at 50% opacity to add warmth, use the clone and patch tools to fix wrinkles in a backdrop, and precisely select and replace colors.Image manipulation
Image manipulationClipping Path Adobe
╠²
This tutorial shows how to create a Queen of Hearts photo manipulation in Photoshop. It demonstrates building the background with ornamental and rock images, adding a frame and filling it with cloud and nebula filters. A model and crown are blended into the scene. Cards with different heart designs are arranged around the model. Final adjustments add lighting effects to complete the scene.Photoshop techniques
Photoshop techniquesDaniel Blair
╠²
The document provides instructions for selecting objects in images using various selection tools in photo editing software. It describes how to use the elliptical selection tool to select circular shapes, the rectangular selection tool to select rectangular objects, and the magic wand tool to select objects that are surrounded by a different color. It also provides directions for applying effects like layers, strokes, and filters to modify and enhance images.3 d color at photoshop
3 d color at photoshopnova arianty
╠²
This document provides a 14 step tutorial for creating a colorful art piece with a textured splatter design and text. The steps include:
1) Creating a blue background layer and adding darker and lighter tones of blue to give it depth.
2) Creating a splatter shape using the pen tool, filling it with a desaturated texture, and adding shading and lighting effects to make it appear 3D.
3) Generating 3D text using Xara3D software, saving it, and adjusting it in Photoshop to fit within the design. Reflections and gloss are added to further enhance the text.
4) Providing additional touch-ups and corrections to improve lighting and shading throughoutHoneymoon suite bedroom tutorial ferry
Honeymoon suite bedroom tutorial ferryNomer Adona
╠²
This tutorial summarizes the process of creating a 3D bedroom scene in SketchUp and rendering it with VRay. Key steps include:
1. Importing models from 3ds Max into SketchUp and ensuring all faces are oriented correctly.
2. Positioning the camera and adding basic lighting before furnishing to improve performance.
3. Using an IES light for interior lighting plus a rectangular light from the window.
4. Applying various textures like wood, velvet, and transparency maps to furnishings.
5. Adjusting render settings and using post-processing in Photoshop to warm the scene.Tutorial in gimp
Tutorial in gimpOscarContreras102
╠²
This tutorial by Oscar B. Contreras Jr. demonstrates how to use GIMP for blending images, removing backgrounds, and changing clothing colors. It provides step-by-step instructions for each process, including the use of layer masks, the fuzzy select tool, and the paths tool. The document concludes with tips on adjusting colors and applying effects to enhance the final results.My mini the making bathroom louie castillo
My mini the making bathroom louie castilloNomer Adona
╠²
The document provides steps for creating a 3D model of a bathroom in SketchUp using imported AutoCAD files. It details importing the files, applying tile materials, setting up lighting and scene, and adjusting rendering options to produce a final rendered output of the bathroom interior with realistic lighting and reflections. The key steps include importing CAD files, applying tile textures, setting up a scene and camera view through a bathroom mirror, adding an IES light profile, and adjusting global illumination and background settings for the final render.Unity workflow
Unity workflow DarylBatesGames
╠²
The document describes the steps taken to create a terrain and environment in Unity. It involves molding hills and mountains, adding textures like grass and rock, placing trees, and adding water. Additional details like lighting were also included. Later, a custom sand texture was created in Photoshop and applied to the terrain. Coins were placed that have collision enabled. A third person controller was also added with animation. A wall jumping obstacle course was built using boxes for the walls and obstacles.Coke can tutorial
Coke can tutorialIsabelleHuang9
╠²
The document provides step-by-step instructions for creating a customized Coke can design in Photoshop. It describes 28 steps for designing the can shape, adding textures and shadows, modifying the color scheme, and including details like logos and nutrition information. The goal is to create a minimalist design that differs from the original Coke can appearance through changes to the color palette and font while keeping the basic cylindrical shape. Screenshots accompany each step to demonstrate the design process and results.technologies
technologies poppysm
╠²
Layering in Photoshop allows you to hide layers to declutter your workspace, move layers above or below others to control visibility, and delete or modify individual layers. InDesign enables setting the number of columns per page and gutter size when using column layouts. Jing's screen recording tool lets you capture a portion of the screen along with audio commentary to demonstrate functions while manipulating the screen.Retrato Pop Art Guia Creativa
Retrato Pop Art Guia CreativaPedro Espinoza Hurtado
╠²
This document is a tutorial guide by Pedro Espinoza Hurtado on converting a photo into a pop art style using Corel PhotoPaint. It provides step-by-step instructions including selecting and preparing an image, desaturating, applying thresholds, and coloring selected gray areas to achieve a final visual effect. The guide emphasizes creating new layers for organization and offers tips for achieving a desirable aesthetic outcome.Experiments
ExperimentsOliverColeman12345
╠²
The document summarizes two photo editing experiments in Photoshop. The first experiment involves creating a glitch effect on an elephant photo by cutting and moving sections to create lines, giving it a 3D effect. The second experiment involves creating a wallpaper image of a soccer player blended into smoke, with a badge and text overlay, sharpening the image. Both experiments allowed the user to learn and practice different photo editing techniques in Photoshop.How to create a film poster
How to create a film posterHG17
╠²
The document provides steps for creating a movie poster using Photoshop and Fireworks. It describes opening background and foreground images, adjusting histograms to modify lighting, cropping and blurring parts of the background, erasing unwanted areas, and using selection tools to isolate characters on white backgrounds. The character image is then copied and scaled on top of the background. Text is added for the title, tagline, and company. An age rating symbol is also copied and isolated.Working with photoshop
Working with photoshopAnto Torres
╠²
This document provides instructions for using various Photoshop tools to edit and manipulate different objects in an image, including shapes, textures, and layers. Circular and elliptical selection tools were used to select circular and elliptical shapes. The rectangular marquee tool selected a complex shape. The magic wand tool ensured no white background was selected. Tools like move, duplicate, and options were utilized to position, modify, and render selected elements. Settings like size, position, and borders customized elements and layers.Adobe Photoshop: Painting Tools
Adobe Photoshop: Painting ToolsDivine Joy Pe├▒ascosas
╠²
The document describes various painting and selection tools in image editing software. It explains tools for applying brush strokes, filling areas with color, replacing color, and applying gradients. Key tools covered are the brush, paint bucket, history brush, magic wand, and gradient tools. Each tool has options to control properties like size, opacity, blending mode, and tolerance.Making of iwasa house render by ferry sugianto
Making of iwasa house render by ferry sugiantoNomer Adona
╠²
This document summarizes the process of rendering an architectural model of Iwasa House using Vray and Sketchup. It describes: (1) Choosing the camera angle to focus on, (2) Setting up ambient lighting and HDRI to establish mood, (3) Texturing the walls, floors, and stairs by remodeling for realism, (4) Positioning IES lights, (5) Adding trees and accessories, (6) Setting render options and doing a raw render, (7) Applying post-production in Photoshop. The full process is explained over several sections to achieve a realistic final rendered image of the house.Complete Tutorial for 3d Text on Photos
Complete Tutorial for 3d Text on PhotosPj Dhanoa
╠²
This document is a comprehensive graphic design tutorial that guides readers on how to create realistic 3D text in a living room scene using Adobe Illustrator and Photoshop. It covers various steps, including importing images, creating 3D text, adjusting colors, and adding shadows for a more lifelike appearance. The tutorial concludes by encouraging readers to experiment further with their designs and share their results.Thought Leadership And Wisdom London
Thought Leadership And Wisdom LondonKate Spiers
╠²
Thought leadership is at the heart of what Wisdom London does and involves sharing ideas, knowledge, and interpretations through human interactions to stimulate discussion and connect with clients. Wisdom London helps organizations develop thoughtful leadership by planning topics and messages, executing projects, diffusing content through various channels, and measuring the impact on opinions and debates. The document provides examples of Wisdom London's work developing journals, advisory boards, reports, and social media strategies to demonstrate their approach to thought leadership.6 Stappen Naar Meer Omzet
6 Stappen Naar Meer OmzetAdHocData
╠²
De goedkoopste online adressen database van Nederland met altijd actuele zakelijke adressen!H:\Facts\Role Models
H:\Facts\Role Modelsguest8cf388
╠²
Hayley Williams is an American singer, songwriter and musician. She is best known as the lead vocalist and keyboardist of the rock band Paramore. Williams formed Paramore in 2004 along with Josh Farro, Jeremy Davis and Zach Farro. Some of her accomplishments include overcoming her stage fright through vocal lessons and singing. She is admired for knowing what she wanted to do from a young age and achieving her dream of singing and having success, such as with her song "Decode" from the Twilight movie soundtrack.
Kat Von D is a Mexican American tattoo artist, television personality and entrepreneur. She owns a tattoo shop called LA Ink and has her own television show. Some of her accomplishments include winning the GuMore Related Content
What's hot (19)
6. production reflection
6. production reflectionMatthewBurniston
╠²
Matt Burniston created clouds in a production process by rendering clouds on a canvas, overlaying blue and purple tones, and adding further clouds and contrast. Stars were generated using noise at specific settings, selected with the magic wand tool, and given a glow by duplicating and blurring layers. A scrolling background was made using three strip slides - two originals and one flipped center slide - seen as a ratio of the canvas and creating an infinite scroll. The experimentation resulted in keeping a health bar. Main sprites were drawn and shaded in layers of differing opacities using selected darker tones painted around to build up shading and texture.Computer Techniques In Photoshop 1
Computer Techniques In Photoshop 1moncrief
╠²
1. The document provides instructions for using Photoshop to convert photographs into digital silkscreens based on Andy Warhol's techniques. It describes how to manipulate images, add layers and effects, and save work.
2. Key steps include using filters, modes, and adjustments to break continuous-tone images into high-contrast "line art" by applying effects like threshold, unsharp mask, and mezzotint.
3. Techniques for converting images to halftones and dithering patterns are described to simulate tones through patterns of dots for screenprinting. Testing printouts is advised to refine the effects.Photoshop
Photoshopmopish
╠²
This document provides instructions for using clipping masks, channel mixing for black and white images, adding color overlays, cloning and patching tools for corrections, and replacing colors in Photoshop. It demonstrates how to create a clipping mask to contain lines within an image, mix channels to achieve a balanced black and white result, overlay an orange layer at 50% opacity to add warmth, use the clone and patch tools to fix wrinkles in a backdrop, and precisely select and replace colors.Image manipulation
Image manipulationClipping Path Adobe
╠²
This tutorial shows how to create a Queen of Hearts photo manipulation in Photoshop. It demonstrates building the background with ornamental and rock images, adding a frame and filling it with cloud and nebula filters. A model and crown are blended into the scene. Cards with different heart designs are arranged around the model. Final adjustments add lighting effects to complete the scene.Photoshop techniques
Photoshop techniquesDaniel Blair
╠²
The document provides instructions for selecting objects in images using various selection tools in photo editing software. It describes how to use the elliptical selection tool to select circular shapes, the rectangular selection tool to select rectangular objects, and the magic wand tool to select objects that are surrounded by a different color. It also provides directions for applying effects like layers, strokes, and filters to modify and enhance images.3 d color at photoshop
3 d color at photoshopnova arianty
╠²
This document provides a 14 step tutorial for creating a colorful art piece with a textured splatter design and text. The steps include:
1) Creating a blue background layer and adding darker and lighter tones of blue to give it depth.
2) Creating a splatter shape using the pen tool, filling it with a desaturated texture, and adding shading and lighting effects to make it appear 3D.
3) Generating 3D text using Xara3D software, saving it, and adjusting it in Photoshop to fit within the design. Reflections and gloss are added to further enhance the text.
4) Providing additional touch-ups and corrections to improve lighting and shading throughoutHoneymoon suite bedroom tutorial ferry
Honeymoon suite bedroom tutorial ferryNomer Adona
╠²
This tutorial summarizes the process of creating a 3D bedroom scene in SketchUp and rendering it with VRay. Key steps include:
1. Importing models from 3ds Max into SketchUp and ensuring all faces are oriented correctly.
2. Positioning the camera and adding basic lighting before furnishing to improve performance.
3. Using an IES light for interior lighting plus a rectangular light from the window.
4. Applying various textures like wood, velvet, and transparency maps to furnishings.
5. Adjusting render settings and using post-processing in Photoshop to warm the scene.Tutorial in gimp
Tutorial in gimpOscarContreras102
╠²
This tutorial by Oscar B. Contreras Jr. demonstrates how to use GIMP for blending images, removing backgrounds, and changing clothing colors. It provides step-by-step instructions for each process, including the use of layer masks, the fuzzy select tool, and the paths tool. The document concludes with tips on adjusting colors and applying effects to enhance the final results.My mini the making bathroom louie castillo
My mini the making bathroom louie castilloNomer Adona
╠²
The document provides steps for creating a 3D model of a bathroom in SketchUp using imported AutoCAD files. It details importing the files, applying tile materials, setting up lighting and scene, and adjusting rendering options to produce a final rendered output of the bathroom interior with realistic lighting and reflections. The key steps include importing CAD files, applying tile textures, setting up a scene and camera view through a bathroom mirror, adding an IES light profile, and adjusting global illumination and background settings for the final render.Unity workflow
Unity workflow DarylBatesGames
╠²
The document describes the steps taken to create a terrain and environment in Unity. It involves molding hills and mountains, adding textures like grass and rock, placing trees, and adding water. Additional details like lighting were also included. Later, a custom sand texture was created in Photoshop and applied to the terrain. Coins were placed that have collision enabled. A third person controller was also added with animation. A wall jumping obstacle course was built using boxes for the walls and obstacles.Coke can tutorial
Coke can tutorialIsabelleHuang9
╠²
The document provides step-by-step instructions for creating a customized Coke can design in Photoshop. It describes 28 steps for designing the can shape, adding textures and shadows, modifying the color scheme, and including details like logos and nutrition information. The goal is to create a minimalist design that differs from the original Coke can appearance through changes to the color palette and font while keeping the basic cylindrical shape. Screenshots accompany each step to demonstrate the design process and results.technologies
technologies poppysm
╠²
Layering in Photoshop allows you to hide layers to declutter your workspace, move layers above or below others to control visibility, and delete or modify individual layers. InDesign enables setting the number of columns per page and gutter size when using column layouts. Jing's screen recording tool lets you capture a portion of the screen along with audio commentary to demonstrate functions while manipulating the screen.Retrato Pop Art Guia Creativa
Retrato Pop Art Guia CreativaPedro Espinoza Hurtado
╠²
This document is a tutorial guide by Pedro Espinoza Hurtado on converting a photo into a pop art style using Corel PhotoPaint. It provides step-by-step instructions including selecting and preparing an image, desaturating, applying thresholds, and coloring selected gray areas to achieve a final visual effect. The guide emphasizes creating new layers for organization and offers tips for achieving a desirable aesthetic outcome.Experiments
ExperimentsOliverColeman12345
╠²
The document summarizes two photo editing experiments in Photoshop. The first experiment involves creating a glitch effect on an elephant photo by cutting and moving sections to create lines, giving it a 3D effect. The second experiment involves creating a wallpaper image of a soccer player blended into smoke, with a badge and text overlay, sharpening the image. Both experiments allowed the user to learn and practice different photo editing techniques in Photoshop.How to create a film poster
How to create a film posterHG17
╠²
The document provides steps for creating a movie poster using Photoshop and Fireworks. It describes opening background and foreground images, adjusting histograms to modify lighting, cropping and blurring parts of the background, erasing unwanted areas, and using selection tools to isolate characters on white backgrounds. The character image is then copied and scaled on top of the background. Text is added for the title, tagline, and company. An age rating symbol is also copied and isolated.Working with photoshop
Working with photoshopAnto Torres
╠²
This document provides instructions for using various Photoshop tools to edit and manipulate different objects in an image, including shapes, textures, and layers. Circular and elliptical selection tools were used to select circular and elliptical shapes. The rectangular marquee tool selected a complex shape. The magic wand tool ensured no white background was selected. Tools like move, duplicate, and options were utilized to position, modify, and render selected elements. Settings like size, position, and borders customized elements and layers.Adobe Photoshop: Painting Tools
Adobe Photoshop: Painting ToolsDivine Joy Pe├▒ascosas
╠²
The document describes various painting and selection tools in image editing software. It explains tools for applying brush strokes, filling areas with color, replacing color, and applying gradients. Key tools covered are the brush, paint bucket, history brush, magic wand, and gradient tools. Each tool has options to control properties like size, opacity, blending mode, and tolerance.Making of iwasa house render by ferry sugianto
Making of iwasa house render by ferry sugiantoNomer Adona
╠²
This document summarizes the process of rendering an architectural model of Iwasa House using Vray and Sketchup. It describes: (1) Choosing the camera angle to focus on, (2) Setting up ambient lighting and HDRI to establish mood, (3) Texturing the walls, floors, and stairs by remodeling for realism, (4) Positioning IES lights, (5) Adding trees and accessories, (6) Setting render options and doing a raw render, (7) Applying post-production in Photoshop. The full process is explained over several sections to achieve a realistic final rendered image of the house.Complete Tutorial for 3d Text on Photos
Complete Tutorial for 3d Text on PhotosPj Dhanoa
╠²
This document is a comprehensive graphic design tutorial that guides readers on how to create realistic 3D text in a living room scene using Adobe Illustrator and Photoshop. It covers various steps, including importing images, creating 3D text, adjusting colors, and adding shadows for a more lifelike appearance. The tutorial concludes by encouraging readers to experiment further with their designs and share their results.Viewers also liked (8)
Thought Leadership And Wisdom London
Thought Leadership And Wisdom LondonKate Spiers
╠²
Thought leadership is at the heart of what Wisdom London does and involves sharing ideas, knowledge, and interpretations through human interactions to stimulate discussion and connect with clients. Wisdom London helps organizations develop thoughtful leadership by planning topics and messages, executing projects, diffusing content through various channels, and measuring the impact on opinions and debates. The document provides examples of Wisdom London's work developing journals, advisory boards, reports, and social media strategies to demonstrate their approach to thought leadership.6 Stappen Naar Meer Omzet
6 Stappen Naar Meer OmzetAdHocData
╠²
De goedkoopste online adressen database van Nederland met altijd actuele zakelijke adressen!H:\Facts\Role Models
H:\Facts\Role Modelsguest8cf388
╠²
Hayley Williams is an American singer, songwriter and musician. She is best known as the lead vocalist and keyboardist of the rock band Paramore. Williams formed Paramore in 2004 along with Josh Farro, Jeremy Davis and Zach Farro. Some of her accomplishments include overcoming her stage fright through vocal lessons and singing. She is admired for knowing what she wanted to do from a young age and achieving her dream of singing and having success, such as with her song "Decode" from the Twilight movie soundtrack.
Kat Von D is a Mexican American tattoo artist, television personality and entrepreneur. She owns a tattoo shop called LA Ink and has her own television show. Some of her accomplishments include winning the GuCreative Folio
Creative FolioGregor_1977
╠²
Gregor Louden maintains both commercial and personal projects to keep his work fresh and inform his paid work. He creates illustrations for his publications and exhibitions to explore new techniques like combining hand drawings with photographs. His process involves scanning drawings, separating the lines from the colors, and then adding photographic elements behind the lines to create composite images. Maintaining personal work leads to new opportunities for Gregor Louden as a freelance artist.čŹčĆ ą║čĆą░čéą║ą░čÅ ą▓ąĄčĆčüąĖčÅ 02.06.16 1
čŹčĆ ą║čĆą░čéą║ą░čÅ ą▓ąĄčĆčüąĖčÅ 02.06.16 1ąæąĖąĘąĮąĄčü-ąŠą╝ą▒čāą┤čüą╝ąĄąĮ ą£ąŠčĆąŠąĘąŠą▓
╠²
ąöąŠą║čāą╝ąĄąĮčé ąŠą┐ąĖčüčŗą▓ą░ąĄčé ą║ąŠąĮčåąĄą┐čåąĖčÄ čüčĆąĄą┤ąĮąĄčüčĆąŠčćąĮąŠą╣ ą┐čĆąŠą│čĆą░ą╝ą╝čŗ čĆą░ąĘą▓ąĖčéąĖčÅ čŹą║ąŠąĮąŠą╝ąĖą║ąĖ ąĀąŠčüčüąĖąĖ, čĆą░ąĘčĆą░ą▒ąŠčéą░ąĮąĮčāčÄ čüč鹊ą╗čŗą┐ąĖąĮčüą║ąĖą╝ ą║ą╗čāą▒ąŠą╝ ą▓ čüąŠąŠčéą▓ąĄčéčüčéą▓ąĖąĖ čü ą┐ąŠčĆčāč湥ąĮąĖčÅą╝ąĖ ą┐čĆą░ą▓ąĖč鹥ą╗čīčüčéą▓ą░. ąŻą┐ąŠą╝ąĖąĮą░ąĄčéčüčÅ čüčéą░ą│ąĮą░čåąĖčÅ ą▓ čĆąŠčüčüąĖą╣čüą║ąŠą╣ 菹║ąŠąĮąŠą╝ąĖą║ąĄ, ąĮą░čćą░ą▓čłą░čÅčüčÅ čü 2012 ą│ąŠą┤ą░, čü ą┐ąŠą┤čĆąŠą▒ąĮčŗą╝ ą░ąĮą░ą╗ąĖąĘąŠą╝ ąĄąĄ ą┐čĆąĖčćąĖąĮ ąĖ ą┐ąŠčüą╗ąĄą┤čüčéą▓ąĖą╣. ą×čüąĮąŠą▓ąĮčŗąĄ ą┐čĆąŠą▒ą╗ąĄą╝čŗ ą▓ą║ą╗čÄčćą░čÄčé ąĘąĮą░čćąĖč鹥ą╗čīąĮąŠąĄ čüąŠą║čĆą░čēąĄąĮąĖąĄ čĆą░ą▒ąŠčćąĖčģ ą╝ąĄčüčé ąĖ ąĮąĖąĘą║ąĖąĄ č鹥ą╝ą┐čŗ čĆąŠčüčéą░ ąÆąÆą¤, čćč鹊 čéčĆąĄą▒čāąĄčé ą║ąŠą╝ą┐ą╗ąĄą║čüąĮąŠą│ąŠ ą┐ąŠą┤čģąŠą┤ą░ ą║ čĆąĄčłąĄąĮąĖčÄ čüčāčēąĄčüčéą▓čāčÄčēąĖčģ 菹║ąŠąĮąŠą╝ąĖč湥čüą║ąĖčģ ą┐čĆąŠą▒ą╗ąĄą╝.Study: The Future of VR, AR and Self-Driving Cars
Study: The Future of VR, AR and Self-Driving CarsLinkedIn
╠²
The research examines the integration of wearable technology, self-driving cars, and AI into everyday life. While 35% of respondents use wearables, their adoption increases with seniority and age, notably with higher usage in Brazil compared to the UK and Australia. Interest in purchasing self-driving cars and VR headsets varies significantly by age and region, with younger individuals showing greater openness, while concerns about AI are present but less acute among those interested in these technologies.Hype vs. Reality: The AI Explainer
Hype vs. Reality: The AI ExplainerLuminary Labs
╠²
The document discusses the current state and future potential of artificial intelligence (AI) in business, separating hype from reality. It emphasizes that AI will change job roles rather than eliminate them, and suggests five practical steps businesses can take to integrate AI in a meaningful way. Key points include starting with specific business problems, fostering empathy in the workforce, and ensuring a clear understanding of AI capabilities.Ad
Similar to Colouring in Photoshop (20)
Evaluation Question 4
Evaluation Question 4RobertWragg
╠²
1) The document discusses how the author used Photoshop to edit photos for a school project. They describe steps like duplicating layers, adjusting curves and levels, adding noise, and correcting lens distortion.
2) They also describe designing a poster by adding shapes and text over an image and adjusting logos to match the color scheme.
3) Finally, they discuss filming a music performance with DSLR cameras on tripods, focusing manually by zooming in fully and adjusting the lens for sharp focus when needed.More photoshop skills
More photoshop skillsmopish
╠²
1) The document provides an overview of techniques used to create a magazine in Photoshop, including changing colors, cutting out images, adding shadows and glow effects, creating shapes and adjusting lighting.
2) Key elements created include the magazine cover with modified text and images, a contents page with fading colors and cut-out pictures, a CD image with adjusted lighting and text, and a double page spread with background images at reduced opacity.
3) Techniques demonstrated include selecting items using various tools, filling selections, adjusting layers, adding layer styles like drop shadows and soft light, and transforming and warping elements.POP ART Tutorial Guide
POP ART Tutorial GuidePedro Espinoza Hurtado
╠²
This document is a tutorial by Pedro Espinoza Hurtado on how to convert a photo into a pop art style using Corel Photo-Paint. It provides step-by-step instructions, including selecting an image, desaturating it, using the magic wand tool for selection, and filling in colors to create the final pop art effect. The guide emphasizes the importance of managing layers and selecting colors for a visually appealing result.Edgy Colors
Edgy Colorssnshnangel04
╠²
The document provides instructions for selectively coloring the eyes in a black and white photo using layers and masks in Photoshop. The steps are: 1) Duplicate the photo layer twice; 2) Apply high pass filters to layers to sharpen details; 3) Desaturate the top layer and change its blend mode; 4) Repeat for another layer; 5) Add a curves adjustment layer and paint with white on the mask to color the eyes; 6) Invert the mask selection and desaturate to remove color from the rest of the photo. Fine-tuning of the eye color is done by adjusting the curves layer.Andy warhol presentation
Andy warhol presentationjs1productionstm
╠²
To create an Andy Warhol style image in Photoshop, follow these steps:
1. Open Photoshop and a photo, then duplicate the background layer. Rename one layer "cut away" and use the magic wand tool to select the background and fill with black.
2. Rename another layer "color" and use the threshold adjustment to give it a high-contrast look.
3. Create new layers for different objects like "shirt" and use the magic wand tool to select the object, then fill with color.
4. Repeat for other objects, lock layers not being edited, and fill selections with bright colors to achieve the classic Warhol style composite image.Andy warhol presentation
Andy warhol presentationjs1productionstm
╠²
To create an Andy Warhol style image in Photoshop, follow these steps:
1. Open Photoshop and a photo, then duplicate the background layer. Rename one layer "cut away" and use the magic wand tool to select the background and fill with black.
2. Rename another layer "color" and use the threshold adjustment to give it a high-contrast look.
3. Create new layers for different objects like "shirt" and use the magic wand tool to select the object, then fill with color.
4. Repeat for other objects, lock layers not being edited, and fill selections with bright colors to achieve the classic Warhol style composite image.Schemingwith warholfulldocument
Schemingwith warholfulldocumentVictor Junior/Senior High School
╠²
This document provides instructions for an art project involving creating a repetitive, unified piece of artwork in Photoshop using color schemes and the style of Andy Warhol. Students are directed to research a product or logo to use, sketch designs, ink a line drawing, scan it, and open it in Photoshop. Directions are given to select colors based on color schemes, fill spaces, arrange the image on a new canvas with four layers, and save/print the results. The objectives are to use knowledge of color schemes and Warhol's style to create a unified piece in Photoshop using a chosen image.Dramatic Wrinkles effect Tutorial
Dramatic Wrinkles effect TutorialRAVE19u3
╠²
The document provides steps to create a dramatic wrinkled skin effect in Photoshop:
1. Add a black and white adjustment layer to alter the color to a moody effect.
2. Set the blending mode of the adjustment layer to Overlay.
3. Duplicate the background layer and apply a plastic wrap filter with the blending mode set to Multiply to darken the skin. Ps zen mj
Ps zen mjMohammed Jogie
╠²
This document provides instructions for creating various visual effects in Photoshop, including creating the appearance of fire, wood, water, brushed metal, and glass. It outlines the steps to take common Photoshop tools and filters to manipulate layers and selections to achieve these realistic material simulations. The steps are broken down in detail with explanatory text and screenshots to clearly illustrate the process. Optional additional steps are also included to refine or enhance the results.Lighting with Photoshop
Lighting with PhotoshopNYCCTfab
╠²
This document provides an overview of three methods for adding lighting effects in Photoshop. Method one uses Photoshop's built-in lighting effects tool. Method two uses layer masking to simulate lighting by overlapping transparent layers. Method three combines the first two methods and applies them to architectural images. The document includes instructions and screenshots to demonstrate each lighting technique.Step-By-Step
Step-By-Stepmaximummedia
╠²
This document provides a step-by-step guide to creating a professional CD cover in Photoshop CS4 in 5 steps:
1) Setting up a new file with the correct dimensions for a CD insert.
2) Creating a border and rasterizing shapes to manipulate objects.
3) Inserting and styling text.
4) Dragging and dropping an image, selecting parts of it, and placing on separate layers.
5) Experimenting with filters to refine the image and combining all elements into the final cover design.Tutorial in gimp
Tutorial in gimpMaTheresaFlorendo
╠²
This document provides instructions for three image editing techniques in GIMP: blending images, removing backgrounds, and changing the color of clothing in an image. To blend images, the user opens two images as layers, adds a layer mask, and uses the gradient tool to fade between the images. To remove a background, the fuzzy select tool is used to select the area to keep, and the alpha channel is locked and deleted. To change clothing color, the user outlines the clothing with the paths tool, desaturates the layer, creates a new color layer, fills the selection with the new color, changes the layer mode to overlay, and blurs the edge.Skills development
Skills developmentHannahPenton
╠²
The document provides instructions for using various photo editing tools in Adobe Photoshop or similar software. It discusses using the history brush tool to retrieve original hair color on a black and white photo. It also covers editing contrast, brightness, and opacity; using custom shapes and the stroke tool; healing blemishes with the healing brush tool; adjusting shadows and highlights; cropping with the magnetic lasso tool; and maintaining the aspect ratio to enlarge a photo without losing quality. The document provides step-by-step explanations and before and after examples for each editing technique.Skills development
Skills developmentHannahPenton
╠²
Using various editing tools in FORTE Magazine, Hannah Penton demonstrates skills for retouching and enhancing photographs. These include the history brush for retrieving original hair color in black and white photos, changing opacity to alter image prominence, and the healing brush tool for removing skin blemishes. Cropping and selection tools are also shown for isolating parts of images. Maintaining the aspect ratio is highlighted as important for enlarging pictures without losing pixel quality.Case Study and Tutorials
Case Study and TutorialsMrLawler
╠²
This document provides instructions for replicating the styles of several historical photographic processes from the 19th century. It includes step-by-step guides for creating daguerreotypes, ambrotypes, tintypes, calotypes, cyanotypes, carte de visites, and adding borders. Additional tips encourage experimenting with different textures and effects to mimic the look of older papers and surfaces. The final section presents a case study challenge to analyze an provided image and deduce the steps taken to create it.Photoshop tutorial - Getting Started and Magic Wand
Photoshop tutorial - Getting Started and Magic WandJenna9
╠²
This document provides instructions for removing backgrounds from images using Photoshop. It explains how to:
1. Create a new blank file and import images
2. Select the area you want to keep using the rectangular marquee or selection brush tool
3. Remove the background by selecting it with the magic wand tool or drawing a selection with the brush tool, then hitting deleteTutorial in Gimp 2.10.2
Tutorial in Gimp 2.10.2RalphEmmanuelBaesa
╠²
The document is a tutorial for blending images using GIMP version 2.10.2, detailing steps such as merging photos, adding layer masks, and removing backgrounds. It also explains how to change the color of a dress in an image using various tools and options in GIMP. Each step includes menu navigation and tool selection to achieve the desired outcome.Paths, Masks And Blend Modes
Paths, Masks And Blend ModesShan
╠²
The document provides instructions for creating a composite image using paths, layer masks, and blend modes in Photoshop. The 11 step process involves: 1) selecting a high resolution photo, 2) using the pen tool to create a path around the photo, 3) refining the edge selection, 4) creating a layer mask filled with black, 5) adding a gradient overlay to create a fading backlight effect, 6) blending additional images using blend modes and opacity adjustments, and 7) fine tuning the blend using curves adjustments.Photoshop skills
Photoshop skillsmopish
╠²
The document describes the various tools and techniques used in Photoshop to design a school magazine. These include using selection tools to cut out images, the gradient tool to create colored backgrounds, shape tools to add design elements, and text tools to add headlines, captions and credits. Effects like drop shadows and warping are also described. The overall summary provided is of creating a magazine layout and design in Photoshop.Ad
Colouring in Photoshop
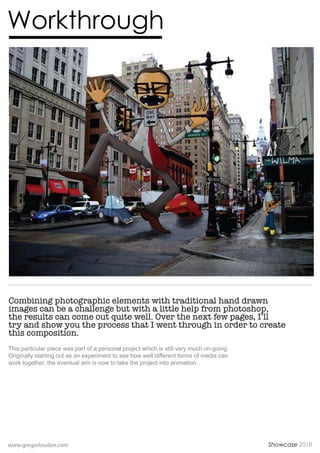
- 1. Workthrough Combining photographic elements with traditional hand drawn images can be a challenge but with a little help from photoshop, the results can come out quite well. Over the next few pages, IŌĆÖll try and show you the process that I went through in order to create this composition. This particular piece was part of a personal project which is still very much on-going. Originally starting out as an experiment to see how well different forms of media can work together, the eventual aim is now to take the project into animation. www.gregorlouden.com Showcase 2010
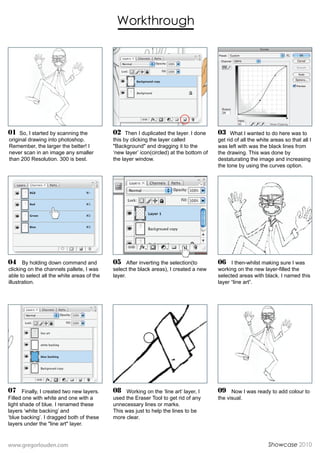
- 2. Workthrough 01 So, I started by scanning the 02 Then I duplicated the layer. I done 03 What I wanted to do here was to original drawing into photoshop. this by clicking the layer called get rid of all the white areas so that all I Remember, the larger the better! I "Background" and dragging it to the was left with was the black lines from never scan in an image any smaller ŌĆśnew layerŌĆÖ icon(circled) at the bottom of the drawing. This was done by than 200 Resolution. 300 is best. the layer window. destaturating the image and increasing the tone by using the curves option. 04 By holding down command and 05 After inverting the selection(to 06 I then-whilst making sure I was clicking on the channels pallete, I was select the black areas), I created a new working on the new layer-filled the able to select all the white areas of the layer. selected areas with black. I named this illustration. layer ŌĆ£line artŌĆØ. 07 Finally, I created two new layers. 08 Working on the ŌĆśline artŌĆÖ layer, I 09 Now I was ready to add colour to Filled one with white and one with a used the Eraser Tool to get rid of any the visual. light shade of blue. I renamed these unnecessary lines or marks. layers ŌĆśwhite backingŌĆÖ and This was just to help the lines to be ŌĆśblue backingŌĆÖ. I dragged both of these more clear. layers under the "line art" layer. www.gregorlouden.com Showcase 2010
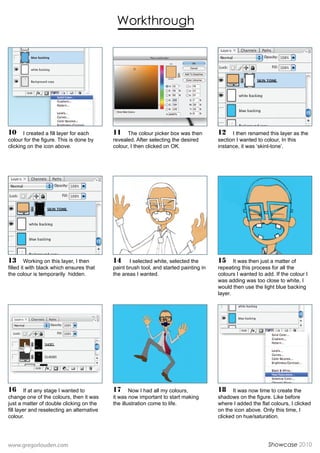
- 3. Workthrough 10 I created a fill layer for each 11 The colour picker box was then 12 I then renamed this layer as the colour for the figure. This is done by revealed. After selecting the desired section I wanted to colour, In this clicking on the icon above. colour, I then clicked on OK. instance, it was ŌĆśskint-toneŌĆÖ. 13 Working on this layer, I then 14 I selected white, selected the 15 It was then just a matter of filled it with black which ensures that paint brush tool, and started painting in repeating this process for all the the colour is temporarily hidden. the areas I wanted. colours I wanted to add. If the colour I was adding was too close to white, I would then use the light blue backing layer. 16 If at any stage I wanted to 17 Now I had all my colours, 18 It was now time to create the change one of the colours, then it was it was now important to start making shadows on the figure. Like before just a matter of double clicking on the the illustration come to life. where I added the flat colours, I clicked fill layer and reselecting an alternative on the icon above. Only this time, I colour. clicked on hue/saturation. www.gregorlouden.com Showcase 2010
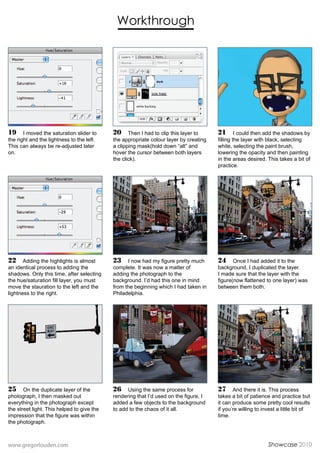
- 4. Workthrough 19 I moved the saturation slider to 20 Then I had to clip this layer to 21 I could then add the shadows by the right and the lightness to the left. the appropriate colour layer by creating filling the layer with black, selecting This can always be re-adjusted later a clipping mask(hold down ŌĆ£altŌĆØ and white, selecting the paint brush, on. hover the cursor between both layers lowering the opacity and then painting the click). in the areas desired. This takes a bit of practice. 22 Adding the highlights is almost 23 I now had my figure pretty much 24 Once I had added it to the an identical process to adding the complete. It was now a matter of background, I duplicated the layer. shadows. Only this time, after selecting adding the photograph to the I made sure that the layer with the the hue/saturation fill layer, you must background. IŌĆÖd had this one in mind figure(now flattened to one layer) was move the stauration to the left and the from the beginning which I had taken in between them both. lightness to the right. Philadelphia. 25 On the duplicate layer of the 26 Using the same process for 27 And there it is. This process photograph, I then masked out rendering that IŌĆÖd used on the figure, I takes a bit of patience and practice but everything in the photograph except added a few objects to the background it can produce some pretty cool results the street light. This helped to give the to add to the chaos of it all. if youŌĆÖre willing to invest a little bit of impression that the figure was within time. the photograph. www.gregorlouden.com Showcase 2010