Edgy Colors
Download as PPT, PDF0 likes931 views

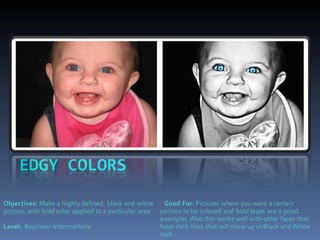
The document provides instructions for selectively coloring the eyes in a black and white photo using layers and masks in Photoshop. The steps are: 1) Duplicate the photo layer twice; 2) Apply high pass filters to layers to sharpen details; 3) Desaturate the top layer and change its blend mode; 4) Repeat for another layer; 5) Add a curves adjustment layer and paint with white on the mask to color the eyes; 6) Invert the mask selection and desaturate to remove color from the rest of the photo. Fine-tuning of the eye color is done by adjusting the curves layer.


More Related Content
What's hot (19)
Viewers also liked (6)


Similar to Edgy Colors (20)


Recently uploaded (20)
![Letasoft Sound Booster 1.12.0.538 Crack + Product Key [Latest] 2025](https://cdn.slidesharecdn.com/ss_thumbnails/wtqproposal2023-250310234537-35b42dc4-250311173648-10477ef4-thumbnail.jpg?width=560&fit=bounds)


Edgy Colors
- 1. ╠²
- 2. Click image to open larger copy for use in tutorial
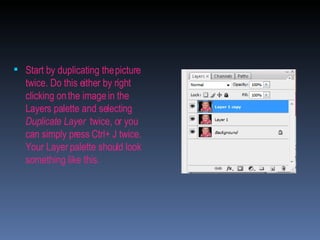
- 3. Start by duplicating the picture twice. Do this either by right clicking on the image in the Layers palette and selecting Duplicate Layer twice, or you can simply press Ctrl+ J twice. Your Layer palette should look something like this.
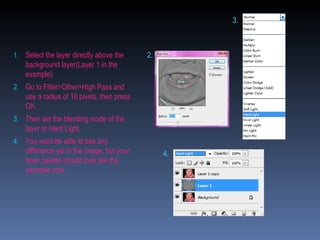
- 4. Select the layer directly above the background layer(Layer 1 in the example). Go to Filter>Other>High Pass and use a radius of 10 pixels, then press OK. Then set the blending mode of the layer to Hard Light. You wont be able to see any difference yet in the image, but your layer palette should look like the example now. 2. 4. 3.
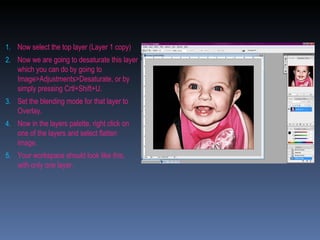
- 5. Now select the top layer (Layer 1 copy) Now we are going to desaturate this layer which you can do by going to Image>Adjustments>Desaturate, or by simply pressing Crtl+Shift+U. Set the blending mode for that layer to Overlay. Now in the layers palette, right click on one of the layers and select flatten image. Your workspace should look like this, with only one layer.
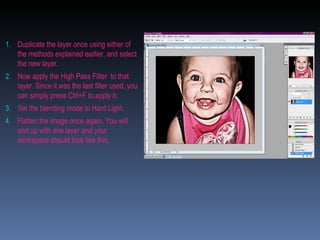
- 6. Duplicate the layer once using either of the methods explained earlier, and select the new layer. Now apply the High Pass Filter to that layer. Since it was the last filter used, you can simply press Ctrl+F to apply it. Set the blending mode to Hard Light. Flatten the image once again. You will end up with one layer and your workspace should look like this.
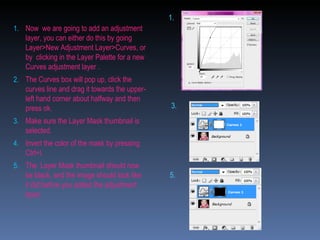
- 7. Now we are going to add an adjustment layer, you can either do this by going Layer>New Adjustment Layer>Curves, or by clicking in the Layer Palette for a new Curves adjustment layer . The Curves box will pop up, click the curves line and drag it towards the upper-left hand corner about halfway and then press ok. Make sure the Layer Mask thumbnail is selected. Invert the color of the mask by pressing Ctrl+I. The Layer Mask thumbnail should now be black, and the image should look like it did before you added the adjustment layer. 1. 5. 3.
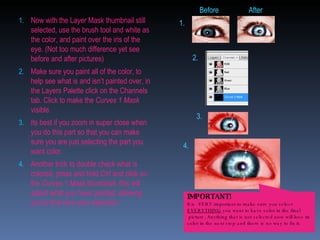
- 8. Now with the Layer Mask thumbnail still selected, use the brush tool and white as the color, and paint over the iris of the eye. (Not too much difference yet see before and after pictures) Make sure you paint all of the color, to help see what is and isnŌĆÖt painted over, in the Layers Palette click on the Channels tab. Click to make the Curves 1 Mask visible. Its best if you zoom in super close when you do this part so that you can make sure you are just selecting the part you want color. Another trick to double check what is colored, press and hold Ctrl and click on the Curves 1 Mask thumbnail, this will select what you have painted, allowing you to fine tune your selection. 1. 2. 3. 4. Before After IMPORTANT! It is VERY important to make sure you select EVERYTHING you want to have color in the final picture. Anything that is not selected now will lose its color in the next step and there is no way to fix it.
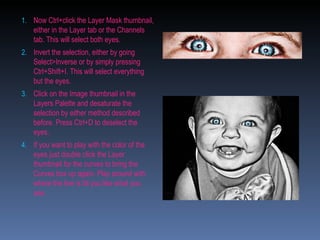
- 9. Now Ctrl+click the Layer Mask thumbnail, either in the Layer tab or the Channels tab. This will select both eyes. Invert the selection, either by going Select>Inverse or by simply pressing Ctrl+Shift+I. This will select everything but the eyes. Click on the Image thumbnail in the Layers Palette and desaturate the selection by either method described before. Press Ctrl+D to deselect the eyes. If you want to play with the color of the eyes just double click the Layer thumbnail for the curves to bring the Curves box up again. Play around with where the line is till you like what you see.
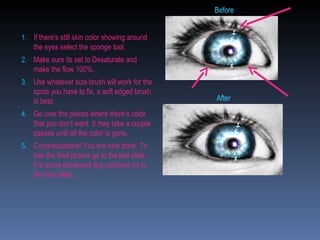
- 10. If there's still skin color showing around the eyes select the sponge tool. Make sure its set to Desaturate and make the flow 100%. Use whatever size brush will work for the spots you have to fix, a soft edged brush is best. Go over the places where thereŌĆÖs color that you donŌĆÖt want. It may take a couple passes until all the color is gone. Congratulations! You are now done. To see the final picture go to the last slide. For some advanced tips continue on to the next slide. Before After
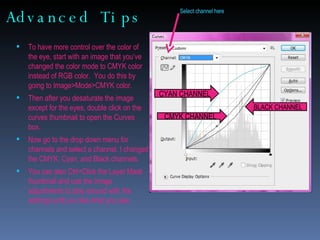
- 11. Advanced Tips To have more control over the color of the eye, start with an image that youŌĆÖve changed the color mode to CMYK color instead of RGB color. You do this by going to Image>Mode>CMYK color. Then after you desaturate the image except for the eyes, double click on the curves thumbnail to open the Curves box. Now go to the drop down menu for channels and select a channel. I changed the CMYK, Cyan, and Black channels. You can also Ctrl+Click the Layer Mask thumbnail and use the Image adjustments to play around with the settings until you like what you see. Select channel here CYAN CHANNEL CMYK CHANNEL BLACK CHANNEL
- 12. ╠²