ESP8266 Wifi Nodemcu
Download as PPTX, PDF2 likes1,252 views
The NodeMcu is an open-source firmware and development kit that helps you to Prototype your IOT product within a few Lua script lines.
1 of 13
Downloaded 87 times






Recommended
Arduino


ArduinoJerin John
Ėý
This document provides an overview of Arduino, an open-source hardware platform used for building interactive objects and prototypes. It describes Arduino as a single-board microcontroller intended to make electronics projects more accessible. Key topics covered include the Arduino programming environment, common Arduino boards and their features, examples of simple Arduino projects like blinking an LED and building a line-following robot, and comparisons to other prototyping platforms. The document encourages readers to get started with Arduino for its low cost, easy programming environment, and large community support.Introduction to Arduino


Introduction to ArduinoGreen Moon Solutions
Ėý
The document provides an introduction to Arduino, including:
- What an Arduino is and its main components like a microprocessor, digital pins for inputs and outputs, and analog pins.
- How to program an Arduino using a processing "sketch" with setup, loop, and other functions like digitalWrite, analogWrite, and delay.
- Examples of inputs like sensors and outputs like LEDs.
- An overview of the Arduino programming language and block-based programming with ArduBlocks.
- Information on upcoming demonstrations of Arduino projects and links for further learning resources.Esp8266 basics


Esp8266 basicsEueung Mulyana
Ėý
This document provides an introduction to programming the ESP8266 WiFi chip. It outlines ESP8266 basics, including an overview of the ESP-01 and ESP-12 models. It then demonstrates how to connect an ESP8266 to an Arduino and use the Blynk app and library to control an LED over WiFi. Wiring diagrams and code examples are provided to showcase setting up and programming the ESP8266 for basic WiFi functionality and Blynk integration.Esp8266 NodeMCU


Esp8266 NodeMCUroadster43
Ėý
Lightning talk from the 24 March 2016 FW Dev meetup.
http://www.meetup.com/FW-Dev/
This talk will give a brief overview of the ESP8266, show how easy they are to get started with and discuss interest in holding a Saturday workshopIntroduction to Arduino


Introduction to ArduinoOmer Kilic
Ėý
This document introduces Arduino, an open-source electronics prototyping platform. It discusses that Arduino is intended for artists, designers, hobbyists to create interactive objects. It then describes the Arduino hardware, including the microcontroller, I/O pins, and official and third party boards. It also covers the Arduino programming environment and language, and provides examples of common tasks like reading buttons and displaying to serial. Finally, it discusses common sensors, motors, and modules used with Arduino and points to the active Arduino community for support.Arduino Platform with C programming.


Arduino Platform with C programming.Govind Jha
Ėý
A ppt on Arduino Platform with C programming.
Winter traning arduino ppt.
For GGSIPU students (winter traning report in 6th semester)ESP32 WiFi & Bluetooth Module - Getting Started Guide


ESP32 WiFi & Bluetooth Module - Getting Started Guidehandson28
Ėý
The document provides information about the ESP32 WiFi and Bluetooth SoC module. It discusses the ESP32's dual-core processor, integrated antennas and radios, power efficiency features, and applications in mobile devices and IoT. It also provides specifications, pinout diagrams, and instructions for integrating the ESP32 with the Arduino IDE. Examples are given for running code on the ESP32 to scan for WiFi networks and toggle an LED with a button press.Introduction To Raspberry Pi with Simple GPIO pin Control


Introduction To Raspberry Pi with Simple GPIO pin ControlPradip Bhandari
Ėý
This slide includes Introduction to raspberry pi . Also it covers how to play with GPIO pins using Python languageIntroduction to Arduino


Introduction to ArduinoRichard Rixham
Ėý
Richard Rixham introduces Arduino, an open source hardware and software platform that allows users to build physical computing devices ranging from flashing lights to robots. Arduino uses an inexpensive microcontroller board and IDE to make programming in C/C++ accessible. It has digital and analog pins that can interact with sensors and actuators. Common Arduino models include the Uno, Mini, and Mega. Shield add-on boards provide extra functions like wireless connectivity. Example projects and resources for learning more are provided.Ardui no 


Ardui no Amol Sakhalkar
Ėý
This document provides an overview of microcontrollers and the Arduino platform. It discusses what a microcontroller is and some common types. It then introduces Arduino as an open-source prototyping platform using easy hardware and software. Several Arduino boards are described and the ATmega328p microcontroller chip is specified. The document outlines how to download the Arduino software and write programs. It provides examples of basic Arduino projects like blinking LEDs, reading sensors, and creating sounds.Arduino presentation


Arduino presentationMichael Senkow
Ėý
Arduino is an open-source hardware platform for building interactive electronic projects. It consists of a simple open hardware design with an Atmel processor and input/output support. The hardware is less expensive than other prototyping devices. It is accompanied by a software side written in Java and based on Processing. Arduino began in Italy to control student-built interaction design projects and is descended from the open-source Wiring platform. It has a large community and potential for growth supporting its future success.Arduino


Arduinovipin7vj
Ėý
The document discusses the Arduino, an open-source electronics prototyping platform. It provides a brief history of how Arduino was created in 2005 to provide an affordable platform for interactive design projects. It describes the key features of the Arduino Uno board and the Arduino programming environment. Finally, it outlines some common applications of Arduino in fields like home automation, robotics, and sensor prototyping.Introduction to the Arduino


Introduction to the ArduinoWingston
Ėý
The document provides an introduction to Arduino and physical computing using microcontrollers. It describes that Arduino boards use ATmega microcontrollers and can be programmed to sense the physical world using sensors, process data, and control physical devices using actuators. The document outlines the basic components of a microcontroller, how the Arduino programming environment works, and the basic structure and functions used in Arduino programs.Arduino Workshop Day 1 - Basic Arduino


Arduino Workshop Day 1 - Basic ArduinoVishnu
Ėý
Arduino Workshop Day 1 šÝšÝßĢs
Basics of Arduino - Introduction, Basics of Circuits, Signals & Electronics, LED Interfacing, Switch, Buzzer, LCD & Bluetooth Communication.1. Introduction to Embedded Systems & IoT


1. Introduction to Embedded Systems & IoTIEEE MIU SB
Ėý
This document provides an introduction to embedded systems and the Internet of Things (IoT). It defines embedded systems as hardware and software components that perform dedicated tasks as part of larger machines. Embedded systems are designed for specific tasks without human intervention and must meet real-time performance constraints. Examples are given of embedded systems applications. It then discusses microprocessors versus microcontrollers. The document introduces Arduino, an open-source hardware and software platform used to build electronics projects, and describes its various components. It defines IoT as the network of physical objects embedded with electronics that collect and share data over the internet. Applications and evolution of IoT are briefly outlined.SIP over TLS


SIP over TLSHossein Yavari
Ėý
This document discusses SIP over TLS. It describes how SIP signaling can be secured using TLS instead of UDP or TCP. The TLS handshake process is explained in detail including the messages exchanged between the client and server. It also discusses how media can be encrypted using SRTP and the different key management protocols that can be used like SDES, DTLS, and ZRTP. Sample packet captures of SIP over TLS calls are also provided.What is Arduino ?


What is Arduino ?Niket Chandrawanshi
Ėý
The document discusses the Arduino open-source electronics prototyping platform. It describes what Arduino is, its programming environment, advantages, features, applications, and how it compares to other prototyping platforms. Arduino is an affordable and easy to use platform for creating interactive electronic projects through an open-source hardware board and software. It allows users to prototype sensors and control devices through code.Introduction to Node MCU


Introduction to Node MCUAmarjeetsingh Thakur
Ėý
1. Explaining the importance of platform based development
2. Understanding The importance of NodeMCU and demonstrate its interfacing with various devices and sensors.
Wi-Fi Module


Wi-Fi ModuleMohsen Sarakbi
Ėý
This document provides an overview and instructions for using a Wi-Fi module in a communication PIC microcontroller lab. It defines Wi-Fi and the 802.11 networking standards. It describes the WiFly module and how to configure it, including connecting to wireless networks, setting communication parameters, and forwarding TCP packets. The lab portion involves testing the module on TeraTerm Pro, developing a moving car application, and an Android APK.Basics of arduino uno


Basics of arduino unoRahat Sood
Ėý
This document provides an overview of the Arduino Uno microcontroller board. It defines a microcontroller as a single-chip computer containing a CPU, memory, and input/output interfaces. The Arduino is an open-source electronics platform with easy-to-use hardware and software that allows anyone to develop interactive electronic projects. Key specifications of the Arduino Uno board are provided, including its microcontroller chip, memory, analog and digital pins. The process of analog to digital conversion is explained. Basic Arduino programming concepts like data types, statements, operators, and control structures are covered. The bare minimum code structure of setup() and loop() functions is described.Introduction to Arduino


Introduction to Arduinobaabtra.com - No. 1 supplier of quality freshers
Ėý
The document provides an introduction to programming with Arduino. It explains that Arduino is an open-source hardware and software platform used to build interactive electronic projects. It consists of a microcontroller board that can be programmed and used to read and control sensors, LEDs, motors and more. The document outlines the basic steps to get started which include downloading the Arduino IDE, installing drivers, selecting the board type, and uploading a test "Blink" program to make an LED turn on and off. It also provides explanations of some core electronic components like resistors, LEDs, sensors and describes how to set up a simple temperature sensing project and store the sensor readings in a database.Lesson sample introduction to arduino


Lesson sample introduction to arduinoBetsy Eng
Ėý
This document introduces Arduino by defining what it is, the parts of an Arduino board, and how to program it. An Arduino is a microcontroller board that can be used to develop interactive objects by taking various inputs (e.g. sensors) and controlling physical outputs (e.g. lights, motors). It explains the basic components of an Arduino board and how Arduino code is uploaded and run. A simple example is provided to blink an LED using Arduino code and by changing the delay times, the blinking speed can be adjusted. Keywords like Arduino board, sketch, and LED are also defined.Arduino- Serial communication


Arduino- Serial communicationJawaher Abdulwahab Fadhil
Ėý
Arduinos use serial ports for communicating with computers and other devices. The USB port of an Arduino is used for serial communication with a computer, with the added advantage that USB can also be used to power the device. USB also has the advantage of auto-configuring most of the parameters.I2C Protocol


I2C ProtocolSudhanshu Janwadkar
Ėý
This presentation discusses the details of the I2C protocol and interfacing of EEPROM with 8051 based on I2C protocol. It also discusses the other applications of I2C protocolIoT Programming on the Raspberry Pi


IoT Programming on the Raspberry PiDamien Magoni
Ėý
A 5-part introductory course on IoT and programming a Raspberry Pi model B version 3 for reading a DHT11 sensor.Software defined radio


Software defined radioSandesh Poovaiah
Ėý
This document discusses software defined radio (SDR) technology. SDR uses software modules running on generic hardware like DSPs and microprocessors to implement radio functions rather than using dedicated hardware components. This allows radios to have their functionality redefined or upgraded through changes to its software. The document outlines the architecture of SDR systems and provides examples of SDR applications in areas like public safety, military uses, and commercial devices. It also discusses benefits such as flexibility and interoperability as well as challenges related to hardware limitations and software complexity. The future scope of SDR is seen to include adaptive radios and cognitive radios that can dynamically change their transmission behavior.Introduction To Embedded Systems


Introduction To Embedded SystemsVishwa Mohan
Ėý
This document provides an overview of embedded systems and trends in three paragraphs:
It defines an embedded system as any electronic device that incorporates a microprocessor to perform dedicated tasks. It discusses the history of embedded systems from early military and calculator applications to today where they are ubiquitous. It lists some common applications of embedded systems like ATMs, phones, vehicles, industrial equipment, and medical devices.Interfacing bluetooth with arduino


Interfacing bluetooth with arduinoJairaj Jangle
Ėý
In this presentation, Interfacing Bluetooth(HC-05) with Arduino is explained with some AT commands to configure and initialize the Bluetooth module(HC-05).
Code for Arduino:
#include <SoftwareSerial.h>
SoftwareSerial mySerial(10, 11); // RX, TX
void setup()
{
Serial.begin(9600);
pinMode(9,OUTPUT); digitalWrite(9,HIGH);
Serial.println("Enter AT commands:");
mySerial.begin(38400);
}
void loop()
{
if (mySerial.available())
Serial.write(mySerial.read());
if (Serial.available())
mySerial.write(Serial.read());
}Connected hardware for Software Engineers 101


Connected hardware for Software Engineers 101Pance Cavkovski
Ėý
A short ignite talk on how to begin with hardware prototyping and coding if you are a Java Software Engineer.Embedded application development


Embedded application developmentAakash Raj
Ėý
The document discusses several embedded application development platforms including Arduino, Raspberry Pi, Tiva C Series, and MSP430. It provides overview information on each platform, including key components, features, programming languages supported, and examples of applications. For Arduino, it describes the Arduino Uno board in detail. For Raspberry Pi, it outlines the basic specifications and components. For Tiva C Series and MSP430, it summarizes the development boards and features of the microcontrollers.More Related Content
What's hot (20)
Introduction to Arduino


Introduction to ArduinoRichard Rixham
Ėý
Richard Rixham introduces Arduino, an open source hardware and software platform that allows users to build physical computing devices ranging from flashing lights to robots. Arduino uses an inexpensive microcontroller board and IDE to make programming in C/C++ accessible. It has digital and analog pins that can interact with sensors and actuators. Common Arduino models include the Uno, Mini, and Mega. Shield add-on boards provide extra functions like wireless connectivity. Example projects and resources for learning more are provided.Ardui no 


Ardui no Amol Sakhalkar
Ėý
This document provides an overview of microcontrollers and the Arduino platform. It discusses what a microcontroller is and some common types. It then introduces Arduino as an open-source prototyping platform using easy hardware and software. Several Arduino boards are described and the ATmega328p microcontroller chip is specified. The document outlines how to download the Arduino software and write programs. It provides examples of basic Arduino projects like blinking LEDs, reading sensors, and creating sounds.Arduino presentation


Arduino presentationMichael Senkow
Ėý
Arduino is an open-source hardware platform for building interactive electronic projects. It consists of a simple open hardware design with an Atmel processor and input/output support. The hardware is less expensive than other prototyping devices. It is accompanied by a software side written in Java and based on Processing. Arduino began in Italy to control student-built interaction design projects and is descended from the open-source Wiring platform. It has a large community and potential for growth supporting its future success.Arduino


Arduinovipin7vj
Ėý
The document discusses the Arduino, an open-source electronics prototyping platform. It provides a brief history of how Arduino was created in 2005 to provide an affordable platform for interactive design projects. It describes the key features of the Arduino Uno board and the Arduino programming environment. Finally, it outlines some common applications of Arduino in fields like home automation, robotics, and sensor prototyping.Introduction to the Arduino


Introduction to the ArduinoWingston
Ėý
The document provides an introduction to Arduino and physical computing using microcontrollers. It describes that Arduino boards use ATmega microcontrollers and can be programmed to sense the physical world using sensors, process data, and control physical devices using actuators. The document outlines the basic components of a microcontroller, how the Arduino programming environment works, and the basic structure and functions used in Arduino programs.Arduino Workshop Day 1 - Basic Arduino


Arduino Workshop Day 1 - Basic ArduinoVishnu
Ėý
Arduino Workshop Day 1 šÝšÝßĢs
Basics of Arduino - Introduction, Basics of Circuits, Signals & Electronics, LED Interfacing, Switch, Buzzer, LCD & Bluetooth Communication.1. Introduction to Embedded Systems & IoT


1. Introduction to Embedded Systems & IoTIEEE MIU SB
Ėý
This document provides an introduction to embedded systems and the Internet of Things (IoT). It defines embedded systems as hardware and software components that perform dedicated tasks as part of larger machines. Embedded systems are designed for specific tasks without human intervention and must meet real-time performance constraints. Examples are given of embedded systems applications. It then discusses microprocessors versus microcontrollers. The document introduces Arduino, an open-source hardware and software platform used to build electronics projects, and describes its various components. It defines IoT as the network of physical objects embedded with electronics that collect and share data over the internet. Applications and evolution of IoT are briefly outlined.SIP over TLS


SIP over TLSHossein Yavari
Ėý
This document discusses SIP over TLS. It describes how SIP signaling can be secured using TLS instead of UDP or TCP. The TLS handshake process is explained in detail including the messages exchanged between the client and server. It also discusses how media can be encrypted using SRTP and the different key management protocols that can be used like SDES, DTLS, and ZRTP. Sample packet captures of SIP over TLS calls are also provided.What is Arduino ?


What is Arduino ?Niket Chandrawanshi
Ėý
The document discusses the Arduino open-source electronics prototyping platform. It describes what Arduino is, its programming environment, advantages, features, applications, and how it compares to other prototyping platforms. Arduino is an affordable and easy to use platform for creating interactive electronic projects through an open-source hardware board and software. It allows users to prototype sensors and control devices through code.Introduction to Node MCU


Introduction to Node MCUAmarjeetsingh Thakur
Ėý
1. Explaining the importance of platform based development
2. Understanding The importance of NodeMCU and demonstrate its interfacing with various devices and sensors.
Wi-Fi Module


Wi-Fi ModuleMohsen Sarakbi
Ėý
This document provides an overview and instructions for using a Wi-Fi module in a communication PIC microcontroller lab. It defines Wi-Fi and the 802.11 networking standards. It describes the WiFly module and how to configure it, including connecting to wireless networks, setting communication parameters, and forwarding TCP packets. The lab portion involves testing the module on TeraTerm Pro, developing a moving car application, and an Android APK.Basics of arduino uno


Basics of arduino unoRahat Sood
Ėý
This document provides an overview of the Arduino Uno microcontroller board. It defines a microcontroller as a single-chip computer containing a CPU, memory, and input/output interfaces. The Arduino is an open-source electronics platform with easy-to-use hardware and software that allows anyone to develop interactive electronic projects. Key specifications of the Arduino Uno board are provided, including its microcontroller chip, memory, analog and digital pins. The process of analog to digital conversion is explained. Basic Arduino programming concepts like data types, statements, operators, and control structures are covered. The bare minimum code structure of setup() and loop() functions is described.Introduction to Arduino


Introduction to Arduinobaabtra.com - No. 1 supplier of quality freshers
Ėý
The document provides an introduction to programming with Arduino. It explains that Arduino is an open-source hardware and software platform used to build interactive electronic projects. It consists of a microcontroller board that can be programmed and used to read and control sensors, LEDs, motors and more. The document outlines the basic steps to get started which include downloading the Arduino IDE, installing drivers, selecting the board type, and uploading a test "Blink" program to make an LED turn on and off. It also provides explanations of some core electronic components like resistors, LEDs, sensors and describes how to set up a simple temperature sensing project and store the sensor readings in a database.Lesson sample introduction to arduino


Lesson sample introduction to arduinoBetsy Eng
Ėý
This document introduces Arduino by defining what it is, the parts of an Arduino board, and how to program it. An Arduino is a microcontroller board that can be used to develop interactive objects by taking various inputs (e.g. sensors) and controlling physical outputs (e.g. lights, motors). It explains the basic components of an Arduino board and how Arduino code is uploaded and run. A simple example is provided to blink an LED using Arduino code and by changing the delay times, the blinking speed can be adjusted. Keywords like Arduino board, sketch, and LED are also defined.Arduino- Serial communication


Arduino- Serial communicationJawaher Abdulwahab Fadhil
Ėý
Arduinos use serial ports for communicating with computers and other devices. The USB port of an Arduino is used for serial communication with a computer, with the added advantage that USB can also be used to power the device. USB also has the advantage of auto-configuring most of the parameters.I2C Protocol


I2C ProtocolSudhanshu Janwadkar
Ėý
This presentation discusses the details of the I2C protocol and interfacing of EEPROM with 8051 based on I2C protocol. It also discusses the other applications of I2C protocolIoT Programming on the Raspberry Pi


IoT Programming on the Raspberry PiDamien Magoni
Ėý
A 5-part introductory course on IoT and programming a Raspberry Pi model B version 3 for reading a DHT11 sensor.Software defined radio


Software defined radioSandesh Poovaiah
Ėý
This document discusses software defined radio (SDR) technology. SDR uses software modules running on generic hardware like DSPs and microprocessors to implement radio functions rather than using dedicated hardware components. This allows radios to have their functionality redefined or upgraded through changes to its software. The document outlines the architecture of SDR systems and provides examples of SDR applications in areas like public safety, military uses, and commercial devices. It also discusses benefits such as flexibility and interoperability as well as challenges related to hardware limitations and software complexity. The future scope of SDR is seen to include adaptive radios and cognitive radios that can dynamically change their transmission behavior.Introduction To Embedded Systems


Introduction To Embedded SystemsVishwa Mohan
Ėý
This document provides an overview of embedded systems and trends in three paragraphs:
It defines an embedded system as any electronic device that incorporates a microprocessor to perform dedicated tasks. It discusses the history of embedded systems from early military and calculator applications to today where they are ubiquitous. It lists some common applications of embedded systems like ATMs, phones, vehicles, industrial equipment, and medical devices.Interfacing bluetooth with arduino


Interfacing bluetooth with arduinoJairaj Jangle
Ėý
In this presentation, Interfacing Bluetooth(HC-05) with Arduino is explained with some AT commands to configure and initialize the Bluetooth module(HC-05).
Code for Arduino:
#include <SoftwareSerial.h>
SoftwareSerial mySerial(10, 11); // RX, TX
void setup()
{
Serial.begin(9600);
pinMode(9,OUTPUT); digitalWrite(9,HIGH);
Serial.println("Enter AT commands:");
mySerial.begin(38400);
}
void loop()
{
if (mySerial.available())
Serial.write(mySerial.read());
if (Serial.available())
mySerial.write(Serial.read());
}Similar to ESP8266 Wifi Nodemcu (20)
Connected hardware for Software Engineers 101


Connected hardware for Software Engineers 101Pance Cavkovski
Ėý
A short ignite talk on how to begin with hardware prototyping and coding if you are a Java Software Engineer.Embedded application development


Embedded application developmentAakash Raj
Ėý
The document discusses several embedded application development platforms including Arduino, Raspberry Pi, Tiva C Series, and MSP430. It provides overview information on each platform, including key components, features, programming languages supported, and examples of applications. For Arduino, it describes the Arduino Uno board in detail. For Raspberry Pi, it outlines the basic specifications and components. For Tiva C Series and MSP430, it summarizes the development boards and features of the microcontrollers.Tech Talk IOT


Tech Talk IOTJayant Rajwani
Ėý
This document provides an overview of getting started with Internet of Things (IoT) development using Arduino and the ESP8266 microcontroller. It discusses what a microcontroller and Arduino board are, common Arduino board types like the Arduino UNO, sensors, the Arduino IDE, and IoT. It also covers the ESP8266 module, connecting it to the Arduino IDE, and provides an example IoT demo using the NodeMCU and Blynk app.Ardunio


ArdunioDILEEP KUMAR
Ėý
The document provides information about how the Arduino board works. It explains that the Arduino uses an Atmega microcontroller chip which is programmed to control inputs and outputs. A secondary chip, such as an Atmega8U2, handles the USB connection and communication between the microcontroller and computer. Supporting components like voltage regulators, capacitors, crystals and resistors work together to power the chips safely and generate the clock signal needed for programming and operation.Taller IoT en la Actualidad


Taller IoT en la ActualidadLaurence HR
Ėý
This document discusses Arduino and its history and applications. It notes that Arduino was created in 2005 as an educational open-source hardware project. It was developed by Massimo Banzi and others to provide a low-cost, easy-to-use platform for prototyping that could be used in classrooms. Arduino was built upon Wiring, an earlier open-source electronics platform, to make hardware programming more approachable. It has since grown into a large community and product line used widely for hardware prototyping, especially in IoT and home automation applications.Getting started with Intel IoT Developer Kit


Getting started with Intel IoT Developer KitSulamita Garcia
Ėý
This document provides an overview of setting up an Intel IoT Developer Kit including the hardware components, installing software, and running sample codes. It discusses the Galileo and Edison boards, microSD cards, IDEs, MRAA and UPM libraries, and connecting devices. It also demonstrates how to set up environments for C/C++ with Eclipse, JavaScript with XDK, and Arduino, and describes where to find documentation and sample codes for getting started with the kits and sensors.Arduino camera interfacing OV7670


Arduino camera interfacing OV7670Somnath Sharma
Ėý
This document discusses interfacing an OV7670 camera module with an Arduino board. It provides an overview of the hardware used, including details of the Arduino board specifications and the camera module. It then describes how the camera module connects to the Arduino via its pins and communicates over the Serial Camera Control Bus protocol. The document explains that the Arduino software IDE makes it easy to write code to capture and process images from the camera module.arduino.pdf


arduino.pdfGurumurthy B R
Ėý
This document provides an overview of Arduinos and microcontroller programming. It discusses that Arduinos are open source electronic prototyping platforms that use flexible hardware and software. It then covers the basic structure of Arduino code using setup and loop functions, how to set pin modes as input or output, and how to read and write digital values. The document also introduces the concept of libraries and how they make it easy to connect to sensors and displays. Finally, it discusses single board computers like BeagleBone and compares their processors, interfaces, and software compatibility.Esp8266 v12


Esp8266 v12handson28
Ėý
This document provides instructions for using the ESP8266 microcontroller development board. It begins with an overview of the ESP8266 module and its capabilities. It then provides step-by-step instructions for installing the Arduino IDE and ESP8266 package to program the board using the Arduino environment. Example code is given to blink an LED and connect to WiFi. The document also provides instructions for flashing the NodeMCU firmware using a Windows machine and programming the board using the ESPlorer IDE.Introduction of Arduino Uno


Introduction of Arduino UnoMd. Nahidul Islam
Ėý
Arduino is an open-source electronics platform based on easy-to-use hardware and software. Arduino boards are able to read inputs - light on a sensor, a finger on a button, or a Twitter message - and turn it into an output - activating a motor, turning on an LED, publishing something online.Attendance system using MYSQL with Raspberry pi and RFID-RC522


Attendance system using MYSQL with Raspberry pi and RFID-RC522Sanjay Kumar
Ėý
In this project we are taking data from RFID reader which is connected to Node MCU V3 and saving it to MySQL database running on Raspberry pi.
esp8266nodemcu iot based project on 2025.pptx


esp8266nodemcu iot based project on 2025.pptxAbhinavGurijala
Ėý
esp8266nodemcu iot based project on 2025.pptxThe NodeMCU module is to the ESP-12s as the Arduino UNO is to ATMEGA328s.


The NodeMCU module is to the ESP-12s as the Arduino UNO is to ATMEGA328s.AbhinavGurijala
Ėý
The NodeMCU module is to the ESP-12s as the Arduino UNO is to ATMEGA328s.Adafruit Huzzah Esp8266 WiFi Board


Adafruit Huzzah Esp8266 WiFi BoardBiagio Botticelli
Ėý
Presentation of the ESP8266 WiFi module created for the course Pervasive Systems 2016 of the Master Degree in Engineering in Computer Science (DIAG, University of Rome "La Sapienza")
Pervasive Systems 2016 Web Site: http://ichatz.me/index.php/Site/PervasiveSystems2016
LinkedIn Profile: https://www.linkedin.com/in/biagio-botticelli-444b87105?trk=hp-identity-name
GitHub Repository: https://github.com/biagiobotticelli/ESP8266
Microcontroller based system Babc.pptx


Microcontroller based system Babc.pptxAbhinavGurijala
Ėý
This document provides an introduction to programming the ESP8266 WiFi chip. It outlines ESP8266 basics, including an overview of the ESP-01Tac Presentation October 72014- Raspberry PI


Tac Presentation October 72014- Raspberry PICliff Samuels Jr.
Ėý
Topic: Low cost computing using the Raspberry PI and other single board computing platforms. Overview of the growing low cost computing environment and demo of basic configuration of the Raspberry PI and Arduino for home and business projects.Basics of open source embedded development board (


Basics of open source embedded development board (Dhruwank Vankawala
Ėý
A microcontroller is a computer on a single integrated chip that contains a processor, memory, and input/output ports. Common microcontroller families include Intel, Atmel, Microchip, and ARM. Microcontrollers are used in devices like cellphones, toys, appliances, cars, and cameras. The Arduino is a popular open-source hardware and software platform for building prototypes and interactive objects. It uses a simple programming language based on C/C++ and is inexpensive and easy to use.Basics of open source embedded development board (


Basics of open source embedded development board (Dhruwank Vankawala
Ėý
A microcontroller is a computer on a single integrated chip that contains a processor, memory, and input/output ports. Common microcontroller families include Intel, Atmel, Microchip, and ARM. Microcontrollers are used in devices like cellphones, toys, appliances, cars, and cameras.
The Arduino is an open-source hardware and software platform for building electronics projects. It consists of a microcontroller board, which can be programmed using the Arduino programming language, which is based on C/C++. The Arduino Uno is a popular Arduino board that uses the ATmega328P microcontroller. Accessories called shields can be added to Arduino boards to expand their functionality.
TheMore from creatjet3d labs (8)
Basic Sensors 


Basic Sensors creatjet3d labs
Ėý
This document provides information about different types of sensors, including infrared (IR), temperature, and sound sensors. It discusses the basic working principles of IR sensors, including how they detect objects based on reflected IR light. The document also describes temperature sensors that output a voltage proportional to temperature. Finally, it explains how sound sensors use a microphone and 555 timer integrated circuit to measure sound pressure variations and generate pulses. Key components discussed include the LM358 comparator, LM35 temperature sensor, and operating modes of the 555 timer IC like monostable, bistable, and astable.Arduino interfacing


Arduino interfacingcreatjet3d labs
Ėý
This document lists various sensors and components that can be interfaced with an Arduino board, including LCD displays, LED matrices, Bluetooth modules, 7-segment displays, GSM modules, GPS modules, laser diodes, LDR sensors, keypads, joysticks, buzzers, motor drivers, motors, buttons, touch switches, IR sensors, magnetometers, humidity sensors, gas sensors for detecting methane, alcohol, carbon monoxide and smoke, ultrasonic sensors, accelerometers, PIR motion sensors, pulse sensors, relays, soil moisture sensors, touch sensors, rain drop sensors, flex sensors, temperature sensors, pressure sensors, color sensors, water flow sensors, sound sensors, RFID readers, and RF modulesWi-Fi Esp8266 nodemcu 


Wi-Fi Esp8266 nodemcu creatjet3d labs
Ėý
The NodeMCU is an open-source IoT development kit that allows users to prototype IoT products using a few lines of Lua script. It contains an ESP8266 WiFi SoC, programmable GPIO pins, 32KB RAM, 80KB DRAM, and 200KB flash memory. The NodeMCU can be programmed via C or Lua and connect to devices via WiFi or by connecting pins to sensors and actuators. It provides a low-cost way to build an interactive and programmable smart device with WiFi connectivity.Basic concept of electronics.


Basic concept of electronics.creatjet3d labs
Ėý
Resistors, capacitors, diodes, transistors, and breadboards are basic electronic components. Resistors limit current and divide voltage, and have color-coded bands to indicate resistance values. Capacitors store electric charge and are used in timing circuits. Diodes only allow current to flow in one direction, and are used in logic gates and rectifiers. Transistors amplify and switch signals, and have emitter, base, and collector terminals. Breadboards allow building temporary circuits without soldering for testing components.Arduino uno


Arduino unocreatjet3d labs
Ėý
The Arduino Uno is a microcontroller board based on the ATmega328P chip. It has 32KB of flash memory, 2KB of SRAM, and 1KB of EEPROM. The board has 14 digital input/output pins (of which 6 can be used as PWM outputs), 6 analog inputs, a 16 MHz crystal oscillator, a USB connection, a power jack, an ICSP header, and a reset button. It contains everything needed to support the microcontroller; simply connect it to a computer with a USB cable or power it with a AC-to-DC adapter to get started.Arduino open source


Arduino open sourcecreatjet3d labs
Ėý
Arduino is an open-source electronics prototyping platform consisting of both hardware and software. The hardware is a microcontroller board that contains a whole computer on a small chip. The software is an integrated development environment used to write code for the board. As an open-source project, the design files, schematics, and source code are freely available for anyone to use or modify. This allows users to easily customize the Arduino platform for a wide variety of applications.Arduino IDE


Arduino IDEcreatjet3d labs
Ėý
The document discusses the Arduino integrated development environment and essential functions. It explains that the void setup() function is used to declare pin modes and that void loop() is used for repetitive tasks. It also describes functions for configuring pin modes as inputs or outputs with pinMode(), reading digital and analog pin values with digitalRead(), analogRead(), and writing values to pins with digitalWrite() and analogWrite().Arduino Microcontroller 


Arduino Microcontroller creatjet3d labs
Ėý
In these slides we have disused about AVR Micro controllers, AVR Architecture and Program Memory Map and Packages.Recently uploaded (20)
Strategic Corporate Social Responsibility: Sustainable Value Creation Fourth


Strategic Corporate Social Responsibility: Sustainable Value Creation Fourthkeileyrazawi
Ėý
Strategic Corporate Social Responsibility: Sustainable Value Creation Fourth
Strategic Corporate Social Responsibility: Sustainable Value Creation Fourth
Strategic Corporate Social Responsibility: Sustainable Value Creation FourthA-Z GENERAL QUIZ | THE QUIZ CLUB OF PSGCAS | 14TH MARCH 2025.pptx


A-Z GENERAL QUIZ | THE QUIZ CLUB OF PSGCAS | 14TH MARCH 2025.pptxQuiz Club of PSG College of Arts & Science
Ėý
Behold a thrilling general quiz set brought to you by THE QUIZ CLUB OF PSG COLLEGE OF ARTS & SCIENCE, COIMBATORE, made of 26 questions for the each letter of the alphabet and covering everything above the earth and under the sky.
Explore the trivia , knowledge , curiosity
So, get seated for an enthralling quiz ride.
Quizmaster : THANVANTH N A (Batch of 2023-26), THE QUIZ CLUB OF PSG COLLEGE OF ARTS & SCIENCE, CoimbatoreO SWEET SPONTANEOUS BY EDWARD ESTLIN CUMMINGSAN.pptx


O SWEET SPONTANEOUS BY EDWARD ESTLIN CUMMINGSAN.pptxLiterature Hero
Ėý
O SWEET SPONTANEOUS
explain
ThemesPurchase Analysis in Odoo 17 - Odoo šÝšÝßĢs


Purchase Analysis in Odoo 17 - Odoo šÝšÝßĢsCeline George
Ėý
Purchase is one of the important things as a part of a business. It is essential to analyse everything that is happening inside the purchase and keep tracking. In Odoo 17, the reporting section is inside the purchase module, which is purchase analysis.Developing Topic and Research Question for Systematic Reviews - Emmanuel Ekpor


Developing Topic and Research Question for Systematic Reviews - Emmanuel EkporSystematic Reviews Network (SRN)
Ėý
The topic and research question forms the foundation of the entire systematic review.
A poorly defined topic/question leads to:
Unfocused search strategy
Irrelevant studies
Weak synthesis and conclusionsCode a Strategy on Pine Script With the Help of ChatGPT by Akshay Choudhary


Code a Strategy on Pine Script With the Help of ChatGPT by Akshay ChoudharyQuantInsti
Ėý
This presentation is from a power-packed webinar on AI-driven trading and automation, bringing together leading experts and a community of over 6000 traders, analysts, developers, and students.
Session 2 features a hands-on experience with Akshay Choudhary and Varun Pothula, who demonstrate how to build and deploy real-world trading bots using Python and Pine Script on MetaTrader5 and TradingView.
Participants got the chance to interact live with experts, ask questions, and gain practical, actionable skills in automated tradingâmaking this webinar a useful resource for anyone serious about the future of trading technology.
About the Author:
Akshay, a Quantitative Analyst at QuantInsti, completed his undergraduate studies at IIT Kanpur. Before joining QuantInsti, he served as a Data Scientist at Jio, where he honed his analytical expertise. With a passion for options trading and a keen interest in market psychology, Akshay brings practical insights into designing effective automated strategies.
Using social media to learn from conferences


Using social media to learn from conferencesSue Beckingham
Ėý
This infographic shows how social media can be used before, during and after a conference. It can be used to promote the event and to start to build a community prior to the conference. It can be used during the conference to develop connections, share insights of what's going on and as a space to ask and answer questions. It also has the potential to be used post conference to keep the conference conversations going. How to configure the retail shop in Odoo 17 Point of Sale


How to configure the retail shop in Odoo 17 Point of SaleCeline George
Ėý
Odoo's Retail Shop is managed by the module Point of Sale(POS). It is a powerful tool designed to streamline and optimize the operations of retail businesses. It provides a comprehensive solution for managing various aspects of a retail store, from inventory and sales to customer management and reporting.nature and importance of Indian Knowledge System


nature and importance of Indian Knowledge Systemhanishabatra0
Ėý
it depicts the nature and importance of Indian Knowledge systemSynthesis for VIth SEM 21-2-25.pptx by Mrs. Manjushri P. Dabhade


Synthesis for VIth SEM 21-2-25.pptx by Mrs. Manjushri P. DabhadeDabhade madam Dabhade
Ėý
Synthesis of drugsIB-Unit-4 BBA BVIMR 2022 Syllabus_watermark.pdf


IB-Unit-4 BBA BVIMR 2022 Syllabus_watermark.pdfDr. Mahtab Alam
Ėý
International Business BBA 4 as per Syllabus CBCS 2022 of Bharati Vidyapeeth (Deemed to be University)"The Write Path: Navigating Research Writing, Publication, and Professional G...


"The Write Path: Navigating Research Writing, Publication, and Professional G...neelottama
Ėý
To understand the meaning of publication
Test Bank Pharmacology 3rd Edition Brenner â Stevens


Test Bank Pharmacology 3rd Edition Brenner â Stevensevakimworwa38
Ėý
Test Bank Pharmacology 3rd Edition Brenner â Stevens
Test Bank Pharmacology 3rd Edition Brenner â Stevens
Test Bank Pharmacology 3rd Edition Brenner â StevensAction of Muscles ppt by Priscilla Jasper Vedam Vemavarapu @ASRHMC


Action of Muscles ppt by Priscilla Jasper Vedam Vemavarapu @ASRHMCjaspervedamvemavarap
Ėý
Action of muscles-Anatomy
Contraction and relaxation
Muscle tone
Length and tension relationship
Types of muscle contraction
Active and passive insufficiency
Shunt and sprunt muscles
Agonists
Antagonists
Fixators
Synergists
How to manage Customer Tips with Odoo 17 Point Of Sale


How to manage Customer Tips with Odoo 17 Point Of SaleCeline George
Ėý
In the context of point-of-sale (POS) systems, a tip refers to the optional amount of money a customer leaves for the service they received. It's a way to show appreciation to the cashier, server, or whoever provided the service.A-Z GENERAL QUIZ | THE QUIZ CLUB OF PSGCAS | 14TH MARCH 2025.pptx


A-Z GENERAL QUIZ | THE QUIZ CLUB OF PSGCAS | 14TH MARCH 2025.pptxQuiz Club of PSG College of Arts & Science
Ėý
Developing Topic and Research Question for Systematic Reviews - Emmanuel Ekpor


Developing Topic and Research Question for Systematic Reviews - Emmanuel EkporSystematic Reviews Network (SRN)
Ėý
ESP8266 Wifi Nodemcu
- 1. http://aicra.ac.in NODEMCU An Open Source IOT Platform
- 2. NODEMCU | Overview ïĩ The NodeMcu is an open-source firmware and development kit that helps you to Prototype your IOT product within a few Lua script lines. ïĩ Power: ïĩ Input Voltage : 3.3V ïĩ DC Current : 250mA ïĩ Memory: ïĩ RAM 32Kb ïĩ DRAM 80Kb ïĩ Flash 200Kb
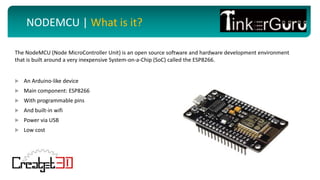
- 3. NODEMCU | What is it? ïĩ An Arduino-like device ïĩ Main component: ESP8266 ïĩ With programmable pins ïĩ And built-in wifi ïĩ Power via USB ïĩ Low cost The NodeMCU (Node MicroController Unit) is an open source software and hardware development environment that is built around a very inexpensive System-on-a-Chip (SoC) called the ESP8266.
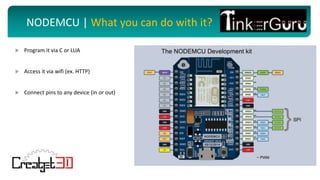
- 4. NODEMCU | What you can do with it? ïĩ Program it via C or LUA ïĩ Access it via wifi (ex. HTTP) ïĩ Connect pins to any device (in or out)
- 5. http://aicra.ac.in NODEMCU | MAIN COMPONENT
- 6. http://aicra.ac.in NODEMCU | PIN DESCRIPTION
- 7. http://aicra.ac.in NODEMCU | ESP8266 ïĩ ESP8266 is a highly integrated chip designed for the needs of a new connected world. ïĩ It offers a complete and self-contained Wi-Fi networking solution, allowing it to either host the application or to offload all Wi-Fi networking functions from another application processor. ïĩ ESP8266 has powerful on-board processing and storage capabilities that allow it to be integrated with the sensors specific devices through its GPIOs with minimal development up-front and minimal loading during runtime.
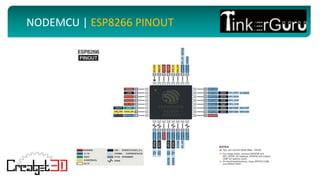
- 8. http://aicra.ac.in NODEMCU | ESP8266 PINOUT
- 9. NODEMCU | Features ïĩ Open-source ïĩ Interactive ïĩ Programmable ïĩ Low cost ïĩ Simple ïĩ Smart ïĩ WI-FI enabled
- 10. http://aicra.ac.in NODEMCU | Features ïĩ I/O Pins: ïĩ Digital Pins: Pin D0 â Pin D10 Digital Pins ïĩ PWM Pins : 12 PWM Pins ïĩ Analog Pins : Pin A0 ïĩ Power PINS ïĩ Ground : 5 Pins ïĩ 3.3V : 3 ïĩ Vin Pin : 1 Adding external supply of +5V (is not connected to USB)
- 11. http://aicra.ac.in NODEMCU | Specifications The Development Kit based on ESP8266, integrates GPIO, PWM, IIC, 1-Wire and ADC all in one board. USB-TTL included, plug&play ïĩ 10 GPIO, every GPIO can be PWM, I2C, 1-wire ïĩ USB-TTL included, plug & play ïĩ PCB antenna
- 12. http://aicra.ac.in NODEMCU | Getting started ïĩ Install the Arduino IDE: https://www.Arduino.cc/en/Main/Software ïĩ Install the ESP8266 Addon ïĩ Go!
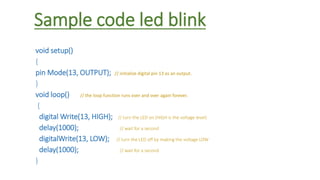
- 13. Sample code led blink void setup() { pin Mode(13, OUTPUT); // initialize digital pin 13 as an output. } void loop() // the loop function runs over and over again forever. { digital Write(13, HIGH); // turn the LED on (HIGH is the voltage level) delay(1000); // wait for a second digitalWrite(13, LOW); // turn the LED off by making the voltage LOW delay(1000); // wait for a second }


