HCQS | Replacing iPhone 6 Earpiece Speaker Guide
Download as pptx, pdf0 likes47 views

This document provides a detailed guide for replacing the front panel assembly of an iPhone 6, including necessary tools and step-by-step instructions. It covers the disassembly process from removing pentalobe screws to disconnecting various cables and removing components like the earpiece speaker. The guide also highlights important precautions to take during both disassembly and reassembly to avoid damage.
1 of 22
Download to read offline


Ad
Recommended
HCQS.CC | Replacing iPhone 6 SIM Eject Lever Guide
HCQS.CC | Replacing iPhone 6 SIM Eject Lever GuideWholesale iPhone LCD iPhone Parts
?
The document provides a detailed guide for replacing the SIM eject lever on an iPhone 6, including necessary tools and the step-by-step disassembly process. It emphasizes the use of specific tools like the isclack for safely opening the device and outlines precautions to avoid damaging components. Instructions for removing the front panel assembly, SIM card tray, and the SIM eject lever are clearly detailed to assist with the repair.HCQS.CC | Replacing iPhone 6 Speaker Guide
HCQS.CC | Replacing iPhone 6 Speaker GuideWholesale iPhone LCD iPhone Parts
?
This document provides a detailed guide for replacing the speaker in an iPhone 6, including steps for disassembly using tools like a pentalobe screwdriver, isclack, and suction cups. It instructs users to power off the device and carefully separate the front panel from the rear case while avoiding damage to display cables. The guide emphasizes the importance of handling connectors properly during the process to prevent issues upon reassembly.HCQS | Guide for iPhone 6 Front Panel Assembly Replacement
HCQS | Guide for iPhone 6 Front Panel Assembly ReplacementWholesale iPhone LCD iPhone Parts
?
The document provides step-by-step instructions for replacing the front panel assembly on an iPhone 6. It involves removing two pentalobe screws, using a tool like an iSclack or suction cup to separate the front panel from the rear case, disconnecting five cables from the logic board, and removing screws securing the cable bracket.HCQS.CC | Replacing iPhone 6 Volume Control Buttons Guide
HCQS.CC | Replacing iPhone 6 Volume Control Buttons GuideWholesale iPhone LCD iPhone Parts
?
This document provides step-by-step instructions for replacing the volume control buttons on an iPhone 6. It involves removing the rear case of the phone using specialized tools like a pentalobe screwdriver and suction cups. Once the rear case is off, cables connecting the front panel and various components must be disconnected carefully before the front panel and battery can be removed to access the volume buttons. Proper reassembly requires reversing these steps and securing components with screws.HCQS.CC | Replacing iPhone 6 Front Facing Camera and Sensor Cable Guide
HCQS.CC | Replacing iPhone 6 Front Facing Camera and Sensor Cable GuideWholesale iPhone LCD iPhone Parts
?
This document is a detailed guide on replacing the front-facing camera and sensor cable for the iPhone 6. It includes step-by-step instructions on disassembling the device, removing the front panel assembly, and carefully handling various components like the earpiece speaker and display cables. Each step emphasizes the importance of using appropriate tools and techniques to avoid damaging internal components during the repair process.HCQS | Replacing iPhone 6 Home Button Guide
HCQS | Replacing iPhone 6 Home Button GuideWholesale iPhone LCD iPhone Parts
?
This document provides a step-by-step guide for replacing the home button on an iPhone 6, emphasizing that only the original home button assembly will restore Touch ID functionality. It outlines the necessary tools and procedures for disassembly, removal, and reassembly while cautioning against damaging components. Additionally, it instructs on ensuring that all connections are properly made to avoid issues upon powering the device back on.HCQS.CC | Replacing iPhone 6 Home Button Cable Guide
HCQS.CC | Replacing iPhone 6 Home Button Cable GuideWholesale iPhone LCD iPhone Parts
?
This document provides a detailed step-by-step guide for replacing the home button cable on an iPhone 6, including necessary tools and safety precautions. It outlines the disassembly process, from removing screws to safely detaching and reattaching the front panel and home button components. The final steps include peeling the home button cable and reassembling the device in reverse order.HCQS.CC | Replacing iPhone 6 Lightning Connector Assembly Guide
HCQS.CC | Replacing iPhone 6 Lightning Connector Assembly GuideWholesale iPhone LCD iPhone Parts
?
This document is a detailed guide for replacing the lightning connector assembly on an iPhone 6. It outlines each step in the disassembly process, including the tools required and precautions to take to avoid damaging components. The instructions emphasize the importance of careful handling during removal and reassembly of parts such as the front panel and battery connector.HCQS.CC | Replacing iPhone 6 Front Panel Guide
HCQS.CC | Replacing iPhone 6 Front Panel GuideWholesale iPhone LCD iPhone Parts
?
This document provides step-by-step instructions for replacing the front panel assembly of an iPhone 6, which includes removing the home button, front-facing camera, sensor assembly, LCD shield plate, and home button ribbon cable and transferring them to a replacement front panel. It outlines 34 steps for disassembling the existing front panel by removing screws, disconnecting cables and removing individual components like the earpiece speaker, home button and front-facing camera.HCQS.CC | Replacing iPhone 6 Logic Board Guide
HCQS.CC | Replacing iPhone 6 Logic Board GuideWholesale iPhone LCD iPhone Parts
?
This document provides a detailed guide for replacing the iPhone 6 logic board, outlining step-by-step instructions for disassembly and reassembly. It includes necessary tools, safety precautions, and specific actions required to disconnect and remove various components. The guide emphasizes careful handling to prevent damage to the device's internal parts during the process.HCQS | replacing i phone 6s plus display guide
HCQS | replacing i phone 6s plus display guideWholesale iPhone LCD iPhone Parts
?
This guide details the steps for replacing the front panel assembly on an iPhone 6s Plus. It includes instructions for powering off the device, removing screws, opening the display, disconnecting various connectors, and ultimately removing the display assembly. Care must be taken to avoid damaging the logic board during the process.HCQS | Guide for Replacing iPhone 6 Battery
HCQS | Guide for Replacing iPhone 6 BatteryWholesale iPhone LCD iPhone Parts
?
This document provides step-by-step instructions for replacing the battery in an iPhone 6. It details 24 steps involving removing screws and connectors to separate the front and rear panels to access the battery. Key tools include pentalobe and Phillips screwdrivers, spudgers, and tweezers. Care is advised when handling components and removing the battery to avoid damaging connectors or releasing chemicals.Iphone 5s battery replacement
Iphone 5s battery replacementWholesale iPhone LCD iPhone Parts
?
The document provides step-by-step instructions for replacing the battery in an iPhone 5s. It details removing the rear case, disconnecting cables and brackets connecting the front panel and display, removing screws securing the battery, and using adhesive tabs to separate the old battery from the phone. New batteries can be purchased from the provided website.Instructions replacing-lcd-display
Instructions replacing-lcd-displaySantiago Martinez
?
The document provides instructions for removing a laptop display in 11 steps:
1) Remove all screw covers and screws from the bezel.
2) Start at the lower edge of the LCD panel and carefully remove the bezel.
3) Remove screws holding the frame and laptop lid to access screws for the LCD panel.
4) Carefully remove the holding screws for the LCD panel.
5) Carefully tilt the LCD panel toward the front while still being connected by cables.
6) Carefully disconnect the data plug and backlight plug from the inverter while the display is tilted.Hcqs | replacing iphone 5s front panel guide
Hcqs | replacing iphone 5s front panel guideWholesale iPhone LCD iPhone Parts
?
1. The document provides step-by-step instructions to replace the cracked or broken front panel on an iPhone 5s by removing the existing front panel and installing a new one.
2. It details removing over 20 components including screws, brackets, cables, sensors and the home button to fully separate the front panel assembly from the rear case.
3. Special tools are recommended, like the iSclack, to safely open the phone and spudgers to disconnect cables and components without damaging them.HCQS.CC | Replacing iPhone 6 Power Button Cable Assembly Guide
HCQS.CC | Replacing iPhone 6 Power Button Cable Assembly GuideWholesale iPhone LCD iPhone Parts
?
The document is a detailed step-by-step guide for replacing the power button cable assembly in an iPhone 6. It includes instructions for disassembling the device, such as removing screws and connectors, while emphasizing the use of specific tools like suction cups and spudgers to avoid damage. The guide ends with instructions to reassemble the device in reverse order of disassembly.HCQS.CC | Replacing iPhone 6 Rear Case Guide
HCQS.CC | Replacing iPhone 6 Rear Case GuideWholesale iPhone LCD iPhone Parts
?
This document provides a detailed step-by-step guide for replacing the rear case of an iPhone 6, including necessary tools, disassembly instructions, and care tips. It outlines the process from powering off the device to removing internal components and the battery, emphasizing caution to avoid damaging connectors and components. The guide also includes reassembly instructions to complete the repair successfully.How to Solve iPhone 6 Charging Port Issues
How to Solve iPhone 6 Charging Port Issuesdiyfix phone
?
The document provides a 14-step guide to replacing the charging port on an iPhone 6. It lists the necessary repair tools and replacement part needed. The steps include removing screws and brackets to access the charging port, disconnecting cables, and removing the old port. The final step is to insert the new charging port and reassemble the phone by reversing the order of steps.Hunky Dory iPhone 5 Tear Down and Repair Guide
Hunky Dory iPhone 5 Tear Down and Repair GuideMarc Mourning
?
This document provides step-by-step instructions for replacing the front assembly of an iPhone 5 with a new full assembly. It describes removing the existing front assembly by removing screws and cables, then installing the new assembly by connecting cables and screws. Safety tips are provided throughout, such as using plastic tools to avoid damage and keeping screws organized during the repair process.Hcqs | replacing iphone 6 plus vibrator guide
Hcqs | replacing iphone 6 plus vibrator guideWholesale iPhone LCD iPhone Parts
?
The document provides instructions for replacing the vibrator motor in an iPhone 6 Plus. It involves removing the front panel assembly by disconnecting various cables and brackets. Next, the battery connector bracket and battery connector are removed. Finally, the vibrator is disconnected from the logic board by prying up connectors and removing two screws, allowing it to be removed from the rear case.Hcqs | replacing iphone 6 plus sim eject lever guide
Hcqs | replacing iphone 6 plus sim eject lever guideWholesale iPhone LCD iPhone Parts
?
This document provides a detailed guide on how to replace or reseat a faulty SIM eject lever in an iPhone 6 Plus. It outlines the necessary tools and steps required for disassembling the phone, removing the SIM card tray, and replacing the SIM eject lever. The instructions include safety precautions and detailed reassembly steps to follow afterward.Hunky Dory Repair iPhone 4 Tear Down and Repair Guide
Hunky Dory Repair iPhone 4 Tear Down and Repair GuideMarc Mourning
?
The document provides step-by-step instructions for replacing the front LCD assembly on an iPhone 4. It details removing over 30 individual components, including screws, plates, cables, and frames. Special care is emphasized to avoid using flathead screwdrivers that could damage delicate parts, and to keep components organized during disassembly and reassembly. Proper techniques are outlined to prevent water damage indicators from being disturbed and cables from being detached or torn.Informative speech power point
Informative speech power pointLightBright1177
?
This document provides step-by-step instructions for replacing a cracked iPhone display at home. It begins by listing the materials and tools needed, including a new display assembly, pentalobe screwdriver, suction cup, and plastic pry tools. The instructions then detail each step to disassemble the iPhone housing, disconnect cables from the old display, and install the new display assembly. The process involves removing screws, using suction cups and pry tools to separate components, transferring parts to the new assembly, and reconnecting cables before reassembling the iPhone housing. Proper handling of components is emphasized to avoid damage.Hunky Dory Repair iPhone 4s Tear Down and Repair Guide
Hunky Dory Repair iPhone 4s Tear Down and Repair GuideMarc Mourning
?
This document provides instructions for replacing the LCD/digitizer assembly or bottom dock assembly for an iPhone 4S. It describes removing over 20 components in a specific order, including screws, brackets, ribbons, antennas and other parts. Special care is emphasized to avoid stripping screws and damaging delicate ribbons or connectors when removing and installing components.HereĪ»s How to Dissemble Your iPhone Motherboard Repair Parts
HereĪ»s How to Dissemble Your iPhone Motherboard Repair PartsPatrickJamieson7
?
This document provides a tutorial for disassembling an iPhone motherboard, detailing each step from turning off the device to removing various components like the SIM drawer, screen, and logic board. It warns that replacing the logic board deactivates the Touch ID functionality unless specific steps are taken during installation. At the end, it mentions the option to reassemble the parts by reversing the disassembly process.How to repair htc one x screen
How to repair htc one x screenWholesale iPhone LCD iPhone Parts
?
This document provides a detailed step-by-step guide on how to repair the screen of an HTC One X, including removing the SIM card, front panel, and various internal components. It emphasizes the need for caution during disassembly to prevent further damage and notes that disassembly voids the warranty. The final steps involve disconnecting and replacing the screen, with instructions to reassemble the device thereafter.How to fast replace iphone 7 battery
How to fast replace iphone 7 battery▌═ ╚╬
?
This guide provides detailed steps for replacing the battery of an iPhone 7, including necessary tools such as pentalobe screws, adhesive, and a heat gun. It outlines the process from turning off the device to removing the battery and reassembling it. For tools, users are directed to visit vipprogrammer.com.iPhone6 Plus Broken Screen Replacement
iPhone6 Plus Broken Screen Replacementdiyfix phone
?
This document provides instructions for replacing a broken outer glass cover on an iPhone 6 Plus. It outlines 17 steps for the replacement process, including separating the screen and frame, removing the old glass and polarizer, aligning and attaching the new glass and polarizer, and testing the repaired screen. Proper tools like an electric soldering iron, LCD separator machine, and alignment mold are required to complete the precision replacement of the iPhone 6 Plus screen.How to Repair iphone 6 Plus Broken Screen Replacement
How to Repair iphone 6 Plus Broken Screen Replacementdiyfix phone
?
This document provides instructions for replacing a broken outer glass cover on an iPhone 6 Plus screen. It outlines 17 steps for the replacement process, including disassembling the iPhone, separating the screen, removing the old glass cover, aligning and sticking on the new glass cover, and testing the repaired screen. The key steps are separating the screen without damage, removing the remaining glue carefully, properly aligning the new polarizer and glass cover, and getting rid of static electricity to avoid display issues.I phone 3gs glass replacement
I phone 3gs glass replacementEnid Stern
?
This document provides step-by-step instructions for replacing the glass on an iPhone 3G. It outlines 17 steps involving removing screws and ribbon cables, using tools like a spudger and heat gun to separate the glass, and installing a new front panel assembly. Safety tips are included to protect from glass shards and avoid damaging internal components. Pictures supplement the text to illustrate cable locations and the order they should be reconnected in during reassembly.More Related Content
What's hot (6)
HCQS.CC | Replacing iPhone 6 Front Panel Guide
HCQS.CC | Replacing iPhone 6 Front Panel GuideWholesale iPhone LCD iPhone Parts
?
This document provides step-by-step instructions for replacing the front panel assembly of an iPhone 6, which includes removing the home button, front-facing camera, sensor assembly, LCD shield plate, and home button ribbon cable and transferring them to a replacement front panel. It outlines 34 steps for disassembling the existing front panel by removing screws, disconnecting cables and removing individual components like the earpiece speaker, home button and front-facing camera.HCQS.CC | Replacing iPhone 6 Logic Board Guide
HCQS.CC | Replacing iPhone 6 Logic Board GuideWholesale iPhone LCD iPhone Parts
?
This document provides a detailed guide for replacing the iPhone 6 logic board, outlining step-by-step instructions for disassembly and reassembly. It includes necessary tools, safety precautions, and specific actions required to disconnect and remove various components. The guide emphasizes careful handling to prevent damage to the device's internal parts during the process.HCQS | replacing i phone 6s plus display guide
HCQS | replacing i phone 6s plus display guideWholesale iPhone LCD iPhone Parts
?
This guide details the steps for replacing the front panel assembly on an iPhone 6s Plus. It includes instructions for powering off the device, removing screws, opening the display, disconnecting various connectors, and ultimately removing the display assembly. Care must be taken to avoid damaging the logic board during the process.HCQS | Guide for Replacing iPhone 6 Battery
HCQS | Guide for Replacing iPhone 6 BatteryWholesale iPhone LCD iPhone Parts
?
This document provides step-by-step instructions for replacing the battery in an iPhone 6. It details 24 steps involving removing screws and connectors to separate the front and rear panels to access the battery. Key tools include pentalobe and Phillips screwdrivers, spudgers, and tweezers. Care is advised when handling components and removing the battery to avoid damaging connectors or releasing chemicals.Iphone 5s battery replacement
Iphone 5s battery replacementWholesale iPhone LCD iPhone Parts
?
The document provides step-by-step instructions for replacing the battery in an iPhone 5s. It details removing the rear case, disconnecting cables and brackets connecting the front panel and display, removing screws securing the battery, and using adhesive tabs to separate the old battery from the phone. New batteries can be purchased from the provided website.Instructions replacing-lcd-display
Instructions replacing-lcd-displaySantiago Martinez
?
The document provides instructions for removing a laptop display in 11 steps:
1) Remove all screw covers and screws from the bezel.
2) Start at the lower edge of the LCD panel and carefully remove the bezel.
3) Remove screws holding the frame and laptop lid to access screws for the LCD panel.
4) Carefully remove the holding screws for the LCD panel.
5) Carefully tilt the LCD panel toward the front while still being connected by cables.
6) Carefully disconnect the data plug and backlight plug from the inverter while the display is tilted.Similar to HCQS | Replacing iPhone 6 Earpiece Speaker Guide (20)
Hcqs | replacing iphone 5s front panel guide
Hcqs | replacing iphone 5s front panel guideWholesale iPhone LCD iPhone Parts
?
1. The document provides step-by-step instructions to replace the cracked or broken front panel on an iPhone 5s by removing the existing front panel and installing a new one.
2. It details removing over 20 components including screws, brackets, cables, sensors and the home button to fully separate the front panel assembly from the rear case.
3. Special tools are recommended, like the iSclack, to safely open the phone and spudgers to disconnect cables and components without damaging them.HCQS.CC | Replacing iPhone 6 Power Button Cable Assembly Guide
HCQS.CC | Replacing iPhone 6 Power Button Cable Assembly GuideWholesale iPhone LCD iPhone Parts
?
The document is a detailed step-by-step guide for replacing the power button cable assembly in an iPhone 6. It includes instructions for disassembling the device, such as removing screws and connectors, while emphasizing the use of specific tools like suction cups and spudgers to avoid damage. The guide ends with instructions to reassemble the device in reverse order of disassembly.HCQS.CC | Replacing iPhone 6 Rear Case Guide
HCQS.CC | Replacing iPhone 6 Rear Case GuideWholesale iPhone LCD iPhone Parts
?
This document provides a detailed step-by-step guide for replacing the rear case of an iPhone 6, including necessary tools, disassembly instructions, and care tips. It outlines the process from powering off the device to removing internal components and the battery, emphasizing caution to avoid damaging connectors and components. The guide also includes reassembly instructions to complete the repair successfully.How to Solve iPhone 6 Charging Port Issues
How to Solve iPhone 6 Charging Port Issuesdiyfix phone
?
The document provides a 14-step guide to replacing the charging port on an iPhone 6. It lists the necessary repair tools and replacement part needed. The steps include removing screws and brackets to access the charging port, disconnecting cables, and removing the old port. The final step is to insert the new charging port and reassemble the phone by reversing the order of steps.Hunky Dory iPhone 5 Tear Down and Repair Guide
Hunky Dory iPhone 5 Tear Down and Repair GuideMarc Mourning
?
This document provides step-by-step instructions for replacing the front assembly of an iPhone 5 with a new full assembly. It describes removing the existing front assembly by removing screws and cables, then installing the new assembly by connecting cables and screws. Safety tips are provided throughout, such as using plastic tools to avoid damage and keeping screws organized during the repair process.Hcqs | replacing iphone 6 plus vibrator guide
Hcqs | replacing iphone 6 plus vibrator guideWholesale iPhone LCD iPhone Parts
?
The document provides instructions for replacing the vibrator motor in an iPhone 6 Plus. It involves removing the front panel assembly by disconnecting various cables and brackets. Next, the battery connector bracket and battery connector are removed. Finally, the vibrator is disconnected from the logic board by prying up connectors and removing two screws, allowing it to be removed from the rear case.Hcqs | replacing iphone 6 plus sim eject lever guide
Hcqs | replacing iphone 6 plus sim eject lever guideWholesale iPhone LCD iPhone Parts
?
This document provides a detailed guide on how to replace or reseat a faulty SIM eject lever in an iPhone 6 Plus. It outlines the necessary tools and steps required for disassembling the phone, removing the SIM card tray, and replacing the SIM eject lever. The instructions include safety precautions and detailed reassembly steps to follow afterward.Hunky Dory Repair iPhone 4 Tear Down and Repair Guide
Hunky Dory Repair iPhone 4 Tear Down and Repair GuideMarc Mourning
?
The document provides step-by-step instructions for replacing the front LCD assembly on an iPhone 4. It details removing over 30 individual components, including screws, plates, cables, and frames. Special care is emphasized to avoid using flathead screwdrivers that could damage delicate parts, and to keep components organized during disassembly and reassembly. Proper techniques are outlined to prevent water damage indicators from being disturbed and cables from being detached or torn.Informative speech power point
Informative speech power pointLightBright1177
?
This document provides step-by-step instructions for replacing a cracked iPhone display at home. It begins by listing the materials and tools needed, including a new display assembly, pentalobe screwdriver, suction cup, and plastic pry tools. The instructions then detail each step to disassemble the iPhone housing, disconnect cables from the old display, and install the new display assembly. The process involves removing screws, using suction cups and pry tools to separate components, transferring parts to the new assembly, and reconnecting cables before reassembling the iPhone housing. Proper handling of components is emphasized to avoid damage.Hunky Dory Repair iPhone 4s Tear Down and Repair Guide
Hunky Dory Repair iPhone 4s Tear Down and Repair GuideMarc Mourning
?
This document provides instructions for replacing the LCD/digitizer assembly or bottom dock assembly for an iPhone 4S. It describes removing over 20 components in a specific order, including screws, brackets, ribbons, antennas and other parts. Special care is emphasized to avoid stripping screws and damaging delicate ribbons or connectors when removing and installing components.HereĪ»s How to Dissemble Your iPhone Motherboard Repair Parts
HereĪ»s How to Dissemble Your iPhone Motherboard Repair PartsPatrickJamieson7
?
This document provides a tutorial for disassembling an iPhone motherboard, detailing each step from turning off the device to removing various components like the SIM drawer, screen, and logic board. It warns that replacing the logic board deactivates the Touch ID functionality unless specific steps are taken during installation. At the end, it mentions the option to reassemble the parts by reversing the disassembly process.How to repair htc one x screen
How to repair htc one x screenWholesale iPhone LCD iPhone Parts
?
This document provides a detailed step-by-step guide on how to repair the screen of an HTC One X, including removing the SIM card, front panel, and various internal components. It emphasizes the need for caution during disassembly to prevent further damage and notes that disassembly voids the warranty. The final steps involve disconnecting and replacing the screen, with instructions to reassemble the device thereafter.How to fast replace iphone 7 battery
How to fast replace iphone 7 battery▌═ ╚╬
?
This guide provides detailed steps for replacing the battery of an iPhone 7, including necessary tools such as pentalobe screws, adhesive, and a heat gun. It outlines the process from turning off the device to removing the battery and reassembling it. For tools, users are directed to visit vipprogrammer.com.iPhone6 Plus Broken Screen Replacement
iPhone6 Plus Broken Screen Replacementdiyfix phone
?
This document provides instructions for replacing a broken outer glass cover on an iPhone 6 Plus. It outlines 17 steps for the replacement process, including separating the screen and frame, removing the old glass and polarizer, aligning and attaching the new glass and polarizer, and testing the repaired screen. Proper tools like an electric soldering iron, LCD separator machine, and alignment mold are required to complete the precision replacement of the iPhone 6 Plus screen.How to Repair iphone 6 Plus Broken Screen Replacement
How to Repair iphone 6 Plus Broken Screen Replacementdiyfix phone
?
This document provides instructions for replacing a broken outer glass cover on an iPhone 6 Plus screen. It outlines 17 steps for the replacement process, including disassembling the iPhone, separating the screen, removing the old glass cover, aligning and sticking on the new glass cover, and testing the repaired screen. The key steps are separating the screen without damage, removing the remaining glue carefully, properly aligning the new polarizer and glass cover, and getting rid of static electricity to avoid display issues.I phone 3gs glass replacement
I phone 3gs glass replacementEnid Stern
?
This document provides step-by-step instructions for replacing the glass on an iPhone 3G. It outlines 17 steps involving removing screws and ribbon cables, using tools like a spudger and heat gun to separate the glass, and installing a new front panel assembly. Safety tips are included to protect from glass shards and avoid damaging internal components. Pictures supplement the text to illustrate cable locations and the order they should be reconnected in during reassembly.Hcqs apple iphone 6 plus teardown guide
Hcqs apple iphone 6 plus teardown guideWholesale iPhone LCD iPhone Parts
?
The document is a teardown guide for the iPhone 6 Plus, highlighting its design, features, and internal components. It compares the new model to the iPhone 5s and details the advantages such as battery life, optical image stabilization on the camera, and improved repairability. Despite improvements, it notes that Apple continues to use proprietary screws, making repairs challenging without the proper tools.Hunky Dory Repair iPhone 3G and 3GS Tear Down Guide
Hunky Dory Repair iPhone 3G and 3GS Tear Down GuideMarc Mourning
?
This document provides step-by-step instructions for replacing the digitizer and LCD assembly on an iPhone. It lists the necessary tools and parts and describes each step of the repair process, emphasizing the importance of going slowly, properly positioning components to avoid damaging ribbons, and ensuring dust and particles do not get inside the phone. Key steps include removing screws, prying up the LCD assembly at a 90 degree angle, disconnecting ribbons in the correct order, inserting the new LCD assembly and aligning components, and replacing all screws.Sample Resized
Sample Resizedhnshuryan
?
This document provides step-by-step instructions for disassembling a Samsung Galaxy S5 smartphone. It details how to remove the back cover, battery, display assembly, rear housing, front housing and other internal components like the motherboard, cameras, dock connector and home button. The guide is intended to assist with repairs by making it simple and affordable to access and replace broken parts.Disassembly & reassembly
Disassembly & reassemblysimirandam
?
1) The document provides disassembly and assembly instructions for an electronic device. It lists 12 steps for disassembly, including loosening screws, removing parts like the rear case and PBA, and verifying the condition after disassembly.
2) The 12 steps for assembly describe reassembling the device by reversing the disassembly steps. This includes assembling components like the main FPCB, LCD module, lower case, and screws to reattach the rear case.
3) Images and numbering are provided to clearly show the order and locations of parts for each step of disassembly and reassembly.Ad
HCQS | Replacing iPhone 6 Earpiece Speaker Guide
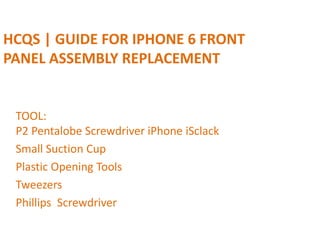
- 1. HCQS | GUIDE FOR IPHONE 6 FRONT PANEL ASSEMBLY REPLACEMENT TOOL: P2 Pentalobe Screwdriver iPhone iSclack Small Suction Cup Plastic Opening Tools Tweezers Phillips Screwdriver
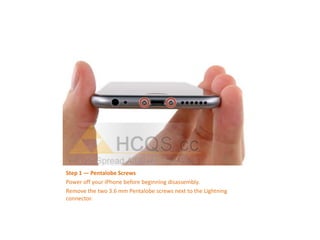
- 2. Step 1 Ī¬ Pentalobe Screws Power off your iPhone before beginning disassembly. Remove the two 3.6 mm Pentalobe screws next to the Lightning connector.
- 3. Step 2 Ī¬ iSclack Opening Procedure The next three steps demonstrate using the iSclack, a great tool for safely opening the iPhone 6 that we recommend for anyone doing more than one repair. If you aren't using the iSclack, skip to Step 5. If the plastic depth gauge is attached at the center of the iSclack, remove it nowĪ¬it's not needed for larger phones like the iPhone 6. Close the handle on the iSclack, opening the suction-cup jaws.
- 4. Step 3 Place the bottom of your iPhone in between the suction cups. Position the iSclack's upper suction cup against the display, just above (but not covering) the home button. Open the handles to close the jaws of the iSclack. Center the suction cups and press them firmly onto the top and bottom of the iPhone.
- 5. Step 4 Hold onto your iPhone securely and close the handle of the iSclack to separate the suction cups, pulling the front panel up from the rear case. The iSclack is designed to safely open your iPhone just enough to separate the pieces, but not enough to damage the display cables. Peel the two suction cups off your iPhone. Skip the next three steps and continue on Step 8
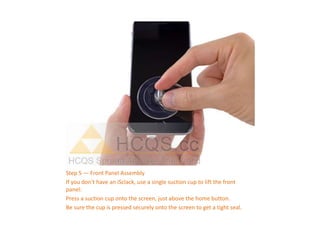
- 6. Step 5 Ī¬ Front Panel Assembly If you don't have an iSclack, use a single suction cup to lift the front panel: Press a suction cup onto the screen, just above the home button. Be sure the cup is pressed securely onto the screen to get a tight seal.
- 7. Step 6 While holding the iPhone down with one hand, pull up on the suction cup to slightly separate the front panel assembly from the rear case. Take your time and apply firm, constant force. The display assembly is a much tighter fit than most devices. Using a plastic opening tool, begin to gently pry the rear case down, away from the display assembly, while continuing to pull up with the suction cup. There are several clips holding the front panel assembly to the rear case, so you may need to use a combination of the suction cup and plastic opening tool to free the front panel assembly.
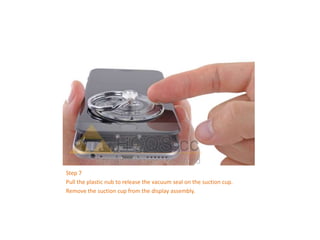
- 8. Step 7 Pull the plastic nub to release the vacuum seal on the suction cup. Remove the suction cup from the display assembly.
- 9. Step 8 Pull the home button end of the front panel assembly away from the rear case, using the top of the phone as a hinge. Keep the front panel supported at a 90? angle in relation to the rear case until you remove itĪ¬allowing it to fall flat will strain the display cables and their connections on the logic board.
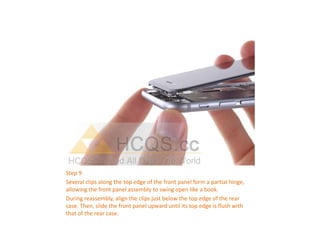
- 10. Step 9 Several clips along the top edge of the front panel form a partial hinge, allowing the front panel assembly to swing open like a book. During reassembly, align the clips just below the top edge of the rear case. Then, slide the front panel upward until its top edge is flush with that of the rear case.
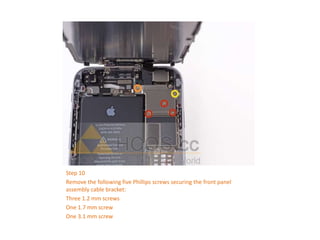
- 11. Step 10 Remove the following five Phillips screws securing the front panel assembly cable bracket: Three 1.2 mm screws One 1.7 mm screw One 3.1 mm screw
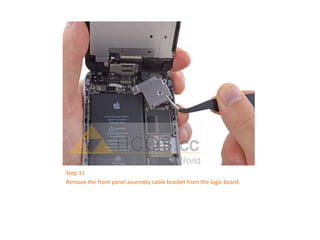
- 12. Step 11 Remove the front panel assembly cable bracket from the logic board.
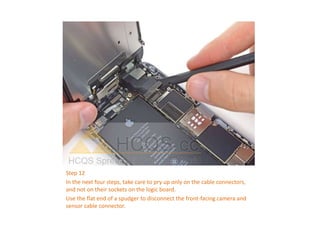
- 13. Step 12 In the next four steps, take care to pry up only on the cable connectors, and not on their sockets on the logic board. Use the flat end of a spudger to disconnect the front-facing camera and sensor cable connector.
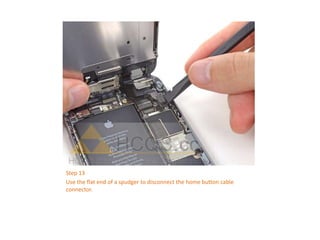
- 14. Step 13 Use the flat end of a spudger to disconnect the home button cable connector.
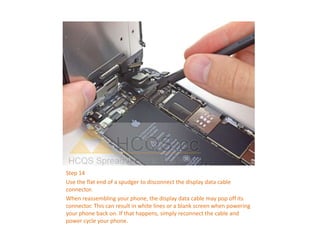
- 15. Step 14 Use the flat end of a spudger to disconnect the display data cable connector. When reassembling your phone, the display data cable may pop off its connector. This can result in white lines or a blank screen when powering your phone back on. If that happens, simply reconnect the cable and power cycle your phone.
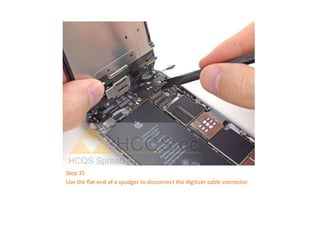
- 16. Step 15 Use the flat end of a spudger to disconnect the digitizer cable connector.
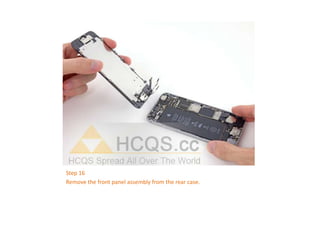
- 17. Step 16 Remove the front panel assembly from the rear case.
- 18. Step 17 Earpiece Speaker Remove the following Phillips #00 screws from the earpiece speaker/front-facing camera bracket: One 2.3 mm screw One 3.0 mm screw One 2.2 mm screw
- 19. Next Step Remove the earpiece speaker/front-facing camera bracket from the front panel.
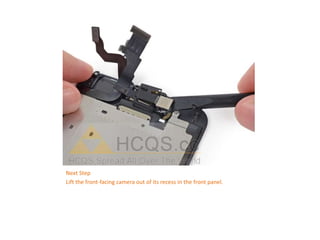
- 20. Next Step Lift the front-facing camera out of its recess in the front panel.
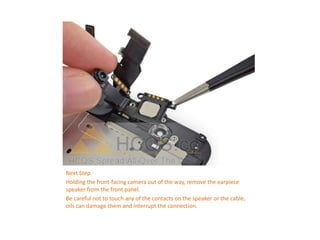
- 21. Next Step Holding the front-facing camera out of the way, remove the earpiece speaker from the front panel. Be careful not to touch any of the contacts on the speaker or the cable, oils can damage them and interrupt the connection.
- 22. To reassemble your device, follow these instructions in reverse order. HCQS 100% ORIGINAL iphone 6 ear speaker, ear speaker felx iphone 6