n
0 likes145 views
This document provides instructions for creating a PDF file from a Microsoft Word document using Adobe Acrobat. It outlines three exercises: 1) Using PDFMaker within Word to convert the document to a PDF, 2) Using the Print command and selecting Adobe PDF as the printer, and 3) Combining multiple PDF files into a single document. The steps provided in each exercise guide the user through setting conversion settings in Adobe PDFMaker or the Print dialog box, and then converting or combining the files to create a PDF.
1 of 6
Download to read offline
Ad
Recommended
Lesson2
Lesson2Vincent Elmalih
╠²
This document provides instructions for creating a PDF file using Adobe Acrobat. It discusses converting documents from Microsoft Word to PDF using either PDFMaker or the Print command. It also describes how to combine multiple PDF files into a single document using Acrobat. The document is divided into three exercises that walk through these processes step-by-step with helpful tips and screenshots to aid in conversion.Sejda.com v pdf
Sejda.com v pdfPeter99279
╠²
This document provides instructions for how to edit PDF files online for free using an online PDF editor tool. It describes how to upload PDFs to edit them, and the various editing features available, including adding text, images, links, and annotations. It also explains how to sign PDF documents by adding a handwritten or typed signature. Resources and other PDF tools are listed at the end.Pdf how-to-view-pdf-as-slideshow
Pdf how-to-view-pdf-as-slideshowÓĖøÓ╣ŖÓĖŁÓĖÜ ÓĖĪÓĖ½ÓĖ▓ ÓĖ¦ÓĖŚÓĖÜ.
╠²
This document provides instructions for viewing a multi-page PDF as a slideshow in Adobe Reader. It explains that the user should open the PDF in Adobe Reader 8 or 9, go to Edit Preferences, select the Full Screen category, and check the boxes for Show Navigation Bar and left/right click navigation. This will allow the PDF to be viewed as an automated slideshow in full screen mode. It also notes additional customization options and tells users to download the latest version of Adobe Reader if needed.║▌║▌▀Żshare Tutorial
║▌║▌▀Żshare TutorialHafidzah Aziz
╠²
This document provides instructions for publishing PowerPoint presentations to the internet using Edline in 7 steps:
1. Create and save a PPT, then upload it to slideshare.net.
2. Copy the embedding code from slideshare.net.
3. In Edline, add the PPT as a document and paste the embedding code in the HTML editor.
4. Provide summary information and set the privacy setting.
5. The uploaded PPT can then be viewed and embedded on Edline pages for students.Acrobat x pro intro 6-1-11
Acrobat x pro intro 6-1-11Matt Sullivan
╠²
This document provides an introduction to Adobe Acrobat X Professional. It discusses opening and viewing PDF files, the differences between Acrobat Pro and Adobe Reader, exploring the Acrobat interface including quick tools, common tools, navigation panes and task panes. It also covers navigating and viewing PDFs using bookmarks, zoom tools and keyboard shortcuts. The document describes creating PDFs from Microsoft Office files using the PDF Maker add-in and mapping headings to bookmarks. It concludes with an overview of advanced topics like creating PDFs from non-MS applications, reviewing PDFs, adding security and signatures, and creating custom stamps.MailerLite-Thrive Themes Connection Using HTML Code
MailerLite-Thrive Themes Connection Using HTML CodeEleanor Trinidad
╠²
This document provides step-by-step instructions for syncing subscriber lists between MailerLite and WordPress using HTML code. It describes how to create a signup form in MailerLite, embed it into a WordPress landing page using Thrive Content Builder, and link it to confirmation and thank you pages to complete the double opt-in subscription process.Creating Web Pages with Microsoft FrontPage - R.D.Sivakumar
Creating Web Pages with Microsoft FrontPage - R.D.SivakumarSivakumar R D .
╠²
This document provides an overview of using Microsoft FrontPage to create websites. It discusses FrontPage's interface views including Page, Folders, Reports, Navigation, Hyperlinks, and Tasks views. It then outlines the steps to create a new website using the Web Wizard, including selecting a website type and location, and exploring the initial default page and folders created. The document also describes how to add text and format it, insert tables and modify table and cell properties, and concludes by thanking the reader.LLH management site tutorial
LLH management site tutorialoneglobenetwork
╠²
This document provides a tutorial on how to manage website pages using Webizy Plus Management software. It outlines 4 key tasks: 1) Managing pages, 2) Editing text, 3) Adding links, and 4) Changing images. For each task, it describes the relevant icons and steps to complete the task, such as selecting text, clicking link/image icons, and browsing/uploading files from the server. The overall goal is to guide users on editing and updating content on their website pages.11.motivation mm
11.motivation mmRoopa slideshare
╠²
This document discusses various theories of motivation. It begins by defining motivation as a need or desire that energizes behavior toward a goal. It then outlines several perspectives on motivation, including instinct theory, drive-reduction theory, arousal theory, Maslow's hierarchy of needs, and Bandura's self-efficacy theory. Specific motivations discussed include social motivation, control motivation, hunger, and sexual motivation. The document examines the biological and psychological factors that influence these motivations.Lesson2 pdf
Lesson2 pdfRoopa slideshare
╠²
This document provides instructions for creating a PDF file from a Microsoft Word document using either Adobe Acrobat PDFMaker or the Print command, and for combining multiple PDF files into a single document. It describes how to set the conversion settings to Standard for an electronic thesis or dissertation (ETD) and ensure fonts and links are properly converted. Exercise steps provide a guide to using each method to convert a Word file to a PDF and then combine files.upload by soft tes
upload by soft tesRoopa slideshare
╠²
This document discusses various theories and perspectives on motivation. It covers instincts and evolutionary psychology, drive-reduction theory, arousal theory, Maslow's hierarchy of needs, and Bandura's self-efficacy theory. Specific motivations like social motivation, control motivation, hunger, sex, and belonging are examined. Factors influencing eating behaviors, sexual behaviors, and orientations are also summarized.11.motivation mm
11.motivation mmRoopa slideshare
╠²
This document discusses various theories and perspectives on motivation. It covers physiological, cognitive, and social factors that motivate behaviors. Physiological motivations discussed include hunger, driven by glucose levels and hypothalamic centers, and sex, driven by hormones and physiological arousal. Cognitive motivations discussed include Maslow's hierarchy of needs and Bandura's self-efficacy theory. Social motivations discussed include the need for control, social affiliation, and achievement/recognition from others. The document also examines specific motivations like eating disorders, sexual orientation, and contraception use in teens.URl
URlRoopa slideshare
╠²
The document provides an overview of thyroid anatomy, physiology, and disorders. It describes the thyroid gland's location in the neck, its hormone production process, and feedback regulation by TRH and TSH. Laboratory tests for evaluating thyroid function include T4, T3, TSH, and antibodies. Imaging studies discussed are thyroid uptake scan, ultrasound, and CT. Common thyroid disorders like goiter, nodules, hyperthyroidism, and hypothyroidism are also overviewed.Std10-Maths-EM-1.pdf
Std10-Maths-EM-1.pdfRoopa slideshare
╠²
- The document discusses the importance of mathematics education in Tamil Nadu. It notes the implementation of a uniform curriculum across all school streams as an opportunity to improve education.
- Mathematics is described as the "queen of all sciences" with intrinsic value and beauty. It plays an indispensable role in sciences and engineering. Mathematical knowledge is essential for growth in science, technology, and any individual's chosen field.
- Thiruvalluvar, a Tamil poet from over 2000 years ago, underlined the importance of mathematical education. We need mathematics to solve increasingly complex problems in life, and it is a creative force, not just a problem-solving tool.lesson2 pdf.pdf
lesson2 pdf.pdfRoopa slideshare
╠²
This document provides instructions for creating a PDF file from a Microsoft Word document using Adobe Acrobat. It describes three exercises: 1) Using PDFMaker to convert a Word doc to PDF, 2) Using the Print command to convert to PDF, and 3) Combining multiple PDF files into a single document. The steps provided in each exercise guide the user through setting conversion settings in PDFMaker or print properties, and then walking through the process of conversion or combination.Bradley witham lesson 2
Bradley witham lesson 2Brad Witham
╠²
This document provides instructions for creating a PDF file from a Microsoft Word document using either Adobe Acrobat PDFMaker or the Print command, and for combining multiple PDF files into a single document. It describes how to set the appropriate conversion settings to create an electronic thesis or dissertation (ETD) and convert the Word file to a PDF, as well as how to merge two or more existing PDF files using Acrobat.Thu nghiem
Thu nghiemTrß║¦n Th├Īi
╠²
This document provides instructions for creating a PDF file of an electronic thesis or dissertation (ETD) using Adobe Acrobat. It describes three methods: 1) Using PDFMaker in Microsoft Word, 2) Using the Print command, and 3) Combining multiple files. The first two methods explain how to open a Word document, select standard conversion settings, and convert the file to a PDF. The third method describes how to first convert documents to PDFs, then use Acrobat's "Create PDF from Multiple Files" option to merge them into a single file.Lesson
Lessonslimsaltcama1971
╠²
This document provides instructions for creating a PDF file using Adobe Acrobat, including three exercises:
1. Create a PDF using PDFMaker within Microsoft Word.
2. Create a PDF using the Print command.
3. Combine multiple PDF files into a single document.Lesson
Lessonslimsaltcama1971
╠²
This document provides instructions for creating a PDF file using Adobe Acrobat, including three exercises:
1. Creating a PDF using PDFMaker in Microsoft Word.
2. Creating a PDF using the Print command.
3. Combining multiple files into a single PDF document.8 channels, future to past future http://awaren.us/H3Wrzw
8 channels, future to past future http://awaren.us/H3Wrzwnikhilawareness
╠²
This document provides instructions for creating a PDF file from a Microsoft Word document using Adobe Acrobat. It describes three methods: 1) Using PDFMaker within Word, 2) Using the Print command, and 3) Combining multiple files. The steps for each method are outlined in detail, including setting conversion options to Standard and ensuring links and fonts are properly embedded in the PDF.Scheduled for SS alone!
Scheduled for SS alone!nikhilawareness
╠²
This document provides instructions for creating a PDF file using Adobe Acrobat, including three exercises:
1. Create a PDF using PDFMaker within Microsoft Word.
2. Create a PDF using the Print command.
3. Combine multiple PDF files into a single document.Lesson
Lessonslimsaltcama1971
╠²
This document provides instructions for creating a PDF file using Adobe Acrobat, with 3 main methods:
1. Using PDFMaker within Microsoft Word to convert a Word document to a PDF.
2. Using the Print command within Word or another program to print to the Adobe PDF printer, converting the file to PDF.
3. Combining multiple existing PDF files into a single document using Acrobat's "Create PDF from Multiple Files" option.helpmegetjackback
helpmegetjackbackslimsaltcama1971
╠²
This document provides instructions for creating a PDF file using Adobe Acrobat, with 3 main methods:
1. Using PDFMaker within Microsoft Word to convert a Word document to a PDF.
2. Using the Print command within Word or another program to print to the Adobe PDF printer, converting the file to PDF.
3. Combining multiple existing PDF files into a single document using Acrobat's "Create PDF from Multiple Files" option.Lesson
Lessonslimsaltcama1971
╠²
This document provides instructions for creating a PDF file using Adobe Acrobat, with 3 main methods:
1. Using PDFMaker within Microsoft Word to convert a Word document to a PDF.
2. Using the Print command within Word or another program to print to the Adobe PDF printer, converting the file to PDF.
3. Combining multiple existing PDF files into a single document using Acrobat's "Create PDF from Multiple Files" option.Adobe Acrobat Pro X - 2014 UVM Extension Professional Improvement Conference
Adobe Acrobat Pro X - 2014 UVM Extension Professional Improvement ConferenceCathy Yandow
╠²
This document provides an overview of Adobe Acrobat and how to create and edit PDF documents. It compares the free Adobe Reader to the paid Adobe Acrobat Pro, outlines how to convert various file types to PDF, create fillable forms, add security features, and edit PDF content and layout. The document demonstrates how to combine files, convert between formats, and distribute and track forms responses.Adobe Best Practice
Adobe Best PracticeKaren Baker
╠²
This document provides recommendations for creating successful PDFs, including:
- Including bookmarks for documents over 3 pages for easier navigation.
- Using standard fonts like Arial or Times New Roman to reduce problems with embedded fonts.
- Optimizing PDFs once finalized to reduce file size.
- Using Acrobat 6 Professional as the standard within the organization.Using Adobe Acrobat 7
Using Adobe Acrobat 7Jeff Wood
╠²
This document provides an overview of how to use Adobe Acrobat 7.0 to create and edit PDF documents. It discusses converting documents from Microsoft Office and other formats into PDF, adding bookmarks, comments and other annotations, optimizing files for print/web/email, and basic editing of PDF pages and objects. Key features covered include combining multiple files into one PDF, attaching files, digital signing of documents, and sending documents for review.More Related Content
Viewers also liked (9)
11.motivation mm
11.motivation mmRoopa slideshare
╠²
This document discusses various theories of motivation. It begins by defining motivation as a need or desire that energizes behavior toward a goal. It then outlines several perspectives on motivation, including instinct theory, drive-reduction theory, arousal theory, Maslow's hierarchy of needs, and Bandura's self-efficacy theory. Specific motivations discussed include social motivation, control motivation, hunger, and sexual motivation. The document examines the biological and psychological factors that influence these motivations.Lesson2 pdf
Lesson2 pdfRoopa slideshare
╠²
This document provides instructions for creating a PDF file from a Microsoft Word document using either Adobe Acrobat PDFMaker or the Print command, and for combining multiple PDF files into a single document. It describes how to set the conversion settings to Standard for an electronic thesis or dissertation (ETD) and ensure fonts and links are properly converted. Exercise steps provide a guide to using each method to convert a Word file to a PDF and then combine files.upload by soft tes
upload by soft tesRoopa slideshare
╠²
This document discusses various theories and perspectives on motivation. It covers instincts and evolutionary psychology, drive-reduction theory, arousal theory, Maslow's hierarchy of needs, and Bandura's self-efficacy theory. Specific motivations like social motivation, control motivation, hunger, sex, and belonging are examined. Factors influencing eating behaviors, sexual behaviors, and orientations are also summarized.11.motivation mm
11.motivation mmRoopa slideshare
╠²
This document discusses various theories and perspectives on motivation. It covers physiological, cognitive, and social factors that motivate behaviors. Physiological motivations discussed include hunger, driven by glucose levels and hypothalamic centers, and sex, driven by hormones and physiological arousal. Cognitive motivations discussed include Maslow's hierarchy of needs and Bandura's self-efficacy theory. Social motivations discussed include the need for control, social affiliation, and achievement/recognition from others. The document also examines specific motivations like eating disorders, sexual orientation, and contraception use in teens.URl
URlRoopa slideshare
╠²
The document provides an overview of thyroid anatomy, physiology, and disorders. It describes the thyroid gland's location in the neck, its hormone production process, and feedback regulation by TRH and TSH. Laboratory tests for evaluating thyroid function include T4, T3, TSH, and antibodies. Imaging studies discussed are thyroid uptake scan, ultrasound, and CT. Common thyroid disorders like goiter, nodules, hyperthyroidism, and hypothyroidism are also overviewed.Std10-Maths-EM-1.pdf
Std10-Maths-EM-1.pdfRoopa slideshare
╠²
- The document discusses the importance of mathematics education in Tamil Nadu. It notes the implementation of a uniform curriculum across all school streams as an opportunity to improve education.
- Mathematics is described as the "queen of all sciences" with intrinsic value and beauty. It plays an indispensable role in sciences and engineering. Mathematical knowledge is essential for growth in science, technology, and any individual's chosen field.
- Thiruvalluvar, a Tamil poet from over 2000 years ago, underlined the importance of mathematical education. We need mathematics to solve increasingly complex problems in life, and it is a creative force, not just a problem-solving tool.Similar to n (16)
lesson2 pdf.pdf
lesson2 pdf.pdfRoopa slideshare
╠²
This document provides instructions for creating a PDF file from a Microsoft Word document using Adobe Acrobat. It describes three exercises: 1) Using PDFMaker to convert a Word doc to PDF, 2) Using the Print command to convert to PDF, and 3) Combining multiple PDF files into a single document. The steps provided in each exercise guide the user through setting conversion settings in PDFMaker or print properties, and then walking through the process of conversion or combination.Bradley witham lesson 2
Bradley witham lesson 2Brad Witham
╠²
This document provides instructions for creating a PDF file from a Microsoft Word document using either Adobe Acrobat PDFMaker or the Print command, and for combining multiple PDF files into a single document. It describes how to set the appropriate conversion settings to create an electronic thesis or dissertation (ETD) and convert the Word file to a PDF, as well as how to merge two or more existing PDF files using Acrobat.Thu nghiem
Thu nghiemTrß║¦n Th├Īi
╠²
This document provides instructions for creating a PDF file of an electronic thesis or dissertation (ETD) using Adobe Acrobat. It describes three methods: 1) Using PDFMaker in Microsoft Word, 2) Using the Print command, and 3) Combining multiple files. The first two methods explain how to open a Word document, select standard conversion settings, and convert the file to a PDF. The third method describes how to first convert documents to PDFs, then use Acrobat's "Create PDF from Multiple Files" option to merge them into a single file.Lesson
Lessonslimsaltcama1971
╠²
This document provides instructions for creating a PDF file using Adobe Acrobat, including three exercises:
1. Create a PDF using PDFMaker within Microsoft Word.
2. Create a PDF using the Print command.
3. Combine multiple PDF files into a single document.Lesson
Lessonslimsaltcama1971
╠²
This document provides instructions for creating a PDF file using Adobe Acrobat, including three exercises:
1. Creating a PDF using PDFMaker in Microsoft Word.
2. Creating a PDF using the Print command.
3. Combining multiple files into a single PDF document.8 channels, future to past future http://awaren.us/H3Wrzw
8 channels, future to past future http://awaren.us/H3Wrzwnikhilawareness
╠²
This document provides instructions for creating a PDF file from a Microsoft Word document using Adobe Acrobat. It describes three methods: 1) Using PDFMaker within Word, 2) Using the Print command, and 3) Combining multiple files. The steps for each method are outlined in detail, including setting conversion options to Standard and ensuring links and fonts are properly embedded in the PDF.Scheduled for SS alone!
Scheduled for SS alone!nikhilawareness
╠²
This document provides instructions for creating a PDF file using Adobe Acrobat, including three exercises:
1. Create a PDF using PDFMaker within Microsoft Word.
2. Create a PDF using the Print command.
3. Combine multiple PDF files into a single document.Lesson
Lessonslimsaltcama1971
╠²
This document provides instructions for creating a PDF file using Adobe Acrobat, with 3 main methods:
1. Using PDFMaker within Microsoft Word to convert a Word document to a PDF.
2. Using the Print command within Word or another program to print to the Adobe PDF printer, converting the file to PDF.
3. Combining multiple existing PDF files into a single document using Acrobat's "Create PDF from Multiple Files" option.helpmegetjackback
helpmegetjackbackslimsaltcama1971
╠²
This document provides instructions for creating a PDF file using Adobe Acrobat, with 3 main methods:
1. Using PDFMaker within Microsoft Word to convert a Word document to a PDF.
2. Using the Print command within Word or another program to print to the Adobe PDF printer, converting the file to PDF.
3. Combining multiple existing PDF files into a single document using Acrobat's "Create PDF from Multiple Files" option.Lesson
Lessonslimsaltcama1971
╠²
This document provides instructions for creating a PDF file using Adobe Acrobat, with 3 main methods:
1. Using PDFMaker within Microsoft Word to convert a Word document to a PDF.
2. Using the Print command within Word or another program to print to the Adobe PDF printer, converting the file to PDF.
3. Combining multiple existing PDF files into a single document using Acrobat's "Create PDF from Multiple Files" option.Adobe Acrobat Pro X - 2014 UVM Extension Professional Improvement Conference
Adobe Acrobat Pro X - 2014 UVM Extension Professional Improvement ConferenceCathy Yandow
╠²
This document provides an overview of Adobe Acrobat and how to create and edit PDF documents. It compares the free Adobe Reader to the paid Adobe Acrobat Pro, outlines how to convert various file types to PDF, create fillable forms, add security features, and edit PDF content and layout. The document demonstrates how to combine files, convert between formats, and distribute and track forms responses.Adobe Best Practice
Adobe Best PracticeKaren Baker
╠²
This document provides recommendations for creating successful PDFs, including:
- Including bookmarks for documents over 3 pages for easier navigation.
- Using standard fonts like Arial or Times New Roman to reduce problems with embedded fonts.
- Optimizing PDFs once finalized to reduce file size.
- Using Acrobat 6 Professional as the standard within the organization.Using Adobe Acrobat 7
Using Adobe Acrobat 7Jeff Wood
╠²
This document provides an overview of how to use Adobe Acrobat 7.0 to create and edit PDF documents. It discusses converting documents from Microsoft Office and other formats into PDF, adding bookmarks, comments and other annotations, optimizing files for print/web/email, and basic editing of PDF pages and objects. Key features covered include combining multiple files into one PDF, attaching files, digital signing of documents, and sending documents for review.Using Adobe Acrobat 7 2
Using Adobe Acrobat 7 2Jeff Wood
╠²
This document provides an overview of how to use Adobe Acrobat 7.0 to create and edit PDF documents. It discusses converting documents from Microsoft Office and other formats into PDF, combining multiple documents, adding bookmarks, comments and other annotations, optimizing files for print/web/email, and basic editing of PDF pages and objects.Adobe Acrobat Pro X - Extension 2014 Conference
Adobe Acrobat Pro X - Extension 2014 ConferenceCathy Yandow
╠²
This document provides an overview of how to become proficient in Adobe Acrobat X Pro. It discusses the differences between Adobe Reader and Acrobat Pro, terminology used in Acrobat, and various ways to create, edit, secure and distribute PDF documents. Form creation, editing text and objects, and converting between file formats are also covered in under 3 sentences.Right Solution for PDF
Right Solution for PDFEnvision Technology Advisors
╠²
Foxit PhantomPDF is a software solution that allows users to create, edit, collaborate on, and secure PDF documents. It comes in three editions - Express, Standard, and Business - to suit different use cases and budgets. PhantomPDF makes it easy to convert documents from other formats into PDFs, scan hardcopy documents, organize and annotate PDFs, edit PDF content, apply security features like encryption and digital signatures, and fill out and share PDF forms. It provides these capabilities at a lower price than Adobe Acrobat.Ad
More from Roopa slideshare (20)
Magnet basics
Magnet basicsRoopa slideshare
╠²
Magnets are key components of particle accelerators. Their modeling involves several stages including simple hard-edge models for initial design, detailed computer calculations, mechanical/electrical design and construction, measurement of field profiles, and beam testing. Magnet measurements are performed using devices like gaussmeters and rotating coils to characterize fields and multipoles. Effective magnet lengths are important parameters and may differ from physical lengths for devices with non-uniform field profiles.what_is_science.pdf
what_is_science.pdfRoopa slideshare
╠²
This document provides an overview of what science is and how it works. It discusses that:
1) Science is both a body of knowledge and a process of discovery to understand the natural world through evidence-based investigation of testable ideas and questions.
2) A key characteristic of science is that it aims to develop explanations of the natural world that can be revised as new evidence emerges. While scientific ideas are subject to change, they become widely accepted when supported by multiple lines of evidence.
3) An example of the scientific process discussed is Ernest Rutherford's early 20th century work investigating the structure of atoms through experiments firing alpha particles at gold foil. His goal was to understand the natural world at the atomicWhat is science
What is scienceRoopa slideshare
╠²
This document provides an overview of what science is and how it works. It discusses that:
1) Science is both a body of knowledge and a process of discovery to understand the natural world through evidence-based investigation of testable ideas and questions.
2) A key characteristic of science is that it aims to develop explanations of the natural world that can be revised as new evidence emerges. While scientific ideas are subject to change, they become widely accepted when supported by multiple lines of evidence.
3) An example of the scientific process discussed is Ernest Rutherford's early 20th century work investigating the structure of atoms through experiments firing alpha particles at gold foil. His goal was to understand the natural world at the atomicPresentations-Tips.ppt
Presentations-Tips.pptRoopa slideshare
╠²
This document provides tips for creating effective PowerPoint slides by avoiding common pitfalls. It addresses how to structure slides with outlines and bullet points, use fonts and colors that are easy to read, include graphs and charts to visualize data, check for spelling and grammar errors, and conclude with a clear summary and invitation for questions. Specifically, the tips suggest using 1-2 slides per minute, including 4-5 bullet points per slide, font sizes of 18 points or larger, consistent backgrounds, labeling all graphs, and proofreading for errors.slide1.rtf
slide1.rtfRoopa slideshare
╠²
This manifesto introduces the ebook "No Idling" which discusses taking action and overcoming resistance to complete important work. It was created by The Domino Project Street Team in under two weeks to honor Steven Pressfield's book "Do the Work", with contributions from authors who delivered in a short timeframe to model doing the work. The ebook provides stories from authors who have taken action to ship their work.Std10-Maths-EM-1.pdf
Std10-Maths-EM-1.pdfRoopa slideshare
╠²
This document is the preface to a mathematics textbook for 10th standard students in Tamil Nadu, India. It outlines the goals of improving mathematics education in the state and emphasizes the importance of mathematics for science, technology, and individual growth. It encourages teachers to facilitate two-way communication to help students learn concepts and apply them to problem solving. The textbook is designed to explain fundamentals and include worked examples to help students understand concepts and practice applying them. Suggestions from teachers and students are welcomed to further improve the textbook.Std10-Maths-EM-1.pdf
Std10-Maths-EM-1.pdfRoopa slideshare
╠²
- The document discusses the importance of mathematics education in Tamil Nadu. It notes the implementation of a uniform curriculum across all school streams as an opportunity to improve education.
- Mathematics is described as the "queen of all sciences" with intrinsic value and beauty. It plays an indispensable role in sciences and engineering. Mathematical knowledge is essential for growth in science, technology, and any individual's chosen field.
- Thiruvalluvar, a Tamil poet from over 2000 years ago, underlined the importance of mathematical education. We need mathematics to solve increasingly complex problems in life, and it is a supremely creative force, not just a problem-solving tool.Daily inspiration
Daily inspirationRoopa slideshare
╠²
This document is from Robin Sharma's book "Daily Inspiration from The Monk Who Sold His Ferrari" published by Jaico Publishing House. It contains a dedication from Robin Sharma to the reader and his two children. The following section contains daily quotes from January on the topics of impact and legacy. The quotes discuss finding purpose and a cause to dedicate one's life to in order to unleash passion and energy. They emphasize connecting to a compelling cause with heart over head to soar in life.slide
slideRoopa slideshare
╠²
This manifesto introduces the ebook "No Idling" which discusses taking action and overcoming resistance to complete important work. It was created by The Domino Project Street Team in under two weeks to honor Steven Pressfield's book "Do the Work", with contributions from authors who delivered in a very short timeframe. The ebook provides real examples of people who have taken action to ship their work.Ad
n
- 1. Create an ETD Using Adobe Acrobat Lesson 2: Create a PDF File 1 Create a PDF File Now that youŌĆÖve seen what an ETD looks like and how to browse the contents, itŌĆÖs time to learn how to convert your own thesis or dissertation into a PDF ’¼üle. There are several different options for doing this, and all require that you have a copy of Adobe┬« Acrobat┬« Standard or Professional installed on your computer. Adobe Reader, which is freely available for downloading from many Internet sites, can only be used to read a PDF ’¼üle. You cannot use it to create a PDF ’¼üle. In this lesson, you will learn how to: 1. Create a PDF using PDFMaker from within Microsoft┬« Word 2. Create a PDF using the Print command 3. Combine multiple ’¼üles Tip Exercise 1 and Exercise 2 produce the same result. Choose the one that works best for you.
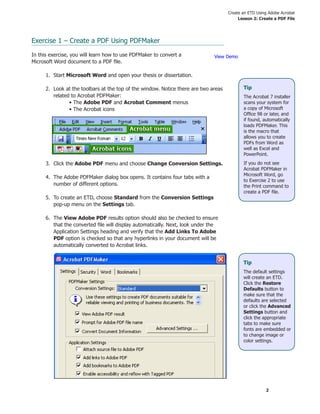
- 2. Create an ETD Using Adobe Acrobat Lesson 2: Create a PDF File 2 Tip The default settings will create an ETD. Click the Restore Defaults button to make sure that the defaults are selected or click the Advanced Settings button and click the appropriate tabs to make sure fonts are embedded or to change image or color settings. Exercise 1 ŌĆō Create a PDF Using PDFMaker In this exercise, you will learn how to use PDFMaker to convert a Microsoft Word document to a PDF ’¼üle. 1. Start Microsoft Word and open your thesis or dissertation. 2. Look at the toolbars at the top of the window. Notice there are two areas related to Acrobat PDFMaker: ŌĆó The Adobe PDF and Acrobat Comment menus ŌĆó The Acrobat icons 3. Click the Adobe PDF menu and choose Change Conversion Settings. 4. The Adobe PDFMaker dialog box opens. It contains four tabs with a number of different options. 5. To create an ETD, choose Standard from the Conversion Settings pop-up menu on the Settings tab. 6. The View Adobe PDF results option should also be checked to ensure that the converted ’¼üle will display automatically. Next, look under the Application Settings heading and verify that the Add Links To Adobe PDF option is checked so that any hyperlinks in your document will be automatically converted to Acrobat links. View Demo Tip The Acrobat 7 installer scans your system for a copy of Microsoft Of’¼üce 98 or later, and if found, automatically loads PDFMaker. This is the macro that allows you to create PDFs from Word as well as Excel and PowerPoint. If you do not see Acrobat PDFMaker in Microsoft Word, go to Exercise 2 to use the Print command to create a PDF ’¼üle.
- 3. Create an ETD Using Adobe Acrobat Lesson 2: Create a PDF File 3 7. Click OK to save your settings. 8. You are ready to convert your thesis or dissertation to an Acrobat PDF ’¼üle. Click the Adobe PDF menu and choose Convert To Adobe PDF, or, alternatively, click the Convert To Adobe PDF button. 9. When prompted, type a ’¼üle name (or accept the default name suggested by Microsoft Word), and click Save. 10. When the conversion is complete, your document will automatically open in Acrobat, and you can check to see how it looks. Continue to Exercise 2
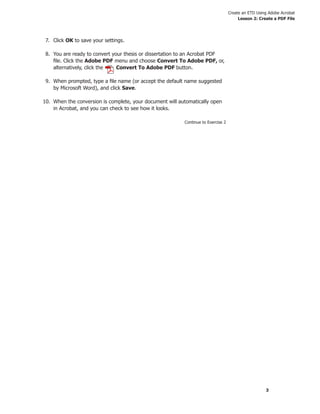
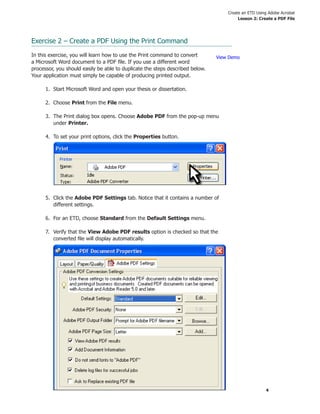
- 4. Create an ETD Using Adobe Acrobat Lesson 2: Create a PDF File 4 Exercise 2 ŌĆō Create a PDF Using the Print Command In this exercise, you will learn how to use the Print command to convert a Microsoft Word document to a PDF ’¼üle. If you use a different word processor, you should easily be able to duplicate the steps described below. Your application must simply be capable of producing printed output. 1. Start Microsoft Word and open your thesis or dissertation. 2. Choose Print from the File menu. 3. The Print dialog box opens. Choose Adobe PDF from the pop-up menu under Printer. 4. To set your print options, click the Properties button. 5. Click the Adobe PDF Settings tab. Notice that it contains a number of different settings. 6. For an ETD, choose Standard from the Default Settings menu. 7. Verify that the View Adobe PDF results option is checked so that the converted ’¼üle will display automatically. View Demo
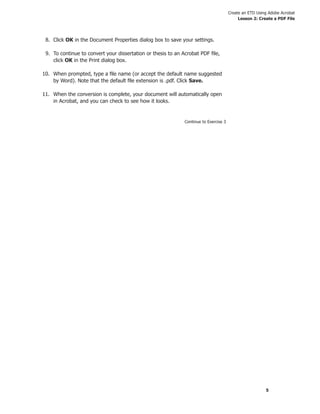
- 5. Create an ETD Using Adobe Acrobat Lesson 2: Create a PDF File 5 8. Click OK in the Document Properties dialog box to save your settings. 9. To continue to convert your dissertation or thesis to an Acrobat PDF ’¼üle, click OK in the Print dialog box. 10. When prompted, type a ’¼üle name (or accept the default name suggested by Word). Note that the default ’¼üle extension is .pdf. Click Save. 11. When the conversion is complete, your document will automatically open in Acrobat, and you can check to see how it looks. Continue to Exercise 3
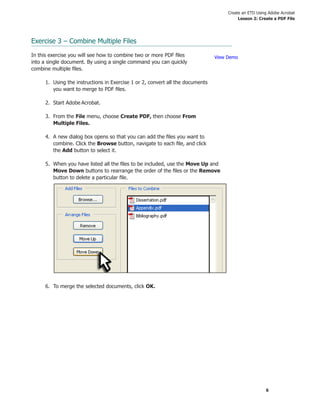
- 6. Create an ETD Using Adobe Acrobat Lesson 2: Create a PDF File 6 Exercise 3 ŌĆō Combine Multiple Files In this exercise you will see how to combine two or more PDF ’¼üles into a single document. By using a single command you can quickly combine multiple ’¼üles. 1. Using the instructions in Exercise 1 or 2, convert all the documents you want to merge to PDF ’¼üles. 2. Start Adobe Acrobat. 3. From the File menu, choose Create PDF, then choose From Multiple Files. 4. A new dialog box opens so that you can add the ’¼üles you want to combine. Click the Browse button, navigate to each ’¼üle, and click the Add button to select it. 5. When you have listed all the ’¼üles to be included, use the Move Up and Move Down buttons to rearrange the order of the ’¼üles or the Remove button to delete a particular ’¼üle. 6. To merge the selected documents, click OK. View Demo