


云端搜影机使用手册 中英版
- 1. 雲 端 搜 影 機 使用說明書 1
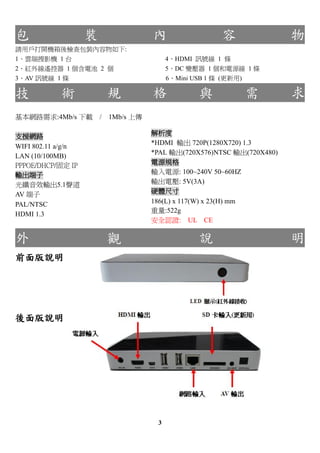
- 3. 包 裝 內 容 物 請用戶打開機箱後檢查包裝內容物如下: 1、雲端搜影機 1 台 4、HDMI 訊號線 1 條 2、紅外線遥控器 1 個含電池 2 個 5、DC 變壓器 1 個和電源線 1 條 3、AV 訊號線 1 條 6、Mini USB 1 條 (更新用) 技 術 規 格 與 需 求 基本網路需求:4Mb/s 下載 / 1Mb/s 上傳 支援網路 解析度 *HDMI 輸出 720P(1280X720) 1.3 WIFI 802.11 a/g/n *PAL 輸出(720X576)NTSC 輸出(720X480) LAN (10/100MB) PPPOE/DHCP/固定 IP 電源規格 輸出端子 輸入電源: 100~240V 50~60HZ 光纖音效輸出5.1聲道 輸出電壓: 5V(3A) AV 端子 硬體尺寸 PAL/NTSC 186(L) x 117(W) x 23(H) mm 重量:522g HDMI 1.3 安全認證: UL CE 外 觀 說 明 前面版說明 後面版說明 3
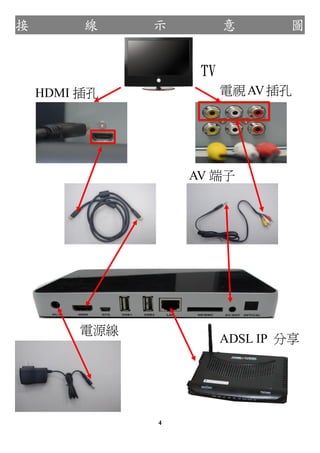
- 4. 接 線 示 意 圖 TV HDMI 插孔 電視 AV 插孔 AV 端子 HDMI 線 線 電源線 ADSL IP 分享 器 4
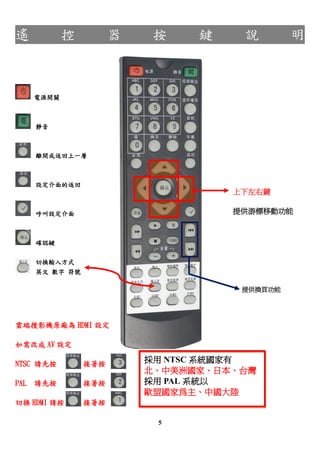
- 5. 遥 控 器 按 鍵 說 明 電源開關 靜音 離開或返回上一層 設定介面的返回 上下左右鍵 呼叫設定介面 提供游標移動功能 確認鍵 切換輸入方式 英文 數字 符號 提供換頁功能 雲端搜影機原廠為 HDMI 設定 如需改成 AV 設定 NTSC 請先按 接著按 採用 NTSC 系統國家有 北、中美洲國家、日本、台灣 PAL 請先按 接著按 採用 PAL 系統以 歐盟國家為主、中國大陸 切換 HDMI 請按 接著按 5
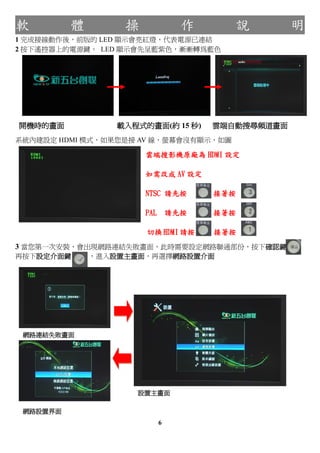
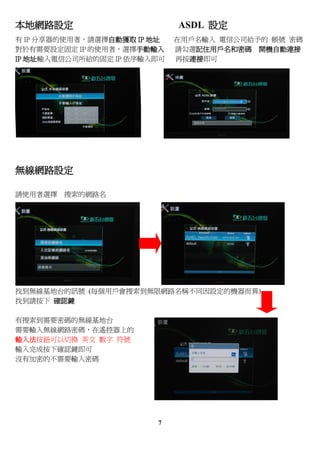
- 6. 软 體 操 作 說 明 1 完成接線動作後,前版的 LED 顯示會亮紅燈,代表電源已連結 2 按下遥控器上的電源鍵, LED 顯示會先呈藍紫色,漸漸轉為藍色 開機時的畫面 載入程式的畫面(約 15 秒) 雲端自動搜尋頻道畫面 系統內建設定 HDMI 模式,如果您是接 AV 線,螢幕會沒有顯示,如圖 雲端搜影機原廠為 HDMI 設定 如需改成 AV 設定 NTSC 請先按 接著按 PAL 請先按 接著按 切換 HDMI 請按 接著按 3 當您第一次安裝,會出現網路連結失敗畫面,此時需要設定網路聯通部份,按下確認鍵 再按下設定介面鍵 ,進入設置主畫面,再選擇網路設置介面 網路連結失敗畫面 設置主畫面 網路設置界面 6
- 7. 本地网路设定 ASDL 設定 有 IP 分享器的使用者,請選擇自動獲取 IP 地址 在用戶名輸入 電信公司給予的 帳號 密碼 對於有需要設定固定 IP 的使用者,選擇手動輸入 請勾選記住用戶名和密碼 開機自動連接 IP 地址輸入電信公司所給的固定 IP 依序輸入即可 再按連接即可 無線網路設定 請使用者選擇 搜索的網路名 找到無線基地台的訊號 (每個用戶會搜索到無限網路名稱不同因設定的機器而異) 找到請按下 確認鍵 有搜索到需要密碼的無線基地台 需要輸入無線網路密碼,在遥控器上的 輸入法按鈕可以切換 英文 數字 符號 輸入完成按下確認鍵即可 沒有加密的不需要輸入密碼 7
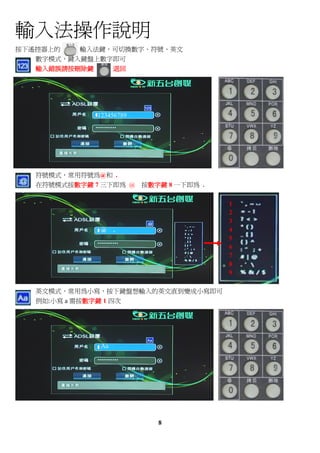
- 8. 輸入法操作說明 按下遥控器上的 輸入法鍵,可切換數字、符號、英文 數字模式,鍵入鍵盤上數字即可 輸入錯誤請按刪除鍵 退回 123456789 符號模式,常用符號為@和 . 在符號模式按數字鍵 7 三下即為 @ 按數字鍵 8 一下即為 . 1 2 3 @ . 4 5 6 7 8 9 英文模式,常用為小寫,按下鍵盤想輸入的英文直到變成小寫即可 例如:小寫 a 需按數字鍵 1 四次 Aa 8
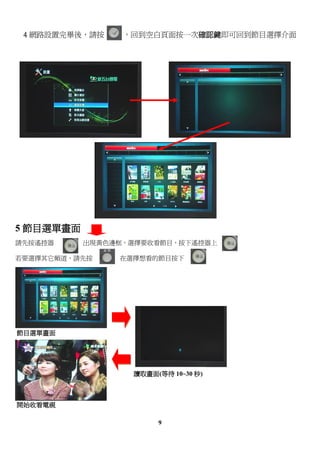
- 9. 4 網路設置完畢後,請按 ,回到空白頁面按一次確認鍵即可回到節目選擇介面 5 節目選單畫面 請先按遥控器 出現黃色邊框,選擇要收看節目,按下遥控器上 若要選擇其它頻道,請先按 在選擇想看的節目按下 節目選單畫面 讀取畫面(等待 10~30 秒) 開始收看電視 9
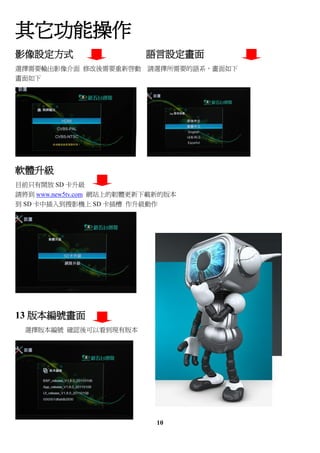
- 10. 其它功能操作 影像設定方式 語言設定畫面 選擇需要輸出影像介面 修改後需要重新啟動 請選擇所需要的語系,畫面如下 畫面如下 软體升級 目前只有開放 SD 卡升級 請將到 www.new5tv.com 網站上的韌體更新下載新的版本 到 SD 卡中插入到搜影機上 SD 卡插槽 作升級動作 13 版本編號畫面 選擇版本編號 確認後可以看到現有版本 10
- 11. Cloud Reciver Operating Instruction 11
- 12. Contents Package accessories、Specifications and Requirements、exterior and connections-13 Connection diagram-14 Remote control buttons-15 Software instruction-16~20 Thank you for purchasing this Cloud Receiver ,the most advance instant TV. For your safety and quality of entertainment, please read and follow all instructions before during and after operating Cloud Receiver. Keep these instructions for future reference. 12
- 13. P a c k a g e A c c e s s o r i e s Check your product package for following items: 1、Cloud Receiver X 1 4、HDMI cable X 1 2、IR Remote control X 1 Battries X 2 5、DC Adapter X 1 3、AV Cable X 1 6、Mini USB X 1 Specifications and Requirements Minimum bandwidth speed :4Mb/s download / 1Mb/s upload Available Internet Connection Resolution WIFI 802.11 a/g/n *HDMI output 720P(1280X720) 1.3 LAN (10/100MB) *AV output PPPOE/DHCP/Static IP PAL (720X576) NTSC(720X480) Output Video Mode Power Specification Optical digital audio out 5.1channel Input power: 100~240V 50~60HZ Output power: 5V(3A) AV cable PAL/NTSC Hardware Size HDMI 1.3 186(L) x 117(W) x 23(H) mm Weight:522g 安全認證: UL CE E x t e r i o r Front LED Status light (IR Remote Sensor) Rear SD memory card slot HDMI Output (Firmware update) DC In 5V(3A) Jack LAN Inport AV OutPut 13
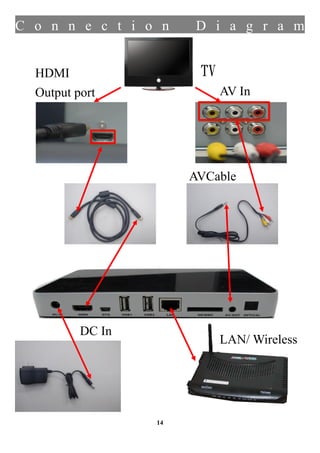
- 14. C o n n e c t i o n D i a g r a m HDMI TV Output port AV In AVCable HDMI 線 DC In LAN/ Wireless 14
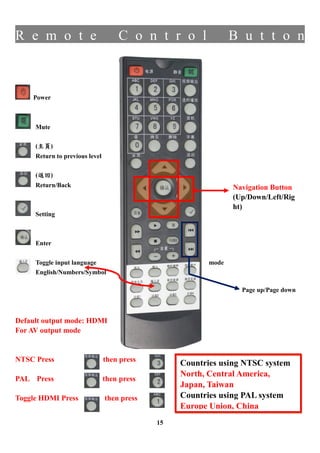
- 15. R e m o t e C o n t r o l B u t t o n Power Mute (主頁) Return to previous level (返回) Return/Back Navigation Button (Up/Down/Left/Rig ht) Setting Enter Toggle input language mode English/Numbers/Symbol Page up/Page down Default output mode: HDMI For AV output mode NTSC Press then press Countries using NTSC system North, Central America, PAL Press then press Japan, Taiwan Toggle HDMI Press then press Countries using PAL system Europe Union, China 15
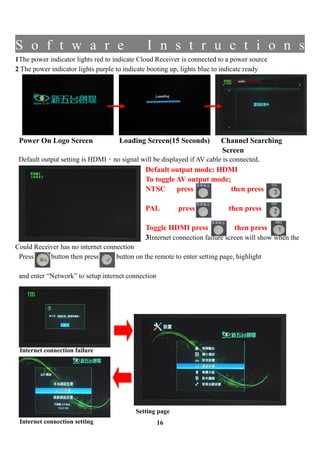
- 16. S o f t w a r e I n s t r u c t i o n s 1The power indicator lights red to indicate Cloud Receiver is connected to a power source 2 The power indicator lights purple to indicate booting up, lights blue to indicate ready Power On Logo Screen Loading Screen(15 Seconds) Channel Searching Screen Default output setting is HDMI,no signal will be displayed if AV cable is connected, Default output mode: HDMI To toggle AV output mode; NTSC press then press PAL press then press Toggle HDMI press then press 3Internet connection failure screen will show when the Could Receiver has no internet connection Press button then press button on the remote to enter setting page, highlight and enter “Network” to setup internet connection Internet connection failure Setting page Internet connection setting 16
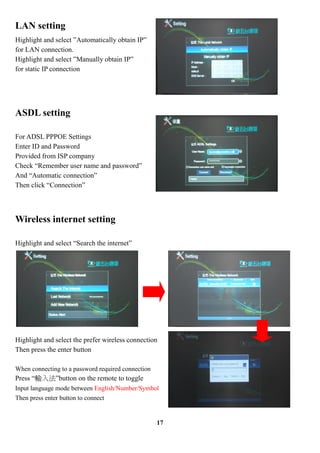
- 17. LAN setting Highlight and select ”Automatically obtain IP” for LAN connection. Highlight and select ”Manually obtain IP” for static IP connection ASDL setting For ADSL PPPOE Settings Enter ID and Password Provided from ISP company Check “Remember user name and password” And “Automatic connection” Then click “Connection” Wireless internet setting Highlight and select “Search the internet” Highlight and select the prefer wireless connection Then press the enter button When connecting to a password required connection Press “輸入法”button on the remote to toggle Input language mode between English/Number/Symbol Then press enter button to connect 17
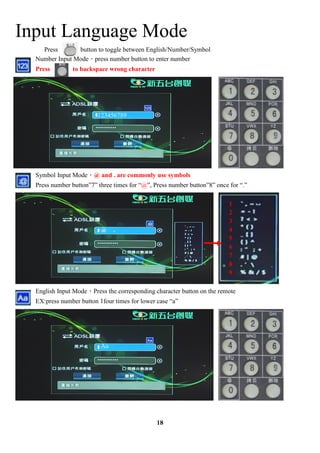
- 18. Input Language Mode Press button to toggle between English/Number/Symbol Number Input Mode,press number button to enter number Press to backspace wrong character 123456789 Symbol Input Mode,@ and . are commonly use symbols Press number button”7” three times for “@”, Press number button”8” once for “.” 1 2 3 @ . 4 5 6 7 8 9 English Input Mode,Press the corresponding character button on the remote EX:press number button 1four times for lower case “a” Aa 18
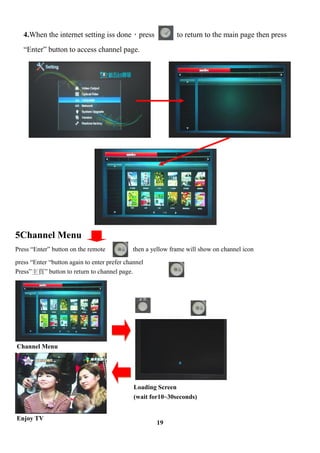
- 19. 4.When the internet setting iss done,press to return to the main page then press “Enter” button to access channel page. 5Channel Menu Press “Enter” button on the remote then a yellow frame will show on channel icon press “Enter “button again to enter prefer channel Press”主頁” button to return to channel page. Channel Menu Loading Screen (wait for10~30seconds) Enjoy TV 19
- 20. Other functions Video output mode Language selection Select the prefer output mode, select prefer language reboot is required for any change Firmware update SD Card update Please go to our website;www.new5tv.com to download the latest firmware to the SD card then insert the SD card to the Cloud Receiver 13 Firmware Version Select Version then press “Enter” button to check firmware version 20
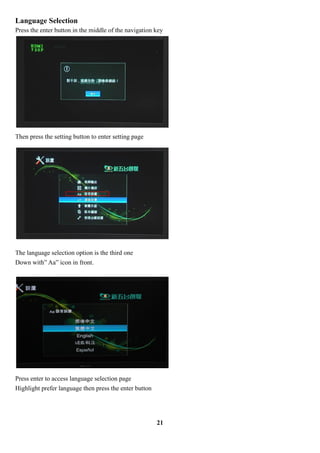
- 21. Language Selection Press the enter button in the middle of the navigation key Then press the setting button to enter setting page The language selection option is the third one Down with” Aa” icon in front. Press enter to access language selection page Highlight prefer language then press the enter button 21