teacherinset.pptx
- 2. • What is Photoshop • Photoshop Interface Window • Adding, Deleting, and Duplicating Layers
- 3. How to Use Photoshop Adobe Photoshop is an imaging and graphic design software used by thousands of people in many different roles across the world. Not only is it for photos but you can use Photoshop for designing websites, editing videos, and creating 3D artwork. Before you can get started with Photoshop you will need to purchase a plan and download Photoshop onto your device. Once you have downloaded the software you can start to get to know the interface which is very intuitive. Introduction to Adobe Photoshop As a beginner in Photoshop, it’s important to understand the anatomy of the interface before you get started.
- 4. Parts of a Photoshop Interface
- 5. Parts of a Layer Panel
- 7. Photoshop Toolbox The toolbox in the left sidebar will be your best friend. The tools are organized into groups based on what they do: • The top section features selection, cropping, and slicing tools. Use these to select parts of your images that you want to edit or enhance, or crop and slice out parts you want to exclude. • The second section features retouch and paint tools. Use these to get rid of unwanted spots on product items, draw on your image, erase certain parts, color them in, or enhance them by sharpening or blurring. • The third section is drawing and typing tools. Use these to write text over your image or draw images onto them by hand using the pen tool.
- 9. How to Open a Document in Photoshop To create a new document or open a file on your computer, click “File” on the top left menu. Select “New” to create a new, blank document. Or click “Open” to go through your computer and open an existing file. When you create a new document, a dialog box will pop up. In this window, you can name the file and select the size and resolution you want. This is helpful if your website requires a certain file size to display photos properly. Our photo dimensions are 880 pixels wide by 450 pixels tall. For resolution, 72 pixels/inch will work for online images. But if you want high-quality for print, we recommend 300 pixels/inch. (Warning: this will make the file size much larger, so be careful.) Click OK and voilà! You’re ready to work. Keep in mind that Photoshop will “lock” this new document, which keeps you from making edits directly to that layer. To unlock it, just click the lock icon in the layer’s name and it will disappear. Keep reading to learn more about layers.
- 11. Pixels, abbreviated as "px", are also a unit of measurement commonly used in graphic and web design, equivalent to roughly 1‚ÅÑ96 inch (0.26 mm). This measurement is used to make sure a given element will display as the same size no matter what screen resolution views it.
- 13. How to Use Layers in Photoshop Speaking of layers, this is a critical feature to understand when you’re learning how to use Photoshop, even for the most basic Photoshop tutorials. You might find that Photoshop isn’t doing something that you want it to, only to discover that it’s an issue with your layers. Having basic knowledge of this feature can help to avoid road bumps and frustration when you’re using Photoshop. You can think of layers like sheets of glass that are stacked on top of each other. When you use multiple layers, it’s easier to edit one part of your image without messing up the rest of the final product. You can easily add or delete layers, as well as “hide” them by clicking the eyeball icon to the left of each layer’s name.
- 14. 1. The Layer Tool What It Does: A layer can be used for an image, text, brush strokes, background colors, patterns, and filters. I like to think of layers as sheets of glass stacked on top of one another that you'll use to create a final product. Each sheet can be modified individually without affecting the project as a whole, which can save you tons of time when making edits to individual elements of your graphic. Image Credit: StackExchange Where It's Located: It has its own module on the bottom right-hand corner of your Photoshop screen, by default. You can also access it by clicking "Layer" in the top menu bar. Pro Tip: Always name your layers. Keeping them organized will help keep you safe, especially if you find yourself working on a project with a large number of layers.
- 15. To add or delete a layer: From the top menu bar, choose Layer > New > Layer... To select a layer: The selected layer is highlighted in blue. To edit a specific part of your image, you'll need to select that specific layer. You'll also notice there's an "eye" symbol next to each layer: Click that symbol to turn the eye on and off, thereby toggling the visibility of that layer as you work. To duplicate a layer: First, select a layer or group in the Layers panel. Next, either drag the layer or group to the Create a New Layer button, or right-click the layer to choose "Duplicate Layer" or "Duplicate Group." Enter a name for the layer or group, and click OK. HOW TO ADD, DELETE, SELECT, AND DUPLICATE LAYER
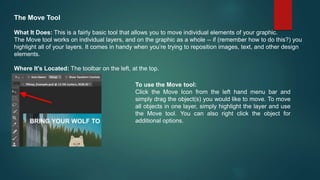
- 16. The Move Tool What It Does: This is a fairly basic tool that allows you to move individual elements of your graphic. The Move tool works on individual layers, and on the graphic as a whole -- if (remember how to do this?) you highlight all of your layers. It comes in handy when you’re trying to reposition images, text, and other design elements. Where It's Located: The toolbar on the left, at the top. To use the Move tool: Click the Move Icon from the left hand menu bar and simply drag the object(s) you would like to move. To move all objects in one layer, simply highlight the layer and use the Move tool. You can also right click the object for additional options.
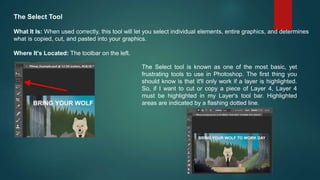
- 17. The Select Tool What It Is: When used correctly, this tool will let you select individual elements, entire graphics, and determines what is copied, cut, and pasted into your graphics. Where It's Located: The toolbar on the left. The Select tool is known as one of the most basic, yet frustrating tools to use in Photoshop. The first thing you should know is that it'll only work if a layer is highlighted. So, if I want to cut or copy a piece of Layer 4, Layer 4 must be highlighted in my Layer's tool bar. Highlighted areas are indicated by a flashing dotted line.
- 18. Custom Fonts & The Text Tool What It Does: The Text tool lets you add custom fonts to your database, and it gives you access to advanced font settings that give your text some serious style. Where It's Located: The toolbar on your left, near the bottom. Once you click the Text tool icon, all of the settings and font options will pop up at the top of your screen. These settings let you change the font, font size, and spacing between characters, height, width, color, and style. Be sure to select the layer of your desired text to edit it.
- 19. To add text to your graphic: The text tool works like any other text tool you’ve used. Click the "T" icon on the left side bar, drag the text box over any particular area you want text to appear, and you’re set to go. Whenever you create a text box, Photoshop will generate a layer for it. You can choose the color, size, stroke, font style, and a variety of other options to switch things up. Pro Tip: While Photoshop offers a wide variety of fonts, you can also install your own fonts.
- 20. To scale, rotate, move, and flip things: The Free Transform tool lets you scale, rotate, move, and flip any element in your select layer or layers. Use the shortcut CTRL + T or Command + T (for Macs) to initiate Free Transform, and check out the options that pop up at the top of your screen. Hold the SHIFT key while transforming to maintain the proportions of your elements.
- 21. The Zoom Tool What It Does: The Zoom tool lets you zoom in close to certain areas of an image, and zoom out to get more of a bird's eye view of what's happening. Where It's Located: In the top menu bar, choose View > Zoom In or View > Zoom Out. To use the Zoom tool: Either select the zoom options from the "View" menu (as shown above). To use the keyboard shortcut, hold ALT (PC) or Command (Mac) and press + to zoom in, and ALT (PC) or Command (Mac) and press - to zoom out.
- 22. The Eraser What It Does: The Basic Eraser functions a lot like the brush tool. You can change the size and hardness of the eraser tip to achieve a variety of effects, like blending and fades. The Background Eraser uses differences in color to help you erase unwanted background areas from your images. The eraser is one of the most useful tools in Photoshop. Yes, I understand it’s technically just an eraser, but you’ve never used an eraser like this. Where It's Located: The toolbar on the left.
- 23. To use the Basic Eraser: Once you click the Eraser icon, all of the settings will pop up at the top of your screen. These settings let you change the eraser size, hardness, and other aspects of the tool. Like most tools in Photoshop, the eraser works only on a specifically selected layer. Make sure you've got the layer you want selected before you start erasing.
- 24. To use the Background Eraser: This tool is a time-saving wonder. You can see how easily it eliminates background colors from images. This is especially helpful if you need an object with a transparent background. To use the Background Eraser, click and hold the eraser icon until the slide out menu appears. Choose "Background Eraser." Now you're ready to do some serious erasing. Adjust the size of the Background Eraser, and simply click the color you would like deleted from the selected layer. Remember to select the layer you want to erase on. Pro Tip: Don’t be afraid to use an oversized eraser tip for the Background Eraser. Since it works by removing particular colors from the image, it won’t erase colors that aren’t selected.
- 25. The Fill Tool What It Does: The Fill tool, formerly the Paint Bucket tool, fills any solid area with the color of your choice. It's great for solid backgrounds or coloring large areas. It can also be used to apply patterns to your images. The Gradient tool within the Fill tool lets you create a nice, faded background effect of the color of your choice. Where It's Located: On the top menu bar, choose Layer > New Fill Layer. From there, you have the option to choose "Solid Color," "Gradient," or "Pattern."
- 26. To fill a solid area with a color: First, select the layer you'd like to fill with a solid color. Then, from the top menu bar, choose Layer > New Fill Layer > Solid Color... From there, a "New Layer" window will pop up and prompt you to name the new color fill layer. Don't worry about choosing the color you want right then and there -- simply name the layer and press "OK." Next, the Color Picker window will pop up. Here, you can choose which solid color you'd like to fill. Since I'd selected my background layer to fill in (i.e. the color of the sky in my graphic), the color I select in the Color Picker dictates the color of the sky:
- 27. To apply patterns to your images: These patterns can be manually created if you have the time and patience, or you can find a variety of royalty-free patterns available for download through a basic Google search. To apply a pattern, first select the layer you'd like to fill with a pattern. Then, from the top menu bar, choose Layer > New Fill Layer > Pattern... From there, a "New Layer" window will pop up and prompt you to name the new color fill layer. Don't worry about choosing the color you want right then and there -- simply name the layer and press "OK.“ Next, you'll see the "Pattern Fill" window pop up. From there, you can choose the pattern and its scale. Since I'd selected my background layer to fill in (i.e. the color of the sky in my graphic), the pattern I select in the Pattern Fill changes the sky:
- 28. To use the Gradient tool: To apply a gradient, first select the layer you'd like to fill with a pattern. Then, from the top menu bar, choose Layer > New Fill Layer > Gradient... From there, a "New Layer" window will pop up and prompt you to name the new color fill layer. Don't worry about choosing the color you want right then and there -- simply name the layer and press "OK.“ Next, a "Gradient Fill" window will pop up. Play around with these options, including the style, angle, and scale. To choose a different gradient than the one offered by default, click the arrow on the right-hand side of the default gradient to open the Gradient Editor, shown below:
- 29. The Eyedropper What It Does: This handy little tool lets you extract and use any color from any image in Photoshop. Where It's Located: The toolbar on the left.
- 30. To use the Eyedropper tool: Select the icon from the sidebar. Next, locate that color you would like to extract, and simply click that area to clone the color. Once you've extracted the color, you'll see it indicated both in the Color module at the top right of your screen, as well as the bottom of the left sidebar. You can double-click that color box to bring up the advanced color picker, where you can then adjust and save the color to a swatch for future use.


