The document provides instructions for using the Encompass360 origination software. It summarizes the key sections of the software including the home tab, pipeline tab, loan folders, views, and how to create a new loan. It describes how to fill out important forms like the borrower summary, credit report, and 1003 when originating a loan in the system. The document is a training manual for origination staff to learn to use the Encompass360 software.
This document summarizes a .NET library management application created in two phases. Phase I involved building the frontend using Windows Forms to add members, check out/in books. Phase II focused on the backend, creating business and data access layers along with stored procedures. Key functionality included getting member info, adding adults/juveniles, checking books in/out with validation rules. Code snippets demonstrated ADO.NET data access and stored procedures for retrieving member data.
Guide to Online International Non-Proprietary Name (INN) Electronic Name Subm...Bill Smith
油
Brand Acumen's Guide to Online International Non-Proprietary Name (INN) Electronic Name Submission Process.
Brand Acumen. The Global Leader in Pharmaceutical Name Development and Submission Strategy.
This document provides guidance on completing the online application for the CCBA速 certification. It outlines the steps to access and navigate the application, instructions for filling out each section, and recommendations for initiating references and submitting sufficient work experience hours. The key sections include confirming personal information, entering education history, detailing work experience aligned to the BABOK速 guide, and including professional development courses. It emphasizes saving regularly and having references submitted before finalizing the application.
1DepEd eAPS - School Module User Manual - Per Transaction.pdfJansen Jacinto
油
The document is a user manual for DepEd Regional Office 1's e-Application for Private Schools and Records Management (e-APS-RM) system. It provides instructions on how private schools can use the system to apply for various permits and requests online, including government recognition, government permits, permit renewals, tuition fee increases, and more. The manual outlines the application process step-by-step and includes screenshots to illustrate navigation of the school login page, application forms, file uploads, and application submission.
The document provides a guide for suppliers to register and use the Oracle Supplier Portal for online bidding with several UN agencies. It outlines the registration process which includes entering company details, contacts, addresses, business classifications, products/services, and completing a questionnaire. Suppliers must register to access tender documents, submit bids, and manage their profile. The guide explains each step and provides tips to navigate the portal effectively.
Q3 2019 compensation-quick-preview by deloitte germanyHazal Yac脹
油
This document provides information on the Q3 2019 release of SuccessFactors Compensation Management. Key updates include:
1) Enhancements to the Reward and Recognition page including a new section to edit appreciation messages and view available budgets.
2) Ability for employees to track details of awards sent and received on their profile.
3) A new step sequence for nominating employees for Spot Awards.
4) Ability to filter Spot Award history reports by date fields and see time zones on report exports.
5) Budget entities now read-only on Manage Data page to avoid data issues when edited.
Q4 2019 compensation-quick-preview by deloitte germanyHazal Yac脹
油
This document provides a preview of the Q4 2019 release of SuccessFactors Compensation Management. It includes general dates for past and upcoming releases. The Q4 2019 release includes enhancements around viewing comments, translating labels, encrypting lookup tables, aborting stalled budget assignments, retiring custom reports and Live Analytics. Additional features include printing statements, publishing to Employee Central, new total compensation templates/plans, custom validations, data purging, deleting employees from worksheets, and restricting the audit population. Localization of categories/levels, point-based programs, employee nomination search, custom images for categories/levels, and redeeming rewards are also highlighted.
This document provides a guide for using the BilSPED (Bilingual Special Education) Student Training Guide on the GWeb info system. It outlines 22 steps for students to access their TaskStream account through single sign-on, view and work on assessments, upload assignments, submit work, and view evaluation results and scores. Key aspects covered include logging in, accessing the student home page and BilSPED folio, adding and submitting work, viewing rubrics and comments, and getting additional assistance.
This document provides a guide for using the BilSPED (Bilingual Special Education) Student Training Guide on the GWeb info system. It outlines 22 steps for students to access their TaskStream account through single sign-on, view assessments and rubrics, upload and submit assignments, and view evaluation results and scores. The guide explains how students can get help from TaskStream's Mentoring Services or the GSEHD TaskStream Administrators if needed.
User Guide - Chewy Vendor Partner Portal - New to Chewy.pdfmbcnszjrvf
油
This document provides a user guide for vendors to onboard with Chewy using the Vendor Partner Portal. It outlines the multi-step onboarding process including creating an account, completing company and product information forms, submitting banking details, and electronically signing documents. Vendors can also use the portal to submit and track inquiries during the onboarding process and ongoing vendor services through a request system. The guide provides screenshots to illustrate each step of the onboarding workflow and support features within the Vendor Partner Portal.
Incumbent Worker Tracking System (IWTS) InstructionsIllinois workNet
油
This document provides an overview of the Illinois workNet Incumbent Worker Tracking System (IWTS) webinars and the IWTS process. The webinars will cover submitting an incumbent worker training plan, adding employees to courses, and submitting quarterly reports. The summary is:
The document outlines the IWTS process which includes grant recipients submitting an incumbent worker training plan, adding employees who will receive the training, registering employees for courses and sessions, and submitting quarterly reports on employee outcomes. It provides instructions for grant recipients to access the online IWTS guide and tools to navigate completing plans, entering data, and submitting reports in the IWTS system.
This document provides documentation on finance interface processes between the bluQube and RMS systems at Kingston University. It describes several interfaces including deposit receipts, deposit refunds, and headed tenancy. For deposit refunds, it outlines a two stage process where data is first imported from RMS into bluQube, then validated and processed to generate refunds. The interfaces are run on a regular basis and various validation steps are described to ensure accuracy.
This presentation was used during the E&ES Annual Meeting in February 2016. It provides an overview of Illinois workNet tools for individuals, employers, and workforce & education partners.
CMS XLCAppendix D ApprovalsStudent Management Program SystemUser.docxmary772
油
CMS XLC Appendix D: ApprovalsStudent Management Program SystemUser Documentation and Tutorials
Version 1.0
02/23/2020
Table of Contents
1.Introduction1
2.Overview2
3.Getting Started3
3.1Set-up Considerations3
3.2User Access Considerations3
3.3Accessing the System4
3.4System Organization & Navigation4
3.5The system datastore is up-to-date and on-line. Exiting the System5
4.Using the System6
5.Troubleshooting & Support7
5.1Error Messages7
5.2Support7
Appendix A: Record of Changes8
Appendix B: Acronyms9
Appendix C: Glossary10
Appendix D: Referenced Documents11
Appendix E: Approvals12
Appendix F: Additional Appendices13
Appendix G: Notes to the Author/Template Instructions14
Appendix H: XLC Template Revision History15
List of Tables
Table 1 - Support Points of Contact7
Table 2 - Record of Changes8
Table 3 - Acronyms9
Table 4 - Referenced Documents10
Table 5 - Approvals11
CMS XLC Table of Contents
UM Version X.X iii <Project and release name>Introduction
This project Student Management Program System has been designed to efficiently manage student and program data, that will provide data management capabilities and analysis needed for student advising and tracking. This document is designed to help the user to understand the how the system works and the way it could be operated. Overview
The main functionality of the System includes the following:油
揃 Input, select specific academic programs and general education requirements specific to each program, and process student data
揃 Provide immediate access to student and program information
揃 Capture student program and advising data through tracking for review, analysis, and making advising and program decisions
揃 Integrate student email functions
揃 Produce reports on specific program enrollment, student program progress, new or current students, students taking remedial courses.Getting Started
This system is designed to help the students in the following areas:
1. Student Enrollment
2. Student re-enrollment/edit the existing information
3. Student data management
4. Accessing the programs
5. Maintain real-time data
6. Generate Customized reports
Set-up Considerations
Student Management Program System screens are designed to be viewed at a minimum screen resolution of 800 x 600. To optimize your access to the SMPS:
Please disable pop-up blockers prior to attempting access to the SMPS.
Use Google Chrome or Firefox.
This application server will support Windows, Linux, and Mac client operating system.
User Access Considerations
1. System Administrator Registration: System Administrator will be able to register in the System by entering the First name, Last name and authenticating by entering the SSN and date of birth details.
2. Student Registration: Once System admin registers the students in the system and generates the Student ID, student should be able to register online by entering the student email Id and student ID provided by the administrator.
3. Student will be able to setup their own.
CMS XLCAppendix D ApprovalsStudent Management Program SystemUser.docxmccormicknadine86
油
CMS XLC Appendix D: ApprovalsStudent Management Program SystemUser Documentation and Tutorials
Version 1.0
02/23/2020
Table of Contents
1.Introduction1
2.Overview2
3.Getting Started3
3.1Set-up Considerations3
3.2User Access Considerations3
3.3Accessing the System4
3.4System Organization & Navigation4
3.5The system datastore is up-to-date and on-line. Exiting the System5
4.Using the System6
5.Troubleshooting & Support7
5.1Error Messages7
5.2Support7
Appendix A: Record of Changes8
Appendix B: Acronyms9
Appendix C: Glossary10
Appendix D: Referenced Documents11
Appendix E: Approvals12
Appendix F: Additional Appendices13
Appendix G: Notes to the Author/Template Instructions14
Appendix H: XLC Template Revision History15
List of Tables
Table 1 - Support Points of Contact7
Table 2 - Record of Changes8
Table 3 - Acronyms9
Table 4 - Referenced Documents10
Table 5 - Approvals11
CMS XLC Table of Contents
UM Version X.X iii <Project and release name>Introduction
This project Student Management Program System has been designed to efficiently manage student and program data, that will provide data management capabilities and analysis needed for student advising and tracking. This document is designed to help the user to understand the how the system works and the way it could be operated. Overview
The main functionality of the System includes the following:油
揃 Input, select specific academic programs and general education requirements specific to each program, and process student data
揃 Provide immediate access to student and program information
揃 Capture student program and advising data through tracking for review, analysis, and making advising and program decisions
揃 Integrate student email functions
揃 Produce reports on specific program enrollment, student program progress, new or current students, students taking remedial courses.Getting Started
This system is designed to help the students in the following areas:
1. Student Enrollment
2. Student re-enrollment/edit the existing information
3. Student data management
4. Accessing the programs
5. Maintain real-time data
6. Generate Customized reports
Set-up Considerations
Student Management Program System screens are designed to be viewed at a minimum screen resolution of 800 x 600. To optimize your access to the SMPS:
Please disable pop-up blockers prior to attempting access to the SMPS.
Use Google Chrome or Firefox.
This application server will support Windows, Linux, and Mac client operating system.
User Access Considerations
1. System Administrator Registration: System Administrator will be able to register in the System by entering the First name, Last name and authenticating by entering the SSN and date of birth details.
2. Student Registration: Once System admin registers the students in the system and generates the Student ID, student should be able to register online by entering the student email Id and student ID provided by the administrator.
3. Student will be able to setup their own ...
This document provides an introduction to the Mail Order Manager Report Builder module. It outlines the prerequisites for using the Report Builder and walks through the steps for installing, setting up, and activating the software. The main sections of the Report Builder are explained, including creating quick reports, cross tabulation reports, labels, and chart reports. Various examples are provided to illustrate how to build different types of reports. Support resources and suggestions for future webinars are also mentioned.
This quick start guide provides instructions for new Eikon users on how to install the application, sign in, navigate the interface, set up a workspace, monitor portfolios, and get alerts. It covers the basic steps of checking system requirements, activating an account, downloading and installing Eikon, customizing profiles, searching for content, linking apps, saving workspaces, creating alerts, and using briefcase to store articles offline. The guide is designed to help financial professionals get up and running quickly on the Eikon platform.
Access Support Centre
Use Support Centre
Tally.ERP 9 provides a new capability to its users known as Support Centre, wherein a user can
directly post his support queries on the functional and technical aspects of the Product. Using
Support Centre feature, the user can view all the support queries reported via Support Centre and
also through other modes viz., Email, Chat, Calls, etc.
Use of GMMSO4 Software for Your Business OrganizationJaimankato
油
GMMSO4 is a research and strategic planning management tool designed to help your company enter or expand its presence into foreign markets. This software will assist you in making strategic marketing/management decisions on how to expand a companys business internationally and how to develop an appropriate business and marketing plan.
The document provides a step-by-step guide to using the FidPro debt counseling system. It outlines 14 steps for capturing a client's application information, including personal details, income, expenses, debts, documents, and bank details. It describes how the system automatically calculates some fields, checks for errors, and allows uploading documents. The final steps review the application summary and notes, and submit the completed application for processing.
H1 2021 Onboarding-quick-review by deloitte germanyPradyp Parakala
油
The new release is available since Monday this week on all preview instances and therefore I created a new Quick Review with a focus on Onboarding (1.0 & 2.0)
As always, please keep in mind that this compilation is not intended to be complete, but should rather be treated as a snippet of features which customers often request or which can be seen as major enhancements with great impact.
This document provides an overview and instructions for a Paywell Online Learning Course. The course is self-paced and module-based. It aims to teach users how to administer and run payrolls for a small to medium business using the Paywell Online payroll system. The summary includes:
- The course contains several modules that cover topics like logging in, navigating menus, maintaining employee masterfiles, entering transaction inputs, running payrolls, and printing reports.
- Users can take the course at their own pace by starting from the beginning or jumping directly to specific modules.
- Each module states the learning objectives and provides step-by-step instructions and screenshots to guide users through the system functionality and tasks.
Freelance Academy Virtual Platform Plan.pptxobeidhamza
油
The virtual platform has three main purposes:
1) To allow Mercy Corps team to track freelancers' activities and provide reports to help improve the freelance academy.
2) Give each freelancer a personalized dashboard to see their progress, activities, and income generated.
3) Build a community of freelancers in Lebanon who can generate income and improve living standards through the platform's tools and training programs.
Freelance Academy Virtual Platform Plan.pptxobeidhamza
油
SAMPLE - Origination Manual
1. Origination Manual
Encompass360属 Support
Webpage: http//:www.support.COMPANYNAME.com
Phone no.: NUMBER
Email: COMPANY EMAIL
Software/Login
The software will need to be installed on the PC and can be installed on multiple computers for
the same user. Contact COMPANY for link to install and COMPANY for user ID and Password.
The system is not compatible with MAC unless you run parallels.
Client ID Type NUMBER
User ID and Password Provided by COMPANYNAME
Click Log In
Page | 1 Return to Top Rev. 4/28/2015
Origination Training Manual 04/28/2015
2. Origination Manual
Home Tab
The home tab is the Central location for viewing important information. The first two column
can be customized to personal preferences. These modules can be added, removed, change
location and/or color with the exception of the Admin Whiteboard, which still can be moved and
changed color but not removed. The third column cannot be altered in anyway, these modules
are directly from Ellie Mae, the makers of Encompass360. Any messages Ellie Mae wants to
broadcast to ALL users, not just COMPANY, can be found third column along with the
Resource Center, which is a great source of all trainings for Encompass360属. The user can also
add different modules is up to 12, by using the Add Modules icon.
Page | 2 Return to Top Rev. 4/28/2015
Origination Training Manual 04/28/2015
3. Origination Manual
Pipeline Tab
The pipeline tab is the starting point for originating, viewing, and managing loans. The user can
view loan summary, detail information, search, and sort, manage alerts and open loan files.
Loans in the summary area display with the following colors:
White - a loan with a status of Active Loan, Loan Originated, or Loan purchased by your
institution.
Gray - a loan with a status of Active Loan, Loan Originated, or Loan purchased by your
institution.
Pink - a loan with an Adverse status: Application approved but not accepted, Application
denied, Application withdrawn, File closed for incompleteness, Preapproval request
denied by financial institution, or Preapproval request approved but not accepted.
Dark Gray - the logged-in user has read-only access to the loan.
Light Blue - a loan that is open on the Loan tab.
Page | 3 Return to Top Rev. 4/28/2015
Origination Training Manual 04/28/2015
4. Origination Manual
Loan Folders
Depending on the status of a loan will determine which loan folder it will be in.
<(All Folders)> contains all loans no matter the status
<(Archive)> - contains loans after a period of time being completed
Adverse Loans - contains loans that have been withdrawn or denied
Closed Loans contains loans that have closed and funded
Completed Loans contains loans that have gone through all the milestones
My Pipeline contains loans that are active and have been disclosed
Prospects contains loans that are not a full application. A full application contains the
following;
o Name
o Income
o Social Security Number
o Subject Property Address
o Estimated Value of Subject Property
o Mortgage Loan Amount Sought
*Note Refinances are an automatic application since all the above information is received
and/or can be obtained with due diligence. A refinance needs to be disclosed by the third day to
stay in compliance.*
Page | 4 Return to Top Rev. 4/28/2015
Origination Training Manual 04/28/2015
5. Origination Manual
Views
Users will have one or more default view from which to choose. The administrator determines
the views that are available to the user based on their assigned personas.
Create Views: After changing the columns, sorting the data, applying search criteria, and/or
selecting All Loan of My Pipeline, the user can save the new configuration as a new custom
view. Once the view is saved, the user can select it at any time to apply the criteria to your loan
summary list.
Right click the column header and select Custom Columns
Check or uncheck column header titles then click OK
Click the save icon
Page | 5 Return to Top Rev. 4/28/2015
Origination Training Manual 04/28/2015
6. Origination Manual
Type the name for the new view and then click Save. The new view will be saved along with the
default views set by the administrator and both can be accessed at any time.
Page | 6 Return to Top Rev. 4/28/2015
Origination Training Manual 04/28/2015
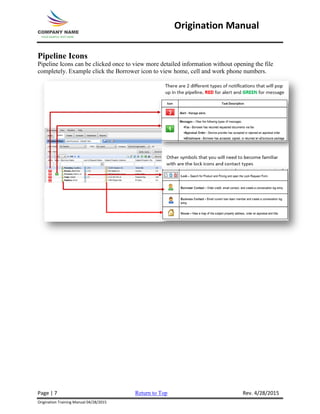
7. Origination Manual
Pipeline Icons
Pipeline Icons can be clicked once to view more detailed information without opening the file
completely. Example click the Borrower icon to view home, cell and work phone numbers.
Page | 7 Return to Top Rev. 4/28/2015
Origination Training Manual 04/28/2015
8. Origination Manual
Loan Workspace
The loan workspace will look the same on every loan with the exception of the data within the
loan.
1. Header: Contains summary of key information such as subject address, LTV, DTI, the
eFolder, save icon, print icon, loan exit, etc.
2. Left Panel Upper Section: Contains all messages and alerts and the Log tab has all the
milestones
3. Left Panel Lower Section: Contains Forms, Tools and Services
4. Work Area/Viewing Section: Displays items selected in the Left Panel Upper and Lower
sections
Page | 8 Return to Top Rev. 4/28/2015
Origination Training Manual 04/28/2015
9. Origination Manual
Help
The Help Tab is always available as you maneuver through Encompass360. The Help function is
intuitive and will populate help information as it relates to the page that you are on. A detailed
table of contents is available with hyperlinks to written material, videos and graphics.
Accessing help topics can be done by clicking the word Help on the main screen then click
Encompass360 Help or by pressing the F1 key on the keyboard.
Page | 9 Return to Top Rev. 4/28/2015
Origination Training Manual 04/28/2015
10. Origination Manual
Keyboard Shortcuts
Help F1
Current Date Ctrl+D
Go-To Field Ctrl+G
The Go-To Field option locates a field based on its field ID:
Step 1. With a loan open, press Ctrl+G
Step 2. Type a field ID and click Find
The system will automatically go to the form the field is found. The field ID can also be found
by hovering over the field a quick popup will show the field ID number and description. See
HelpPad for descriptions too long to read in the quick popup.
Field IDs can also be found on the bottom right side of the computer screen.
The HelpPad allows you to capture field-level help in a separate help window:
Press the Ctrl key and then click a field on a form (repeat to add more field information),
the HelpPad opens with the selected field-level help displayed.
Page | 10 Return to Top Rev. 4/28/2015
Origination Training Manual 04/28/2015
11. Origination Manual
Custom Links
Adding Custom Links is a faster way to access websites frequently used i.e. 411.com, FHA
connector, VA portal, NMLS consumer access, etc.
Step 1. Click Services
Step 2. Click My Custom Links
Step 3. Click New Link
Step 4. Type in the information for the website
Step 5. Click Add Custom Link
Page | 11 Return to Top Rev. 4/28/2015
Origination Training Manual 04/28/2015
12. Origination Manual
Step 6. Access the website by clicking the name
Step 7. Click Continue
Page | 12 Return to Top Rev. 4/28/2015
Origination Training Manual 04/28/2015
13. Origination Manual
Page Left Intentionally Blank
Page | 13 Return to Top Rev. 4/28/2015
Origination Training Manual 04/28/2015
14. Origination Manual
Creating a New Loan
Creating a new loan can only be done in the Prospect Loan Folder. If you are in any other folder
the New icon will not be illuminated.
Step 1. Click the New Icon
Step 2. There are two (2) options of selecting a template
a. Double click PURCHASE Loans or REFINANCE Loans
b. Select PURCHASE Loans or REFINANCE Loans then click Select
Template
Page | 14 Return to Top Rev. 4/28/2015
Origination Training Manual 04/28/2015
15. Origination Manual
Forms to Complete For All Loans
Purchase
If a prospect is a purchase and the Borrower is looking to see if they qualify, the following forms
need to be filled out;
1. Borrower Summary
2. 1003 Page 1
3. 1003 Page 2 - Pull credit
4. 1003 Page 3
5. 2010 Itemization Manually enter fees
Once the Borrower has an Accepted Offer or signed a Sales Contract (Purchase and Sales) the
prospect becomes a full application and will need to be disclosed within three (3) business days,
follow Full Application Workflow.
Refinance
If a prospect is a refinance all of the six (6) pieces of information are available and/or obtainable
with due diligence. A full application contains the following and needs to follow the Full
Application Workflow; *Note a refinance CANNOT be a TBD*
o Name
o Income
o Social Security Number
o Subject Property Address
o Estimated Value of Subject Property
o Mortgage Loan Amount Sought
Page | 15 Return to Top Rev. 4/28/2015
Origination Training Manual 04/28/2015
16. Origination Manual
Full Application Workflow
All forms need to be filled out, see below. When originating a loan it is crucial to follow the
workflow from top to bottom in the forms tab as well as when inputting data. Fields will
automatically populate on other forms for less data entry. If the file is FHA, VA or USDA
additional forms will need to be filled out, as well as below, use the Show All and Show in
Alpha Order to view all available forms.
1. Borrower Summary
2. 1003 Page 1
3. 1003 Page 2 (Pull credit)
4. 1003 Page 3
5. 2010 Itemization (SmartGFE)
6. 2010 GFE
7. REGZ-TIL
8. Home Counseling Providers
9. Request for Transcript of Tax
10. State-Specific Disclosure Information
Page | 16 Return to Top Rev. 4/28/2015
Origination Training Manual 04/28/2015
17. Origination Manual
Borrower Summary
The Borrower Summary is the first form that needs to be filled out. When a file is started there
will be BLUE fields throughout all the forms, these fields are mandatory and must contain data
in order to finish the qualification milestone and generate disclosures to eSign or WetSign. Start
at the top of the form and work down filling in required data fields, such as Name, SSN, DOB,
Phone numbers, etc. Some fields may not be BLUE but still might be applicable to the
transactions and should be filled in such as Middle initial, E-mail address, Title held, etc. Note
DO NOT use any COMPANYs, realtors or settlement agents email address, otherwise it will
look like they eSigned instead of the borrower.
Page | 17 Return to Top Rev. 4/28/2015
Origination Training Manual 04/28/2015
18. Origination Manual
Credit Information Pulling New Credit
In order to pull credit an authorization is needed, usually the Borrower gives a verbal
authorization when asked if credit can be pulled. When a Borrower gives their name, present
address, SSN and date of birth this is considered a verbal authorization to pull the credit report
without having a written authorization.
Step 1. Click the calendar
Step 2. Select the date the borrower authorized a credit report pull
Step 3. Click Order Credit
Step 4. Select either ACRAnet or Credit Plus depending on what the branch uses
Step 5. Click Submit
Page | 18 Return to Top Rev. 4/28/2015
Origination Training Manual 04/28/2015
19. Origination Manual
Step 6. Fill in the required information
Step 7. Click Finish
Step 8. The Services View tab will open, review report and click Loan to go back to the
File
Step 9. Click Import Liabilities
Page | 19 Return to Top Rev. 4/28/2015
Origination Training Manual 04/28/2015
20. Origination Manual
Step 10. Make sure Delete existing liabilities before importing and Import FACTA are
checked. Import Credit Fee to HUD and GFE can be checked if desired
Step 11. Click Import
Step 12. Click OK
Page | 20 Return to Top Rev. 4/28/2015
Origination Training Manual 04/28/2015
21. Origination Manual
Importing Existing Credit Report
To import a credit report that has already been pulled and has not yet expired, can be done by the
following;
Step 1. Click the calendar
Step 2. Select the date the borrower authorized a credit report pull
Step 3. Click Order Credit
Step 4. Select either ACRAnet or Credit Plus depending on what the branch uses
Step 5. Click Submit
Page | 21 Return to Top Rev. 4/28/2015
Origination Training Manual 04/28/2015
22. Origination Manual
Step 6. Select Import from website from the dropdown menu
Step 7. Type in the Reference/File Number
Step 8. Click Finish
Step 9. The Services View tab will open, review report and click Loan to go back to the
file
Step 10. Click Import Liabilities
Page | 22 Return to Top Rev. 4/28/2015
Origination Training Manual 04/28/2015
23. Origination Manual
Step 11. Make sure Delete existing liabilities before importing and Import FACTA are
checked. Import Credit Fee to HUD and GFE can be checked if desired
Step 12. Click Import
Step 13. Click OK
Step 14. Click the Save icon in the top right corner of the screen
Page | 23 Return to Top Rev. 4/28/2015
Origination Training Manual 04/28/2015
24. Origination Manual
Step 15. Fill in the Subject Property Info. For purchases, only, leaving the street address as
TBD will not trigger any alerts for RESPA or Disclosures until the address is
known.
Step 16. Click the Magnified glass to select the Loan Program then click Select
Step 17. Click the Magnified glass to select COMPANY Fee then click Select
Step 18. Fill in all required fields. Comments / Special Instructions from Sales is a
location that is used for any information the Originator wants to say about the file
to the Processor and/or Underwriter and anyone else that opens the loan file.
Page | 24 Return to Top Rev. 4/28/2015
Origination Training Manual 04/28/2015
25. Origination Manual
Page Left Intentionally Blank
Page | 25 Return to Top Rev. 4/28/2015
Origination Training Manual 04/28/2015
26. Origination Manual
1003 Page 1
Entering data on the Borrower Summary form will autocomplete some fields on 1003 Page 1.
Continue filling out data, use the Show All (VOR) and Show All (VOE)
to add additional records of housing and/or employment see next page for
instructions.
Page | 26 Return to Top Rev. 4/28/2015
Origination Training Manual 04/28/2015